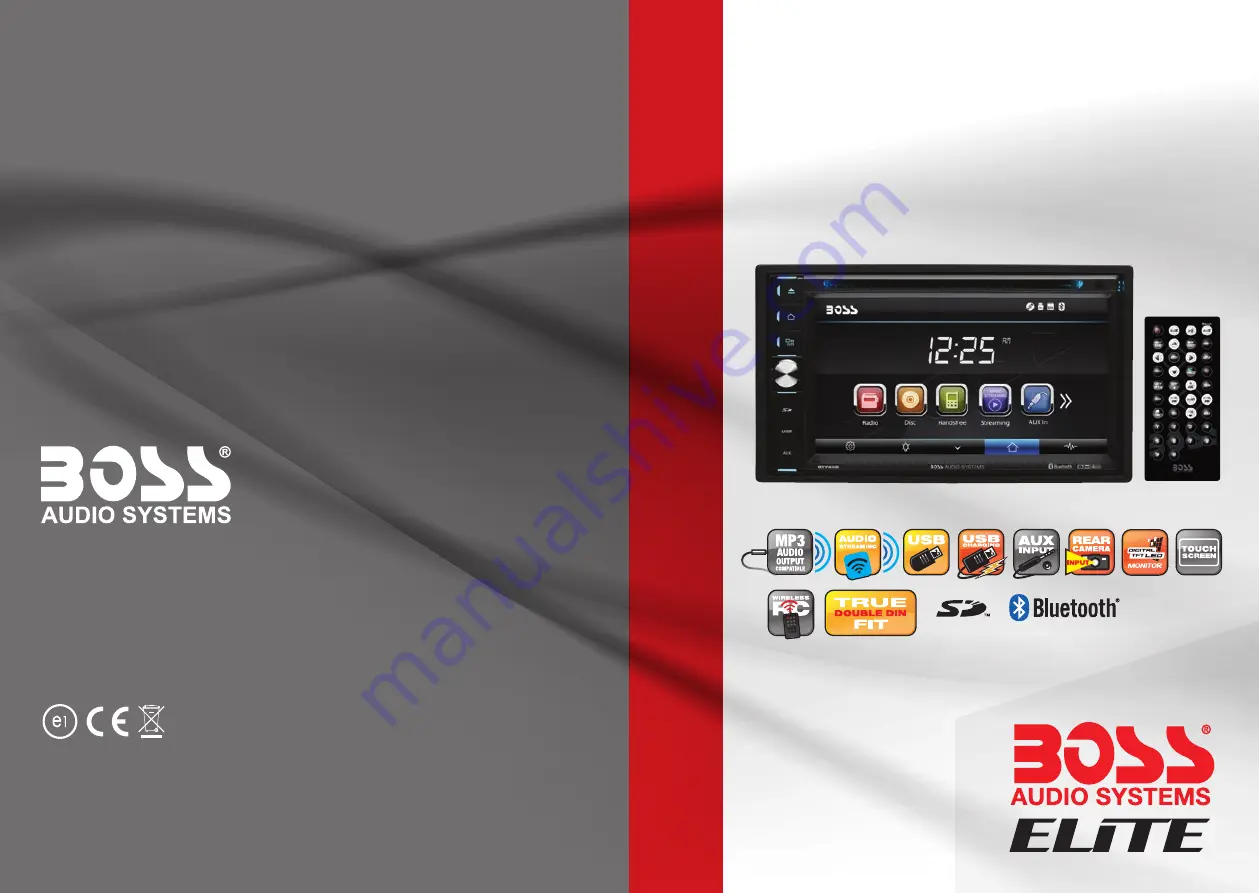
background image

USER’S MANUAL

BV765B

BLUETOOTH®  

|  DVD/MP3/CD Y AM/FM RECEPTOR

BOSS Audio Systems
3451 Lunar Court • Oxnard, CA 93030

www.bossaudio.com
800-999-1236 US Toll-free
805-751-4853 Customer Service

tech support: www.bossaudio.com/support/technical-support

0817

Pod® / iPhone® son marcas comerciales de Apple, Inc., registradas en los EE.UU. y otros países.
BOSS Audio Systems no está afiliado con Apple, Inc.
Las marcas registradas marca Bluetooth® y sus logotipos son marcas registradas propiedad de Bluetooth SIG, Inc. y cualquier uso de dichas marcas por parte de 
BOSS Audio Systems es bajo licencia. Otras marcas y nombres comerciales pertenecen a sus respectivos propietarios.

USER’S MANUAL

BV765B

BLUETOOTH®

DVD/MP3/CD Y AM/FM RECEPTOR

CON PANTALLA DIGITAL TFT LED DE 6.5" (165 mm)

Summary of Contents for BV765BLC

Page 1: ...ales de Apple Inc registradas en los EE UU y otros países BOSS Audio Systems no está afiliado con Apple Inc Las marcas registradas marca Bluetooth y sus logotipos son marcas registradas propiedad de Bluetooth SIG Inc y cualquier uso de dichas marcas por parte de BOSS Audio Systems es bajo licencia Otras marcas y nombres comerciales pertenecen a sus respectivos propietarios USER S MANUAL BV765B BLU...

Page 2: ...To ensure safety while driving and to comply with laws drivers should not watch video or operate the video device while driving ...

Page 3: ... offer you years of entertainment pleasure Content 01 Accessories 02 Unit Installation 03 Wire Connection 03 Parking Brake Connection 04 Speaker connection 05 Button Description 06 Remote Control 07 Main Menu 10 Radio Operation 10 DVD Operation 11 USB SD Operation 12 Settings Operation 12 Bluetooth Operation 15 Aux In Operation 17 Notes of Disc 18 Troubleshooting 19 General Specification 21 ...

Page 4: ...es Package contains the following accessories for installation and operation of the unit 1 Washer Spring 2 Washer M5 Nut 1 5 Rubber Cushion 1 3 Screw 1 6 Screw 8 4 Bolt 1 7 installation bracket 1 Left 1 Right 5 Mounting Strap 1 02 Remote Control ...

Page 5: ...llation 1 Put the 2 brackets to the left and right side of the unit 2 Use screws to fix the brackets to the unit Wire Connection The Description of the Input output Interface of the Rear Chassis 03 Bracket Screw ...

Page 6: ...Parking Brake Connection In order to view videos the parking brake wire must be connected and the vehicle is parked Connecting the reversing line to tail light on the car 04 ...

Page 7: ...ording to the following diagram incorrect connections may damage the unit or your speakers Do not chassis ground the speakers Always observe correct polarity Correct connection Left front Right front Left rear Right rear Incorrect connections 05 ...

Page 8: ... to power on unit and Press and hold for 2 seconds to turn the unit off Rotate VOL knob to increase or reduce the volume 6 USB SD AUX USB for Multimedia playback files only insert a USB into this slot and the unit will automatically start reading and playback Supported Music File Format MP3 WMA files SD card slot for Multimedia playback files only Insert a SD CARD into this slot and the unit will ...

Page 9: ...r long press it to clear all the phone number 5 ENTER Press it to confirm your selection 6 LEFT button Press it to move the cursor left 7 DOWN button Press it to move the cursor down 8 EJECT button Press it to eject the disc 9 STEREO MONO button Press to switch the radio in stereo and mono sound In Bluetooth mode press it to make a symbol 07 1 MODE 2 POWER 3 UP 4 BAND RANDOM CLEAR 5 ENTER 6 LEFT 7...

Page 10: ...luetooth button Short press to mute the volume output press again to resume volume Long press this button to enter into Bluetooth mode Hands free 17 MENU ROOT button Press it to show main menu in DVD mode long press it to enter title menu Available only if the DVD disc with title menu 18 SUBTITLE button Press it to select the subtitle language Available only if the disc with subtitle function 19 R...

Page 11: ...event possible damage from battery leakage and corrosion Do not place any objects between the remote control unit and the sensor on the unit Do not drop the remote control onto the floor it will damage it beyond repair Do not use the remote control unit while simultaneously operating the remote control unit of any other equipment they may interfere resulting in improper operation The battery norma...

Page 12: ...ion backward automatically Touch it to select station forward manually touch and hold this icon to select station forward automatically Touch it to select FM1 FM2 FM3 Touch it to select AM1 AM2 Touch it to select station forward automatically Touch again will stop select station Touch it to select station backward automatically Touch again will stop select station Touch this button can turn on or ...

Page 13: ... as well Touch it to enter to previous next page menu Touch it skip to the previous track Touch it to pause play Touch it skip to the next track Touch it to select the sound track in the sequence of mono L mono R auto L auto R stereo Touch it choose brightness Zoom the image in or out in the sequence of 2 3 4 5 1 2 1 3 1 4 In DVD mode touches it chooses Repeat 1 repeat title repeat all In VCD mode...

Page 14: ...3 1 4 Change the image playback direction Settings Operation Setting Control Your device has default system setting you can customize the settings to suit your personal needs Once you change settings your new settings will remain until you change it again To start setting tap it on main menu General Control 12 OSD Language select English Spanish Wallpaper select and change the wallpaper setting Pa...

Page 15: ... press button or button to search station backward or forward In DVD mode press button or button to select the previous or next track and activate fast reverse REW search or fast forward in a track press VOL button or VOL button to adjust the volume Note 1 The Enter button and the reset button are not included in steering wheel press the enter button to confirm the select press the reset button to...

Page 16: ... can select the preferred language for the disc menu When the selected language is recorded on the disc then this language will automatically be selected If not the first language recorded on the disc is displayed Sound Control Tap Sound Effect button to show following interface TV Type Set TFT screen mode to the correct ratio Three screen ratio modes are available Normal PS 4 3 Pan Scan and Norma...

Page 17: ...press the mute bluetooth button on the remote control or press mode button on remote Tap calling button to use phone functions Tap music button to start bluetooth music player Pairing Mode At the 1st time when using bluetooth you need to pair the mobile phone first When a phone has not been paired with the unit the BT icon and pairingmark will blink continually on the panel When the unit have conn...

Page 18: ...splays the data which have been downloading from a phone Please note that certain mobile device functions are not supported Phonebook contacts will be listed in alphabetical order Note the phonebook only supports western characters any difference in character will be shown such as or Voice Transfer During a call you can change a call from bluetooth mode to phone by tapping transfer button to have ...

Page 19: ...om main menu screen connect the external audio signal source to this unit will display NOW PLAYING Note Aux In does not support a video display function So there is NO SIGNAL DETECTED displayed if no audio signal input Press the icon to be back to main menu 17 ...

Page 20: ...Notes of Disc 18 ...

Page 21: ...r remote wire to the power antenna lead one by one If the amplifiers turn off before all wires are attached use an external replay to provide remote on voltage excessive current required Nothing happens when buttons are pressed Display is not Accurate Unit needs to be Reset Using a pen or toothpick press and release the Reset button Panel or main unit Connectors are dirty Wipe the dirt off with a ...

Page 22: ...he ambient temperature returns to normal No sound Volume is in minimum Adjust volume to a desired level Wiring is not properly connected Check wiring connection The operation keys do not work The built in microcomputer is not operating properly due to noise Press the power button for about 10 seconds to reset the unit Front panel is not properly fix into its place Sound skips The installation angl...

Page 23: ...cy range Asia area FM 87 5 108MHz Step 100KHz Frequency range South America area FM 87 5 108MHz Step 100KHz Frequency range Russia area FM 87 5 108MHz Step 50KHz 65 74MHz Step 30KHz Preset memory stations 18 AM MW radio Frequency range Europe area AM 522 1620 Step 9KHz Frequency range America area AM 530 1710 Step 10KHz Frequency range Asia area AM 531 1602 Step 9KHz Frequency range South America ...

Reviews: