BenQ W1400, User Manual
The BenQ W1400 is a high-performance projector designed to deliver stunning visuals. To get started quickly, make use of the included Quick Start Manual. Easily download the comprehensive product manual for free from manualshive.com, ensuring you have all the necessary information to enhance your viewing experience.
Share
Download


Reviews:
No comments
Related manuals for W1400

E-VISION 4500 series
Brand: Digital Projection Pages: 30

P1165 -P1265
Brand: Acer Pages: 66
P1165 -P1265
Brand: Acer Pages: 2
P1285B
Brand: Acer Pages: 74
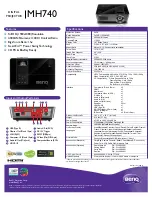
MH740
Brand: BenQ Pages: 2
W1400
Brand: BenQ Pages: 2

HT1070A
Brand: BenQ Pages: 73
MH740
Brand: BenQ Pages: 68
E-Vision Laser 10K Series
Brand: Digital Projection Pages: 126

LWU505
Brand: Christie Pages: 554

R9002400
Brand: Barco Pages: 102

P1165 -P1265
Brand: Acer Pages: 2

MH534
Brand: BenQ Pages: 74

EK-103X
Brand: Eiki Pages: 2
E-Vision Laser 7500 Series
Brand: Digital Projection Pages: 22


