BEMIS SANCTUARY 5000, Owner'S Manual
The BEMIS SANCTUARY 5000 brings ultimate luxury and comfort to your home. Enhance your bathroom experience with this state-of-the-art toilet seat. Stay informed with the detailed Owner's Manual available for free download on our website, ensuring a seamless installation and maximum enjoyment of your product.
Share
Download


Reviews:
No comments
Related manuals for SANCTUARY 5000

BUN/BeBa 27555/78725
Brand: Better Bathrooms Pages: 6

9723ZZ
Brand: Zenith Pages: 12

EL103-3
Brand: Uberhaus Pages: 2

WL4100 H Series
Brand: Croydex Pages: 2

1530
Brand: Gustavsberg Pages: 4

Nautic 1500
Brand: Gustavsberg Pages: 23

TSB
Brand: DIETZ REHA Produkte Pages: 12

Stanwell K-4972-ER
Brand: Kohler Pages: 2

WELLWORTH K-5778T
Brand: Kohler Pages: 10

GRAYVIK 946603
Brand: Signature Hardware Pages: 5

CST614 Series
Brand: Toto Pages: 28
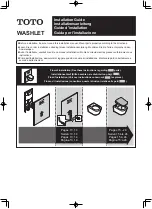
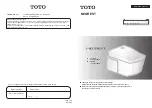
WASHLET RG
Brand: Toto Pages: 28
NEOREST AC SN996MX CWT996CEMFX
Brand: Toto Pages: 30
NEOREST DH TCF9575 Series
Brand: Toto Pages: 76

SLi2000
Brand: STUDIOLUX Pages: 21

SLi1000
Brand: STUDIOLUX Pages: 12

lagon 3663602690337
Brand: GoodHome Pages: 20

cavally 3663602690559
Brand: GoodHome Pages: 21


