

8820-02693 Rev.A01
Objectives
• This guide includes instructions for installing Belkin F1DN102KVM-UN-3, F1DN202KVM-UN-3, F1DN104KVM-UN-3 and F1DN204KVM-UN-3 KVM Switches.
• A KVM allows sharing keyboard, video, mouse, audio and USB peripherals between multiple computers.
• This Manual and additional product documentation is available for online download on Belkin website. For further assistance please refer to:
http://www.belkin.com/us/Resource-Center/Cybersecurity/Secure-KVM-Switching/.
General
• Verify that all peripherals and computers are turned OFF prior to
connecting them to the product.
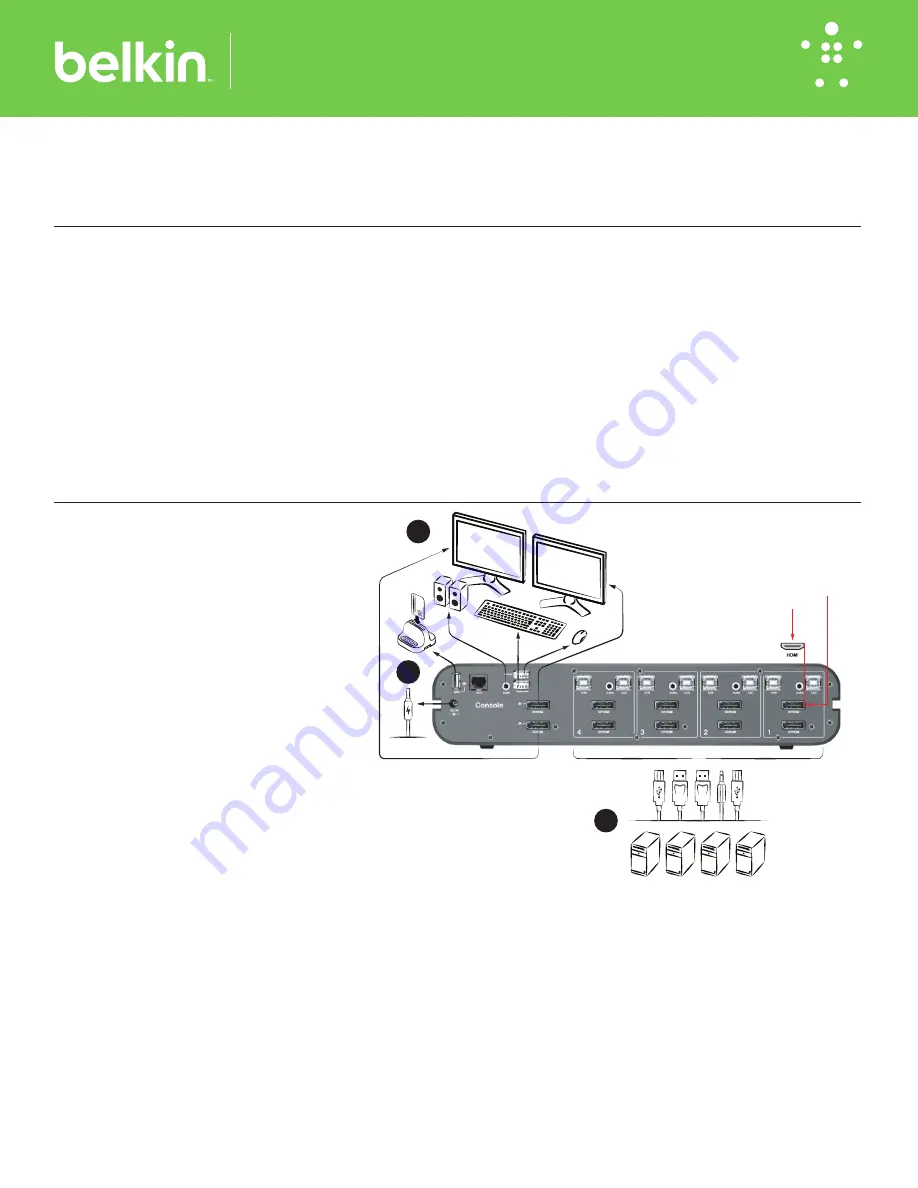
• The KVM’s back panel is divided into sections of Console Ports and
Computer Ports.
–
Connect the peripherals to be shared by the KVM to the Console
Ports.
–
Connect each computer that needs access to shared
peripherals to a specific Computer Ports section.
–
Make sure that every computer is connected to a separate Computer
Ports section.
–
The push buttons on the product’s front panel indicate which
computer has currently access to shared peripherals.
–
To switch peripherals between computers, press the appropriate push
button on the product’s front panel.
Quick Installation Guide
2/4 Port Secure Single/Dual-Head DP/HDMI-DP/HDMI KVM Switches
1
2
3
NOTE:
The video connectors can
accept a Display Port or HDMI
cable. In order to properly insert
an HDMI cable, move it to the far
right of the socket (as viewing
the SKVM from the rear panel)
and insert with the wide side up.
wide side up
far right of the socket
Connect peripherals to the KVM
Console Ports:
• Keyboard & Mouse: Connect a USB keyboard
and mouse to the corresponding KVM console
port.
• Video: Connect the monitor cable to the KVM
console video port.
• Audio peripherals: Connect headphones /
speakers to the KVM console audio-out port.
• Common Access Card (CAC) Configuration
and Operation: Please refer to relevant section
below.
Connect computers to the KVM
Computer ports:
• Computer keyboard & mouse connection:
Connect each computer to the KVM keyboard
& mouse computer port using a USB A to
USB B cable.Connect the USB A end to the
computer and the USB B end to KVM.
• Computer video connection: Connect each
computer to the KVM computer video
port using the corresponding video cable
(DisplayPort/HDMI).
• Computer audio connection: Connect each
computer to the KVM audio-in port using an
audio cable. Connect one end of the cable to
the computer’s audio-out port using the 1/8"
(3.5mm) stereo plug. Connect the other end of
the audio cable to the KVM audio-in computer
port.
Common Access Card (CAC)
Configuration and Operation:
• CAC connection to the computer requires a
separate USB cable connection and allows
the user to specify whether there is a CAC
required for that computer or not. This allows
the CAC to be connected and controlled
separately to the keyboard, mouse, video, and
audio.
• Step 1 – Installation:
1.1
Using the appropriate USB cable, connect
one end of the cable to the computer that
requires CAC, and the other end to the CAC
port on the KVM Switch that corresponds to
the computer. Important Note: Do not connect
the USB cable if CAC functionality is not
needed for that computer.
1.2
If only some of the computers use CAC
functionality, make sure that computer #1
is connected to the CAC device. If needed,
switch channels/computer mapping to create
this configuration.
1.3
Enable CAC for the same port connection
in Step 1.1 by switching the CAC switch on
product front panel to the right.
1.4
Repeat steps above for additional
computers that require CAC. Make sure that
the CAC switch is disabled (left) for all other
non-connected CAC systems.
1.5
Once configured, the CAC connection
will be switched only when required by the
connected computer. When switching from a
CAC enabled port to a non-CAC-enabled port,
the CAC connection will remain with the last
previously selected port where the CAC was
set to “Enable.”
1.6
When product is powered ON and
connected USB device is qualified and ready
for use, the CAC status LED will illuminate
F1DN102KVM-UN-3:
Belkin 2-Port Single Head DP/HDMI to DP/HDMI Video Secure KVM Switch
F1DN202KVM-UN-3:
Belkin 2-Port Dual Head DP/HDMI to DP/HDMI Video Secure KVM Switch
F1DN104KVM-UN-3:
Belkin 4-Port Single Head DP/HDMI to DP/HDMI Video Secure KVM Switch
F1DN204KVM-UN-3:
Belkin 4-Port Dual Head DP/HDMI to DP/HDMI Video Secure KVM Switch
F1DN204KVM-UN-3 Model is shown


