

5 Years Warranty
Each of Korenix’s product line is designed, produced, and tested with high industrial
standard. Korenix warrants that the Product(s) shall be free from defects in materials and
workmanship for a period of five (5) years from the date of delivery provided that the
Product was properly installed and used.
This warranty is voided if defects, malfunctions or failures of the warranted Product are
caused by damage resulting from force measure (such as floods, fire, etc.), other external
forces such as power disturbances, over spec power input, or incorrect cabling; or the
warranted Product is misused, abused, or operated, altered and repaired in an unauthorized
or improper way.
Attention! To avoid system damage caused by sparks, please DO NOT plug in power
connector when power is on.
Support
The product is in compliance with Directive 2002/95/EC and 2011/65/EU of the European
Parliament and of the Council of 27 January 2003 on the restriction of the use of certain
hazardous substances in electrical and electronics equipment(RoHS Directives & RoHS 2.0)
Korenix Customer Service
KoreCARE is Korenix Technology's global service center, where our professional staffs are
ready to solve your problems at any time Korenix global service center's e-mail is
[email protected].
For more information and documents download please visit our website:
http://www.korenix.com/downloads.htm
JetWave 2310 Series
Quick Installation Guide V1.0
The JetWave 2310 is an industrial grade Secure 3G Modem/IP gateway which enables
Ethernet access over 3G network. The JetWave 2310 is equipped with one embedded 3G
module, 2 Gigabit Ethernet ports and dual SIM to support UMTS/ HSPA+ band and
backward support of GSM/GPRS/ EDGE quad-band.
Band Information
GSM/GPRS/EDGE: Quad band 850/900/1800/1900MHz
UMTS/HSPA+: Five band 800/850/900/1900/2100MHz
Package Check List
JetWave 2310 Industrial 3G Modem/IP Gateway
3G Antenna
Quick Installation Guide
DIN rail mount kits
Wall mount plate
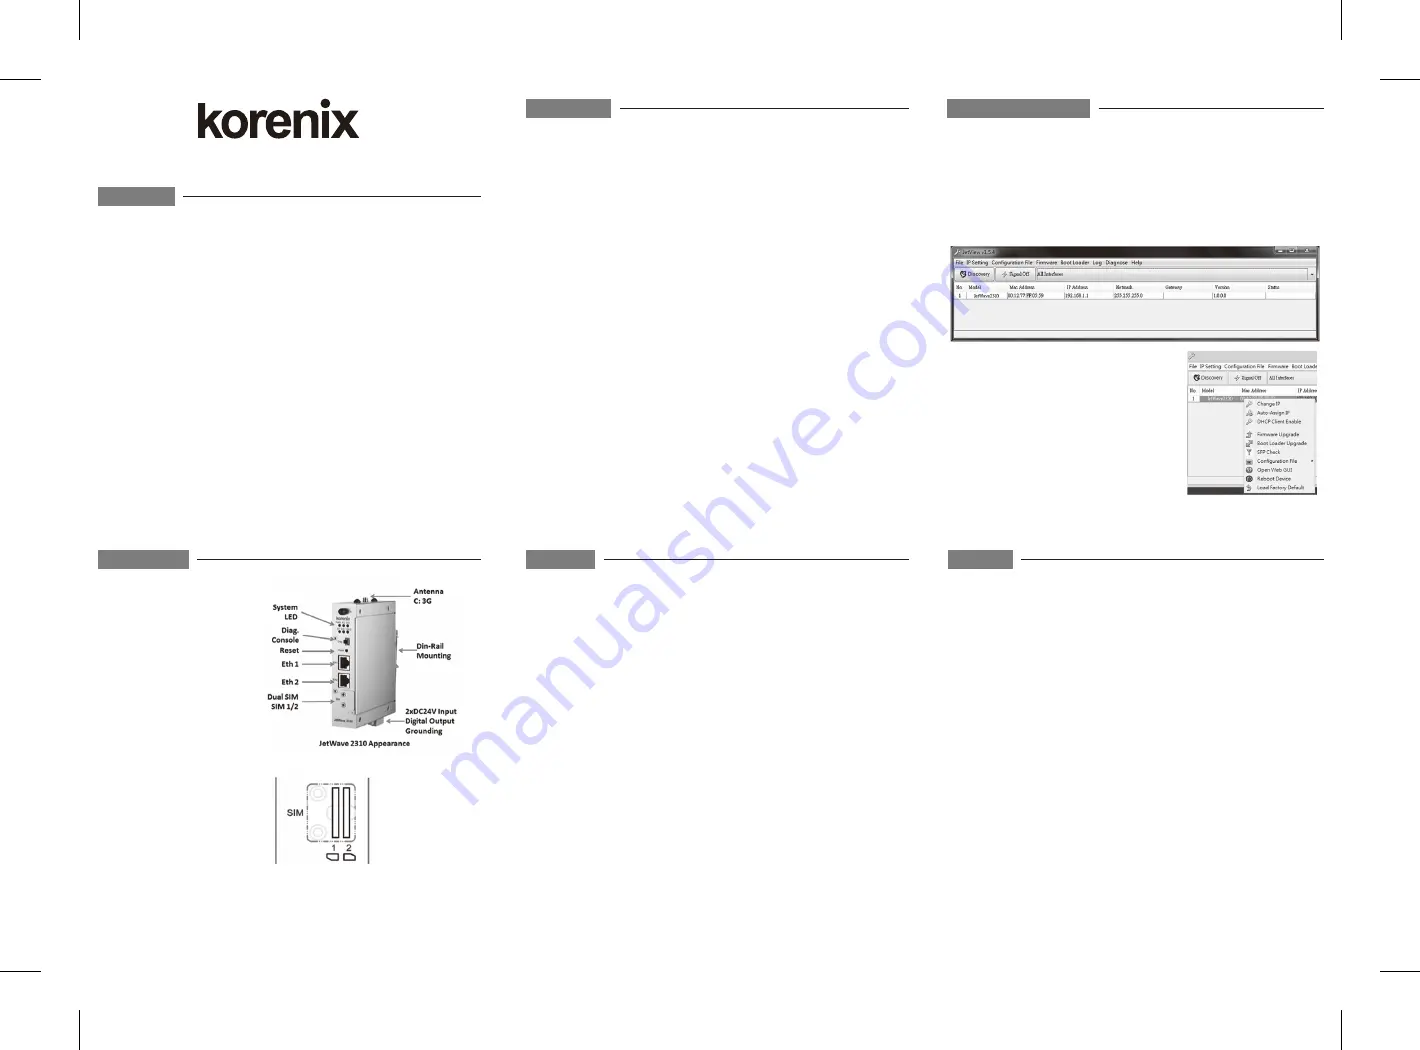
JetWave 2310 Appearance
Dual SIM Socket & Direction
Antenna Number
C: 3G Antenna for JetWave 2310.
A/B/D: Reserved for JetWave 2311 WIFI/LTE
Overview
Appearance
A Beijer Electronics Group Company
The JetWave 2310 Series provides web management interface for basic and advanced settings.
Before configuration, please make sure your system meets the following requirements:
A computer coupled with 10/100/1000 Base-T(X) adapter
Configure the computer with a static IP address of 192.168.10.X (X cannot be 0, 1,
nor 255)
The default IP Address of JetWave 2310 is 192.168.10.1.
The 2 gigabit ports work as Bridge mode in default. All are the LAN port and you can
connect either of them to access the Web GUI.
Open web browser (Ex: IE, Chrome, Firefox…) and enter the IP address
(Default: 192.168.10.1). You will see the System Login page.
The default User Name is “admin”.
The default Password is “admin”.
Check User Manual for advanced settings.
IF the web browser is not access, please check your firewall, JAVA version or contact your
support window for further help.
Note:
If you forget the IP Address, you can use Korenix View Utility to search the device’s IP
address.
Web GUI
DC Input
Insert the positive and negative wires into the V+ and V- contact on the terminal block
connector. The device supports dual DC power input, the typical power source is DC 24V
(range from 12~48VDC).
Insert the SIM
Unlock the front plate of Dual SIM Socket
Insert the SIM card into SIM 1 (Default startup SIM Socket is SIM 1) before power on
system.
The system may take around 1 minutes to startup, and then it will search the 3G SIM
card in SIM1 socket and automatically connect to your ISP.
If you want to use SIM 2 for carrier provider redundant, please insert the 2 SIM cards
before power on the system.
If you want to use SIM 2 as startup SIM socket, please go to Web GUI to modify the
setting.
If the 3G connection is not connected, please go to Web GUI to check the 3G Status and
Settings.
Mounting The Unit/Antenna
JetWave 2310 support Din-Rail mounting, the mounting kit is pre-installed. You can
mount the device to the DIN Rail directly.
Mount the default antenna to the antenna number C.
Installation
The Korenix View Utility provides you convenient tool to scan the network and configure
the device.
Step 1: Open the Korenix View Utility. (Must later than JetView V1.6)
Step 2: Select the correct NIC (Network Interface Card) from the NIC list.
Step 3: Click “Discovery”, and then the Nodes and its IP address can be found and listed in
Node list.
Step 4: After you scan the network, select the device
and click “Open Web GUI” to access the web
management interface. You can also modify the IP
address/Netmask directly on the selected entry and
then click “Change IP“ to change IP settings.
Note:
Please check the User Manual to configure the
other software settings.
Korenix View Utility


