Beflye BFL100, Manual
The Beflye BFL100 manual is available for free download on our website. This comprehensive user manual provides detailed instructions on how to get the most out of your BFL100 drone. Download it now from manualshive.com to ensure a smooth flying experience every time.
Share
Download


Reviews:
No comments
Related manuals for BFL100
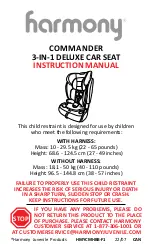
COMMANDER
Brand: Harmony Pages: 102

MILA
Brand: FableKids Pages: 13

isofix base
Brand: Mamas & Papas Pages: 8

QUARTZ
Brand: JANE Pages: 68

VIAGGIO 2
Brand: Peg-Perego Pages: 132

Primo viaggio SL
Brand: Peg-Perego Pages: 24

2 in 1 booster seat
Brand: mothercare Pages: 7

Q3-FIX
Brand: Cyber Pages: 68

L6
Brand: nania Pages: 21

Grow and Go ARB
Brand: Safety 1st Pages: 42

GROW-WITH-ME 79711
Brand: Fisher-Price Pages: 57

RONDA
Brand: KIKKA BOO Pages: 72

B-SAFE GEN2 FLEXFIT
Brand: Britax Pages: 104

ADVOCATE 65 CS
Brand: Britax Pages: 72

Monterey 15000
Brand: Sunshine Kids Pages: 19

Radian Premier
Brand: Sunshine Kids Pages: 44

8201355865
Brand: Renault Pages: 11

PG1117
Brand: Pet Gear Pages: 3


