QUICK START GUIDE
RST055A UPS Pack
Suitable for most Beam equipment requiring
5V or 15V input power, Iridium 9555 phone
and most of the USB powered portable
devices including iPhone®*
Beam Communications Pty Ltd
5. User Modes
www.beamcommunications.com
TEL: +61 3 8588 4500
FAX: +61 3 9560 9055
Safety Information - Important!
Please read this guide carefully before installing or using
the RST055A UPS Pack. Failing to follow instructions may
compromise the safety of the product and may result in
personal injury and/or equipment damage. Please consult your
supplier if you have any further question.
USRQSG005202
5.1 Charging Mode
• Plug the power source (110/240V AC/DC adaptor, car cigarette
lighter input cable or vehicle installation cable) into the input
connector.
• The green INPUT LED will be turned on to indicate the presence
of input power.
• The red CHG LED will be turned on to indicate the fast charging
for the internal battery pack. When the battery is fully charged, this
LED will be switched off.
5.2 Stand-Alone Mode
Main Output:
• DO NOT connect anything to the main output before setting the
voltage correctly!!!
• Set the output voltage to 5V or 15V by sliding the selection switch.
• Plug the appropriate 3-way main output cable into the main
connector.
• Plug the other end of the cable into your equipment, for example,
PotsDOCK.
• If your equipment draws more than 2A current, the red Overload
LED will be turned on!
USB Output:
• Plug the type A end of your USB cable into the USB output.
• Plug the other end of the cable into your equipment, for example,
the 9555 phone.
• If your equipment draws more than 1A current, the red Overload
LED will be turned on!
Please note that both main output and USB output can be used
simultaneously providing up to 3A current.
5.3 UPS Mode
• Plug the input power source as per instructed in 5.1.
• Connect your equipment to the main and/or USB outputs as per
instructed in 5.2.
• In case a power failure occurred, the UPS Pack would continue to
power your equipment and the duration will depend on the battery
capacity at the power failure.
• When the battery capacity in the UPS Pack is low and your
equipment is drawing full current from the outputs, it will take much
longer to charge the UPS Pack. Thus, it is recommended to fully
charge the UPS Pack before using it as a UPS.
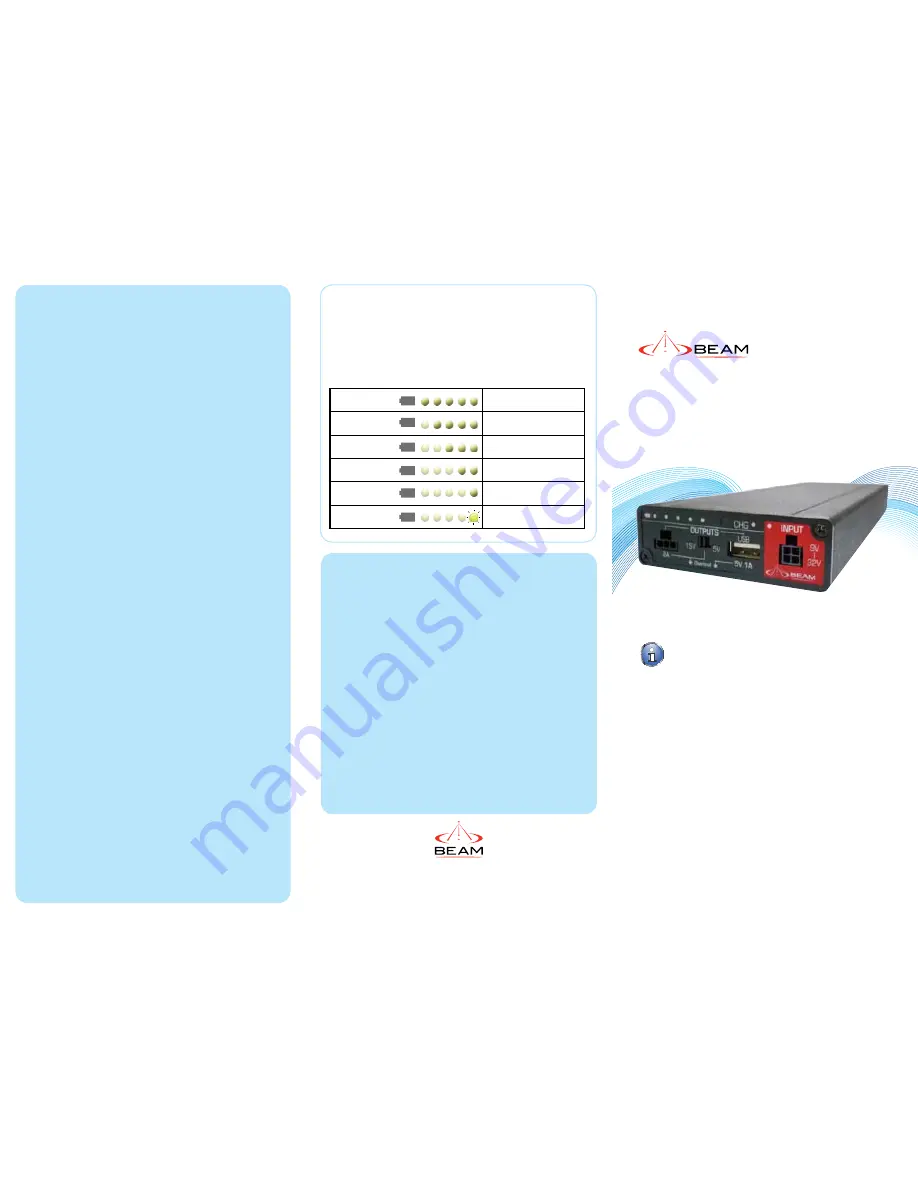
6. Battery Capacity
7. Troubleshooting
• Press the battery capacity push button.
• The five green LEDs next to the push button will display a
pattern showing the remaining battery capacity.
5 LEDs on
80% to 100%
4 LEDs on
60% to 80%
3 LEDs on
40% to 60%
2 LEDs on
20% to 40%
1 LED on
10% to 20%
1 LED
flash
<10%
Q: My equipment is plugged into the output port, but it is not
being powered by the UPS Pack.
A: Please check the battery capacity of the UPS Pack.
Q: My equipment is plugged into the output port, but it is not
being powered by the UPS Pack and the red LED next to
the output is turned on.
A: Your equipment is consuming more than 2A (main
output) or 1A (USB output) current. Please check the power
rating of your equipment. Your equipment may also be
faulty causing a short circuit.
Q: The battery capacity indicator is not correct. UPS pack
has been charging for hours, but it indicates empty when
the push button is pressed.
A: Please discharge the UPS Pack completely and then
recharge it without any load connected.
* iPhone® is a registered trademark of Apple Corporation