TS20Sli
100282
Original-Bedienungsanleitung
V1/0917
Page 1: ...TS20Sli 100282 Original Bedienungsanleitung V1 0917...
Page 2: ......
Page 3: ...e 26 3 1 Delivery check 26 3 2 Packaging 26 3 3 Storage 26 4 Technical data 27 4 1 Technical specification 27 4 2 List of components 28 5 Installation and operation 29 5 1 Installation 29 5 1 1 Locati...
Page 4: ...with this instruction manual 1 Safety This device is designed in accordance with the current technical standards However the device may be a source of dangers if used improperly or against its intend...
Page 5: ...pply cord and plug Do not transport the device by holding the power supply cord Do not use the device when the power supply cord or plug are visibly damaged or are broken Never allow the power cord to...
Page 6: ...device becomes hot during operation The temperature of the device remains high for some time after the device has been switched off Do not insert the hands into the toast slots or touch any surface o...
Page 7: ...ven stable and heat resistant surface Use the device only with the extended toast chute Do not use the device with the external timer or remote control In case the toast bread stuck in the toast slot...
Page 8: ...e of experiencing damage resulting from the use against the intended purpose are inadmissible The liability for damage occurred during the use of the device against its intended purpose is borne solel...
Page 9: ...e the device against the intended purpose alterations are made by the user inappropriate spare parts are used We reserve the right to introduce technical modifications to the product which are intende...
Page 10: ...when relocating or when sending the device to our service point in case of any defaults Before you start the device completely discard any external or internal packaging material Check that the device...
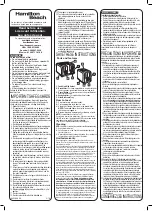
Page 11: ...n 1 control panel Product serving via the toast chute Cancel button Indicator lights Defrost Cancel Number of toast slots 1 Slot size W 270 x D 38 x H 120 mm Number of browning levels 6 Power supply 1...
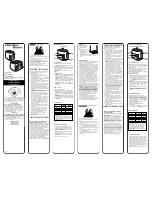
Page 12: ...28 4 2 List of components 1 Operating lever 5 Toast chute 2 Browning level controller 6 Body 3 Cancel button 7 Toast slot 4 Defrost button 1 2 3 4 5 6 7...
Page 13: ...air moves upwards Never use the device at the edge of a table as the device may fall over and down Locate the device so that the plug is easily accessible and can be quickly disconnected from the powe...
Page 14: ...thicker slices of bread The cut surface of the bread should be as smooth as possible in order to achieve a uniform toasting result Remove loose crumbs or protruding bread components e g grains before...
Page 15: ...r 2 anti clockwise to reduce the browning Take into account that during several toasting operations one after another the toaster becomes hotter and the toast slices become darker accordingly CAUTION...
Page 16: ...er 1 Use the device only with the extended toast chute to prevent the device damage or soiling 1 Make sure that there are no packaging materials or other objects left in the device 2 Position the devi...
Page 17: ...5 only when the device has cooled down completely You can move or transport the device when it has cooled down completely 7 Leave the device to cool down completely 5 2 4 Turn off before the set time...
Page 18: ...s remain hot after operation Remove the stuck bread slices only when they have cooled down completely 3 Leave the device to cool down completely NOTE Incorrect use may cause damage Do not use any shar...
Page 19: ...nsport the device when it has cooled down completely 2 Leave the device to cool down completely 3 Turn the device by 180 and shake slightly to remove the stuck slice of bread from the toast slot 7 4 W...
Page 20: ...ble to children Do not place any heavy objects on the device 7 Disposal Old devices The electric devices are marked with this symbol You must not dispose of electric devices with household waste When...