User’s Manual for Fireproof Safe
WARNING
Read all instructions before using this safe.
A
F
B
- For security purposes, change the factory default
code as soon as possible. Factory default code
is 159#.
-Test registered pin code a few times before closing
the safe door.
- Avoid leaving door open and unattended; it will allow
unauthorized individuals to reprogram the safe,
gaining full access to the safe and its contents.
- Do NOT storage combustible materials in this unit.
- The interior will reach up to 350°F. Avoid storing items
such as pearls, digital media, back up tapes, data
cartridge, CD’s etc. These items sustain heat damage
at temperatures much lower than 350°F.
- The safe has a proprietary insulation that has a high
moisture content. To avoid humidity damage to
contents we recommend placing a desiccant or
dehumidifier inside the safe to protect the contents
from rust or mildew.
- If you are storing delicate items such as jewelry,
photos, etc. we recommend putting them in an
air-tight container, prior to placing them in the safe
for storage.
- In the event of a fire, we recommend caution when
opening the safe. If you feel unsure about opening the
safe because of the contents stored, contact your
local fire department for assistance.
- Store emergency keys in a secure place; NOT inside
of the safe.
- Keep children away from safe; they should not play
with or around the safe at anytime. Children at play
could accidentally get locked inside the safe or
accidentally pull on the safe door causing safe to tip
over if not properly mounted.
- Failure to follow these warnings could result in serious
injury or death.
NOTE: BARSKA is not responsible for any damage or
lost contents in the safe due to moisture.
NOTE: BARSKA is not responsible if the safe is stolen
or contents in the safe.
E
D
G
C
Loc
k
U
n
lo
ck
BATTERY INSTALLATION
1. Remove Batter Compartment (F) cover
2. Insert 4AA batteries and restore batter cover
FACTORY DEFAULT MODE \ CREATING A
PERSONAL PIN CODE
Safe retains one 3-8 digit pin code.
1. On
the Keypad (E) enter in
factory default code “159#”.
2. Turn the Handle (C) clockwise to unlock and open the safe
door. You have 5 seconds before the locking mechanism
is reactivated.
3. Locate the Initialization Button (A) on the inside of the
safe door.
4. Press and release the Initialization Button (A), you will hear
one beep. The yellow Indicator Light (D) on the Keypad (E)
will be on, you can only enter your code while the yellow
Indicator Light (D) is on.
5. Enter your 3
‐
8 digit personal pin code and press “*” to
confirm the new code.
TESTING PERSONAL PIN CODE
1. With the safe door open and the Bolts (B) extended in the
locked position, enter in your personal pin code on the
Keypad (E) and press the “#” symbol.
2. Turn the Handle (C).
If pin code was registered correctly the Bolts (B) will retract.
If pin code was NOT registered correctly the Bolts (B) will stay
in the locked position.
If pin code was NOT registered correctly repeat steps in
“FACTORY DEFAULT MODE \ CREATING A PERSONAL PIN
CODE”.
3. Test a pin code that is not registered to ensure the Bolts (B)
will stay in the locked position.
OPENING & CLOSING SAFE WITH PERSONAL PIN
CODE
OPEN:
1. Enter in your personal pin code on the Keypad (E) and press
the “#” symbol.
2. Turn the Handle (C) clockwise to the unlock and pull the
safe door open.
CLOSE:
To close safe, close door and turn Handle (C) counter
clockwise to the lock position.
LOCK OUT MODE
Lock out mode is activated when the wrong pin code is entered
- 3 consecutive times, lock out mode will last 20 seconds
- 6 consecutive times, lock out mode will last 5 minutes
CHANGING PERSONAL PIN CODE
Follow steps 3, 4 and 5 in “ FACTORY DEFAULT MODE \
CREATING A PERSONAL PIN CODE”
BEEP SOUND OPTIONS
Beep OFF: On the Keypad (E) enter in *633
Beep ON: On the Keypad (E) enter in *66
See reverse side for more information
* Actual model may vary
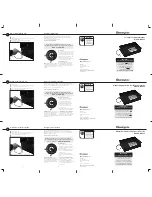
A. Initialization Button
B. Bolts
C. Handle
D. Indicator Lights
E. Keypad
F. Battery Compartment
G. Emergency Key Access