background image

cnd


introduction


03/09/01 

Page 1 


overview 


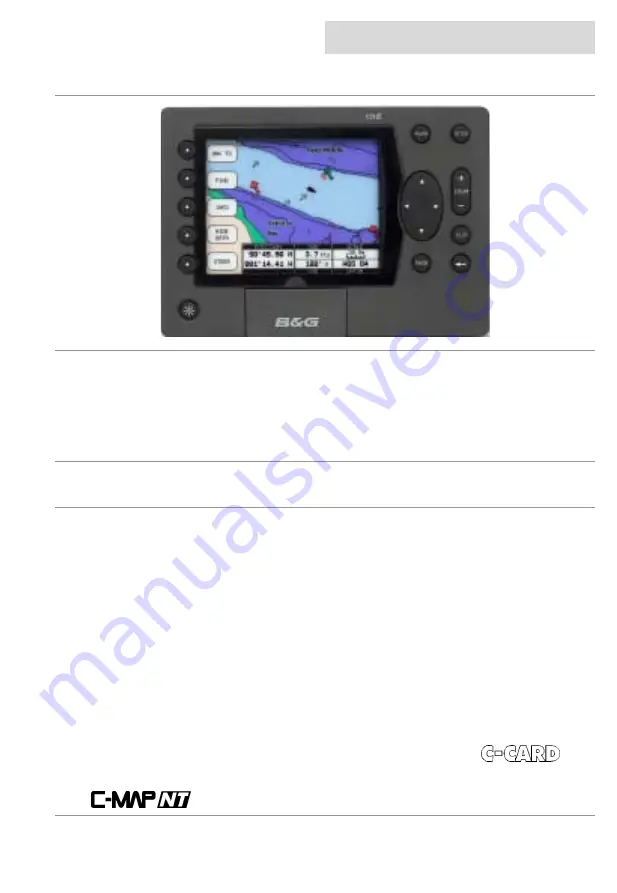
Congratulations on your purchase of the Central Navigation Display (CND) from B&G. The CND is 
the latest in chart plotting and navigation displays from B&G and represents B&G’s commitment to 
providing customers the finest marine navigation systems. The 

CND

 is a state-of-the-art 

computerised electronic chart system designed as a sophisticated navigation aid. Your CND 
provides many useful features and is easy to use. 

Before you begin using your new 

CND

, please take the time to read this manual to help you 

achieve the full potential


from your new system. 


features 

All calculations and information necessary for navigation are performed and displayed on the 
screen quickly and accurately providing all of the facilities of a conventional GPS but with the 
added benefit of a powerful electronic chart display. 

Features 

The Central Navigation Display (CND) is a fully functioned colour Chart Plotter which can be used 
either as a stand-alone system or integrated into an instrument system. 

• 

Daylight viewable transflective ¼ VGA colour screen gives excellent clarity even in bright 
sunlight 

• 

Latest presentation of C-Map NT Cartography, hot-swap cartridges 

• 

Highest specification C-Map NT feature implementation 

• 

Utilises C-Map User-Card technology to enable backup of waypoints, tracks, routes and 
marks.  Also can be used for home route planning (with optional C-Map PC-Planner Kit) 

Instrumentation data repeater

 - any NMEA instrument source (see “Interfacing” for details), 

custom pages provide easy to use presentation of instrument data.


User information like Waypoints, Marks and tracks can be stored on a User 

, and 

can be recalled at any time.  The 

CND

 will also display available instrument data in dedicated 

display formats.  On the screen are shown navigation data and cartographic information obtained 

from 


electronic charts. 

Summary of Contents for CND

Page 1: ... electronic chart display Features The Central Navigation Display CND is a fully functioned colour Chart Plotter which can be used either as a stand alone system or integrated into an instrument system Daylight viewable transflective VGA colour screen gives excellent clarity even in bright sunlight Latest presentation of C Map NT Cartography hot swap cartridges Highest specification C Map NT featu...

Page 2: ...rence will not occur in a particular installation If this equipment does cause harmful interference the user is encouraged to try to correct the interference by relocating the equipment or connecting the equipment to a different circuit Consult an authorised dealer or other qualified technician for additional help if these remedies do not correct the problem This device meets requirements for CFR4...

Page 3: ...ce to bearing 9 Steer 9 Deleting a Destination 9 Navigating on a route 10 Adding a Waypoint 10 Creating a route 10 Deleting a waypoint 10 Moving Waypoint 11 Inserting a Waypoint 11 Editing Waypoints 12 Finding information 13 Time To Go 13 C MAPNT Information 13 Getting Quick Information 13 Getting Port Information 14 Getting Tidal Information 15 Finding Port Services 16 Finding Port by Name 18 Sea...

Page 4: ... Waypoint Marks in a Route list 31 Finding a Waypoint Mark on the chart 32 Marks 33 Adding a Mark 33 Converting a MARK to a Waypoint 33 Deleting a Mark 33 Man Over Board 33 Setup menu 34 Selecting Alarms 34 Depth Shallow Water Alarm 34 Depth Deep Water Alarm 34 Anchor drag alarm 34 HDOP Alarm 34 Cross Track Alarm 34 Waypoint Arrival Alarm 34 Selecting System Settings 35 To set the Language 35 To s...

Page 5: ...emory menu 41 Memory Menu 41 Saving a File 41 User C CARD menu 42 Loading a File 42 Deleting a File 42 Sort the User C CARD Directory 42 Reading the User C CARD 42 Selecting slot 42 Formatting User C CARD 43 Technical Specifications 44 Installation 45 Precautions 45 Panel mounting 45 Electrical Connections 45 Electrical Connection 45 Power Data 46 NMEA In Instrument Interface 46 Fastnet2 46 Terms ...

Page 6: ...more details of a smaller area by changing the chart scale and zooming in on your display Press the ZOOM key to change the scale and display a wider view The CURSOR keypad moves the cursor about on the display screen quickly and accurately It also scrolls the desired option in the menu page s Press the CLR key to exit from menu or to leave a menu without making changes Press the ENTER key to selec...

Page 7: ...tion page is displayed reminding you that the chart plotter is only an aid to navigation and should be used in conjunction with normal navigational practices Pressing any key will then display the cartographic screen with a position if an external GPS is connected The display can be customised for your personal preferences using the System Settings section Switching Off Press the PWR key and hold ...

Page 8: ...l go then gently move it to the bottom position 2 to hold it in the slot 3 Removing the card Press the C CARD gently inward 1 and move it upwards 2 until you hear a click the C CARD will then eject out of the slot 3 is continuously creating new charts and revising old ones If you wish to receive information on the newest available charts you can write for a catalogue of available charts or ask at ...

Page 9: ...tion the cursor on the Direct Target symbol and the Cursor information box will contain the Latitude Longitude the distance and the bearing from your boat s position Steer Pressing the STEER Softkey will display the Destination text box in place of the Position text box Hide Data Pressing the HIDE DATA Softkey will remove the information box and display a full screen chart and the softkeys Deletin...

Page 10: ...mation box will change to the Waypoint information box displaying the Waypoint name and Latitude Longitude Creating a route Repeat the Adding a Waypoint procedure as shown above until you reach your final destination The lines connecting the Waypoints are known as a leg a circle surrounding the first Waypoint of the route identifies the starting point Deleting a waypoint Using the CURSOR keypad pl...

Page 11: ...onnecting the Waypoint to the new position is shown To place the Waypoint in the new position press the ACCEPT Softkey Inserting a Waypoint Place the cursor on the route leg and press the INSERT Softkey The line between the two Waypoints is turned into a dotted line rubber band now move the cursor to the new position Once you have positioned the cursor at new location press the PLACE Softkey ...

Page 12: ...sert the characters then press the ACCEPT Softkey To change the Symbol use the CURSOR keypad to select the Icon and press the ENTER key If the Coordinates field is selected press the ENTER key and then use the CURSOR keypad to insert the value If the Colour field is selected pressing the ENTER key will display a window with 8 different colour use the CURSOR keypad to select the desired colour and ...

Page 13: ...a special pop up window is displayed This feature called Quick Info identifies the symbol and displays the information about Nav Aids To expand information about that object press the EXPAND Softkey Pressing the ALL Softkey displays all available information about that cartographic point Use the CURSOR keypad to scroll through the list press the ENTER key to expand If the information is in several...

Page 14: ...ng Port Information When viewing the chart of a port or harbour you will see a Port Info icon placing the cursor on the symbol will display the available information The Port Info symbol is visible only if the Ports Services option is On default setting Information is displayed with icons of the available services Ensure the Info Level setting is detailed default setting To expand the information ...

Page 15: ... is available for all countries where such information exists on the paper chart You will also see accurately positioned symbols that show where many useful facilities are located Getting Tidal Information Some charts display a Tidal Diamond symbol T placing the cursor on the Tide symbol displays the available information in the Quick Information window To display the Tide Graph page press the EXP...

Page 16: ...ich the graph dips below the horizontal line i e the times when you will be in danger of grounding Pressing the NEXT DAY or PREV DAY Softkeys displays future or past tides Pressing the SETDATE softkey and entering the required date using the CURSOR keypad followed by the ENTER key displays the tide for that date Pressing the TODAY softkey returns to the current day s tide graph Note Tide graphs ar...

Page 17: ...The icons list is shown of the available services Select the facility using the CURSOR keypad and then press the ENTER key Displayed is a list of ports nearest up to 10 in which this facility is present Choose the port you want and press the FIND Softkey A list of that particular facility at the port is displayed Pressing the CLR key returns to the chart with the cursor located on the chosen facil...

Page 18: ...oftkey to display a list of all ports stored on the C CARD Use the CURSOR keypad to select the port and the ZOOM key to select next previous page Pressing the FIND Softkey to locate the selected port on the chart Note A Warning message is shown if there is no C CARD inserted or there are no ports on the C CARD Searching by name Go to the Find Port by Name screen as above and press the NAME Softkey...

Page 19: ...ed name is displayed Repeat the operation to refine the search or move through the list with the CURSOR keypad Pressing the FIND Softkey locates the selected port on the chart Note A Warning message is shown when the inserted name is not in the ports list Searching by list Go to the Find Port by Name screen as above Use the CURSOR keypad to select the port and using the ZOOM key to select next pre...

Page 20: ... Note The find will be from the cursor position if the fix position is not suitable Using the CURSOR keypad select Tide Stations and press the START Softkey to display a list of nearest Tide Stations up to 10 Choose the Tide Station you want and press the FIND Softkey to display the Tide Graph page Pressing the CLR key returns to the chart to display the Tide Station chosen ...

Page 21: ... from the other instruments on your system Using the information available various other parameters can be calculated and displayed Press the PAGE key to enter the Data Pages Speed Depth The Speed and Depth displays are divided into three pages accessed by repeatedly pressing the SPD DEP Softkey ...

Page 22: ...splays are divided into three pages accessed by repeatedly pressing the NAV Softkey To scroll between pages press the NAV Softkey Wind The Wind displays are divided into three pages accessed by repeatedly pressing the WIND Softkey To scroll between pages press the WIND Softkey ...

Page 23: ...cnd getting started 03 09 01 Page 23 data pages Multi Function The Multifunction displays are divided into two pages accessed by repeatedly pressing the MULTI Softkey ...

Page 24: ...getting started cnd Page 24 03 09 01 data pages Data Logs The Data Logging pages are divided into four pages accessed by repeatedly pressing the DATA LOGS Softkey ...

Page 25: ... the satellites currently in view with their identification numbers These numbers correspond to the bar graph Where a satellite is blacked it is being used by the CND for positional information The data boxes are updated when the CND has obtained a lock on sufficient satellites for navigation The HDOP Horizontal Dilution of Precision and VDOP Vertical Dilution of Precision figures give an indicati...

Page 26: ... OPTIONS Softkey displays the Road Page Options Pressing the XTE Softkey displays the XTE Page XTE Page The XTE Cross Track Error page displays the distance from the current position to the closest position on a line between the last waypoint and the next waypoint on the leg being travelled Pressing the OPTIONS Softkey displays the XTE Options XTE Options The Options menu is used for setting the d...

Page 27: ...oute Using the CURSOR keypad select Routes from the Setup screen From the Main Route screen the CND displays a list of available routes Routes are permanently stored in the memory as they are created Selecting a route to work Scroll through the routes using the up down CURSOR keypad pressing the SELECT Softkey selects the route When an existing route is selected pressing the VIEW Softkey will auto...

Page 28: ...our select window use the CURSOR keypad to select the colour press the ACCEPT Softkey to confirm The route appears on the screen in the selected colour You can select a different colour for each route Reversing a route To navigate to the point where the route originally started Put the cursor over one of the lines on the route and press the REV Softkey This option is only available when the route ...

Page 29: ...use the up and down CURSOR keypad to select another page Press the CLR key to exit from Route Data Report page Changing Speed Fuel values In the Route Report screen pressing the SPEED Softkey displays the boats average speed in Kts pressing the FUEL Softkey displays the boats average fuel consumption in L Hr With the Fuel box displayed use the CURSOR keypad to change the value Press ENTER key to c...

Page 30: ...h of the Waypoints Marks in the route and the fuel required Route Report from the chart Place the cursor on an existing Waypoint or route leg and press the REPORT Softkey to display the same Route Data Report page Finding information on Waypoints A window is opened that gives information about all stored Waypoints If there are more than 10 Waypoints shown use the up and down CURSOR keypad to selec...

Page 31: ...ete then press the DELETE Softkey OR When the delete box appears press the ENTER key to Delete Selected Point or using the CURSOR keypad to select Delete All Points then press the ENTER key Viewing Waypoint Marks in a Route list Select the route and press the VIEW Softkey will display the selected route with the waypoints listed ...

Page 32: ...ey to return to the Route page Finding a Waypoint Mark on the chart Press the FIND Softkey Select Find User Point and press ENTER A window appears to insert the Name by using the CURSOR keypad Press the ACCEPT Softkey to accept the CND will display the selected point ...

Page 33: ...ERT Softkey a window to confirm the conversion is displayed Deleting a Mark Place the cursor on an existing Mark press the DELETE Softkey a window to confirm the deletion is displayed Man Over Board Press and hold the MARK key for two seconds to place a MOB symbol at the boat s current position As soon as MOB is selected an Alarm window appears on the screen giving the position that the MOB occurr...

Page 34: ...epth Depths below this value triggers the alarm Depth Deep Water Alarm This specifies the maximum depth Depths above this value triggers the alarm Anchor drag alarm Triggers when the boat exits from the anchor circle The radius is set in the Alarm Value HDOP Alarm This specifies the minimum number of satellites to receive from Below this number the alarm sounds Cross Track Alarm This specifies the...

Page 35: ...ings menuand press the ENTER key to select To set the Language Use the CURSOR keypad to select language and press ENTER to reveal the sub menu Highlight the desired language and then press the ENTER key To set the GPS NMEA Use the CURSOR keypad to select the NMEA sub menu and use the ENTER key to confirm the settings ...

Page 36: ...settings menu and press the ENTER key to confirm changes Selecting Chart Plotter settings Use the CURSOR keypad to scroll to the Chart Plotter Settings menuand press the ENTER key to select Use the CURSOR keypad to select the sub menus or to change the value of a setting Press the ENTER key to select ...

Page 37: ...keypad to select a sub menu or to change the value of a setting and press the ENTER key to select It should be noted that these Display Option settings are stored when the CND is turned off Selecting Demo Mode settings Use the CURSOR keypad to scroll to Demo Mode and press the ENTER key to select Use the CURSOR keypad change the values of the Speed and Heading and press the ENTER key to select Act...

Page 38: ...at exactly on the chart where it should be From the Plotter Setup menu select Position Offset and press the ENTER key Manually adjust the offset by the amount required to place your boat accurately on the chart Note The position correction feature should be used with care Datum shifts and poor survey data are not always consistent and can be very localised In areas where these errors occur the tra...

Page 39: ...TER key to toggle between on and off Note It is not possible to use the track storing if you are not receiving a valid fix Selecting Active Track Use the CURSOR keypad to scroll to Current Track and pressing the ENTER key repeatedly to select the desired number of the active track The default setting is 1 Displaying Track Use the CURSOR keypad to scroll to Visible Track press the ENTER key to make...

Page 40: ...1 minute which gives a total maximum Tracking period of over 11 hours The default setting is 10 sec Selecting Vector Vector feature displays a vector line protruding from the boat showing where the boat will be in a set period of time This line is based on the boat s current speed and course and is useful for indicating at any given time where the boat is heading Various lengths of vector are avai...

Page 41: ...torage Saving a File A window is opened to insert the file name and the type of data to save Choose the type of data to save by pressing the related Softkey Use the CURSOR keypad to choose the file name At first a default name is shown use the CURSOR keypad to insert the name then press the ENTER key Note The maximum length of the filename is 8 characters The characters may be numbers 0 9 letters ...

Page 42: ...he User C CARD Directory The contents of the C CARD is displayed when you enter this mode It is possible to sort the file directory This is possible in three different modes select the SORT BY Softkey then select one of the options Press the NAME Softkey to order by the filename Press the TIME Softkey to order by the time of file creation Press the TYPE Softkey to order by the type of data Reading...

Page 43: ...ser C CARD must be formatted before use This operation prepares the User C CARD to receive and store information Pressing the FORMAT Softkey will display a box to advise that all data will be lost Pressing the ACCEPT Softkey will format the C CARD If a used User C CARD is formatted all previously stored data on the User C CARD will be completely deleted ...

Page 44: ...nstrument Interface NMEA 0183 ver 2 3 Display mm inch LCD colour TFT transflective active area 142mm 5 6 Display Resolution 320 x 240 pixels Cartography C MAPNT Temperature range 10 60 degrees Celsius Memory Non volatile with battery back up Keyboard Silicon rubber backlit Weight 950g Sealing IP67 With door closed Accessories Bracket Flush mounting kit mounting template Power supply and I O cable ...

Page 45: ...r appropriate caps Panel mounting Screw the bolts supplied into the fittings on the back of the CND A hole must be cut in the panel using the template supplied Fit the CND into the hole you have cut and place the mounting bracket so that the panel is sandwiched between it and the CND Fit the knobs onto the bolts and tighten The rubber sealing gasket should be placed between the plotter and bulkhea...

Page 46: ...G WCV XTE ZDA and VTG Pin Colour Signal Red 1 12 VDC Black 0 VDC NEMA OUTPUT GND Blue NEMA OUTPUT Green NMEA INPUT White UNUSED Yellow NMEA INPUT Screen SCREEN NMEA In Instrument Interface Auxiliary NMEA input port for NMEA messages transmitted by the instrument system Sentences decoded DBT DPT HDG HDM HDT MWV VHW VWR VWT and WPL Pin Colour Signal RED 1 NMEA INPUT Blue NMEA INPUT Green SCREEN 5 2 ...

Page 47: ...ting is Off Arrival Alarm Specifies the radius of a circle around the Waypoint Mark of a route when your boat reaches this circle the alarm sounds The default setting is Off Arrival Time The estimated time of day you will reach your destination based on your current speed and track from GPS Attention Areas Enables by filling area On enables only contour Contour or disables Off the display of Atten...

Page 48: ... represents the direction to follow Bottom Type Turns On Off the displaying of Bottom Type type colour and other qualities of seabed The default setting is On Buoy A floating object moored to the sea bottom in a particular charted place as an aid to navigation Chart Boundaries Enables Disables the displaying of the Chart Boundaries Selecting Auto instead if we are in background charts only the fir...

Page 49: ...different temperatures and prevalent winds Date Format Sets your preferred date between MMMM DD YYYY month day year and DD MMMM YYYY day month year Datum The Latitude and Longitude lines printed on any map are based on certain models of the shape of the earth Dedicated key A key with permanently defined function These keys are labelled on the front panel of the CND Default Indicates a value or a s...

Page 50: ... Department of Defence It gives the navigator a position 24 hours a day 365 days a year under any weather conditions GPS Datum Sets the datum that the GPS unit is set to If the internal GPS is being used this value should be set to WGS 1984 If an external GPS is used find out what datum the external GPS is set to and set the same datum value for this option The default value is WGS 1984 GPS Positi...

Page 51: ... wish screen labels menus and options information to be displayed This does not affect the map information The default setting is English Latitude The angular distance North or South of the equator measured by lines encircling the earth parallel to the equator in degrees from 0 to 90 LAT LONG Coordinate system using Latitude and Longitude coordinates to define a position on earth Lat Long Grid Tur...

Page 52: ...ith North upwards Track Up the map is shown with the boat s current heading upwards The default setting is North Up If Track Up is selected a window is opened to insert the Resolution angle Mark Reference points related to cursor position Marks Turns on or off the user entered Marks The default setting is On Memory CARD The CND uses the optional User C CARD to save user data Minimum Depth Sets the...

Page 53: ...ter Mode Selects whether areas not covered by the electronic charts on the C CARD can be viewed If set to On then the user can zoom in to view Marks routes tracks and boat s position anywhere in the world down to a zoom level of 0 008 Nm Screen width 15 metres regardless of what charts are on the C CARD If set to Off then the CND will only display the areas covered by the chart When the edge of ch...

Page 54: ...list of the available services is shown on the screen Position Correction Allows the user to correct for any position inaccuracy due to datum shifts or poor survey data This can sometimes occur in areas where the original paper charts are produced from very old survey data or where the chart has an unknown datum or datum that is not listed on the CND list of datums R B Allows the range and bearing...

Page 55: ...r the current functions are shown on the screen immediately adjacent to the keys Speed The current velocity at which you are travelling relative to a ground location Speed Units Sets the speed unit among Kts knots Mph miles per hour Kph kilometres per hour The default setting is Kts Split Map Display In Split Map Display the screen is split between showing the chart on the top of the screen and a ...

Page 56: ...R to return to the previous menu Time Reference Sets UTC or Local Time The default setting is UTC Track A very useful feature of the CND is the ability to store and display exactly where the boat has been This feature is referred to as Tracking TRN Turning The difference between COG and BRG If COG is 80 and BRG is 75 TRN is 5 Left TTG Time To Go The estimated time needed to reach your destination ...

Page 57: ...oints makes up a route WGS 84 World Geodetic System 1984 Coordinate System or Datum developed by the Defence Mapping Agency DMA Zoom In Shows more detail in a smaller area Zoom Out Shows a wider but less detailed view UTC Universal Time Coordinated A time scale based on the rotation of the earth that is used by most broadcast time services XTE Alarm You can enable disable the XTE Alarm if it is se...

Page 58: ...S antenna and that the CND has been correctly wired If after 15 minutes the CND does not get a fix turn it Off and On again The chartplotter does not turn Off If after a PWR pressure for at least 3 seconds the CND does not turn Off then turn Off the supply The chartplotter screen becomes very dark after a long exposure to direct sunlight Adjust the contrast SETUP System Settings ENTER Contrast ENT...

Page 59: ...r B G shall not be responsible for any such costs including but not limited to 3 1 Boat slipping or lifting 3 2 Freight shipping charge 3 3 Engineer s travelling time and expenses 3 4 Installation labour costs associated with the Warranty claims and 3 5 Loss or damage of products or boats in transit 4 Conditions The Warranty will not apply in the following circumstances 4 1 Where the product has b...

Page 60: ... That it is suitable for any particular use or 7 2 That it conforms to any particular quality standards 8 Transfer This Warranty is not transferable 9 Consequential Loss B G shall not be liable for any damage to persons yachts equipment or any other property or for any other kind of consequential loss 10 Governing Law This document is governed by and shall be construed in accordance with English l...

Reviews: