Avery Berkel FX210, Service Instructions Manual
The Avery Berkel FX210 is a versatile weighing scale designed for precision and accuracy in various industries. Enhance your operational efficiency with our Service Instructions Manual, available for easy download absolutely free, from manualshive.com. Get comprehensive guidance on using and maintaining your FX210 to maximize its potential.
Share
Download


Reviews:
No comments
Related manuals for FX210
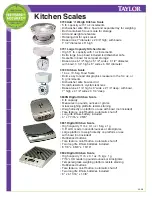
3700
Brand: Taylor Pages: 2
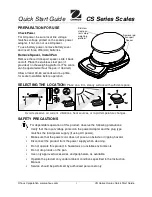
CS Series
Brand: OHAUS Pages: 2

JC
Brand: Jadever Pages: 4

JZ115
Brand: J-Scale Pages: 2

SB-315
Brand: ARESA Pages: 12

Ginette
Brand: Korona Pages: 5

246-026
Brand: Exido Pages: 1

SCA102 Simply Fit
Brand: Goddess Pages: 68

LBK Series
Brand: Adam Equipment Pages: 20

GBC 130a
Brand: Adam Equipment Pages: 108

89187
Brand: miniland baby Pages: 32

SPC-2002
Brand: Yamato Pages: 4

5100 IB
Brand: Salter Pages: 2

200
Brand: Salter Pages: 2

9074
Brand: Salter Pages: 12

9063 WH3R
Brand: Salter Pages: 20

9000 WH3R
Brand: Salter Pages: 20

9036
Brand: Salter Pages: 13


