
SBT4000 User Manual
User Guide
Should you have any questions or problems concerning this
product, please contact our customer service department at:
TO OBTAIN WARRANTY SERVICE:
●
Call the Customer Support number located below, or go
to our website portal to receive an SRO number.
●
Provide proof of the date of purchase within the package
(Dated bill of sale).
●
Prepay all shipping costs to the authorized service center,
and remember to insure your return.
●
Include a return shipping address (no P.O. Boxes), a
telephone contact number, and the defective unit within
the package.
●
Describe the defect or reason you are returning the
product.
Your product will be repaired or replaced, at our option, for
the same or similar model of equal value if examination by
the service center determines this product is defective.
Products received damaged as a result of shipping will
require you to file a claim with the carrier.
The shipping address of the authorized service center is:
Southern Telecom, Inc.
Attention: Customer Service (2nd Floor)
14-C 53rd Street
Brooklyn, NY 11232
90 Days Limited Warranty
In the unlikely event that this product is defective, or does
not perform properly, you may within ninety (90) days from
your original date of purchase return it to the authorized
service center for repair or exchange.
Limitation of Warranty:
•
THE WARRANTY STATED ABOVE IS THE ONLY WARRANTY
APPLICABLE TO THIS PRODUCT. ALL OTHER WARRANTIES,
EXPRESS OR IMPLIED (INCLUDING ALL IMPLIED WARRANTIES
OF MERCHANTABILITY OR FITNESS FOR A PARTICULAR
PURPOSE) ARE HEREBY DISCLAIMED. NO VERBAL OR
WRITTEN INFORMATION GIVEN BY AIT, INC. ITS AGENTS, OR
EMPLOYEES SHALL CREATE A GUARANTY OR IN ANY WAY
INCREASE THE SCOPE OF THIS WARRANTY.
•
REPAIR OR REPLACEMENT AS PROVIDED UNDER THIS
WARRANTY IS THE EXCLUSIVE REMEDY OF THE CONSUMER.
AIT, INC. SHALL NOT BE LIABLE FOR INCIDENTAL OR CONSE-
QUENTIAL DAMAGES RESULTING FROM THE USE OF THIS
PRODUCT OR ARISING OUT OF ANY BREACH OF ANY
EXPRESS OR IMPLIED WARRANTY ON THIS PRODUCT. THIS
DISCLAIMER OF WARRANTIES AND LIMITED WARRANTY ARE
GOVERNED BY THE LAWS OF THE STATE OF NEW YORK.
EXCEPT TO THE EXTENT PROHIBITED BY APPLICABLE LAW,
ANY IMPLIED WARRANTY OF MERCHANTIBILITY OR FITNESS
FOR A PARTICULAR PURPOSE ON THIS PRODUCT IS LIMITED
TO THE APPLICABLE WARRANTY PERIOD SET FORTH ABOVE.
Some states do not allow the exclusion nor limitation of
incidental or consequential damages, or limations on how
long an implied warranty lasts so the above limitations on
exclusions may not apply to you. This warranty gives you
specific legal rights, and you also may have other rights that
vary from state to state.
SBT4000
User Guide
Portable Turntable
SBT4000
User Guide
Portable Turntable
Portable Turntable
Customer Support:
Phone: 1-877-768-8481
Monday-Friday 8AM-10PM(EST)
www.southerntelecom.com
Click on “Product Support”
In the box
In the box
Sharper Image® name and logo are registered trademarks. Manufactured
and marketed by Southern Telecom under license. © Sharper Image.
All Rights Reserved.
FRONT
BACK
Limited Warranty
Warranty service not provided
This warranty does not cover damage resulting from
accident, misuse, abuse, improper installation or operation,
lack of reasonable care, and unauthorized modification. This
warranty is voided in the event any unauthorized person
opens, alters or repairs this product. All products being
returned to the authorized service center for repair must be
suitably packaged.
Location of controls
Location of controls
Playing music
Playing music
READ AND KEEP THESE INSTRUCTIONS.
Caution: Any changes or modifications not expressly approved
could void the user's authority to operate the equipment.
Note: This equipment has been tested and found to comply with the
limits for a Class B digital device, pursuant to part 15 of the FCC
Rules. These limits are designed to provide reasonable protection
against harmful interference in a residential installation. This
equipment generates, uses and can radiate radio frequency energy
and, if not installed and used in accordance with the instructions,
may cause harmful interference to radio communications. However,
there is no guarantee that interference will not occur in a particular
installation. If this equipment does cause harmful interference to
radio or television reception, which can be determined by turning
the equipment off and on, the user is encouraged to try to correct
the interference by one or more of the following measures:
•
Reorient or relocate the receiving antenna.
•
Increase the separation between the equipment and
receiver.
•
Connect the equipment into an outlet on a circuit different
from that to which the receiver is connected.
•
Consult the dealer or an experienced radio/TV technician
for help.
This device complies with Part 15 of the FCC Rules. Operation is
subject to the following two conditions: (1) this device may not
cause harmful interference, and (2) this device must accept any
interference received, including interference that may cause
undesired operation.
Legal information
Legal information
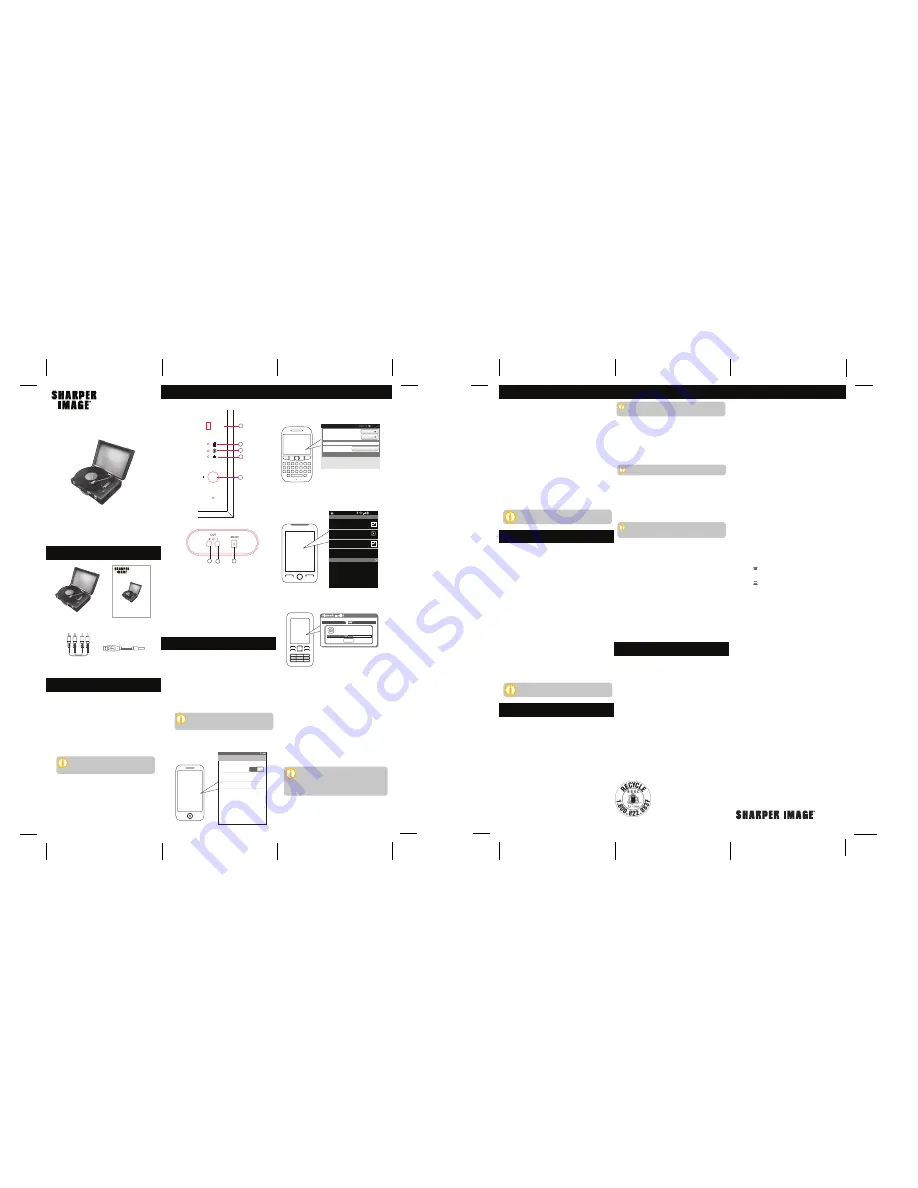
1. Bluetooth/Turntable switch
2. LED charging indicator light
3. LED Bluetooth indicator light
4. LED power indicator light
5. Power/Volume knob
6. RCA right speaker output port
7. RCA left speaker output port
8. USB DC 5V charging port
Pairing the turntable with a Bluetooth-
enabled device
Pairing the turntable with a Bluetooth-
enabled device
1. Turn the turntable ON.
2. Move the Bluetooth/Turntable switch to the
Bluetooth position. The LED Bluetooth
indicator light will quickly flash BLUE.
3. Keep the turntable and Bluetooth-enabled
device within 3 feet of each other during the
pairing process.
4. Set your Bluetooth-enabled device to search
for Bluetooth devices.
If a paired device is in range when the
speaker is turned on, the speaker will
connect to it automatically.
On an iPhone
•
Go to SETTINGS > BLUETOOTH (Make sure
Bluetooth is turned ON)
Paired
Bluetooth
Bluetooth
ON
SBT4000
Devices
Now discoverable
12:12 PM
The screenshots above are typical of many Bluetooth-
enabled devices in the market today, and are used
to assist in the explanation of the pairing process.
Your Bluetooth enabled device’s interface and
interaction with the speaker
may differ slightly
from the illustrations above.
On a Blackberry
• Go to SETTINGS/OPTIONS > BLUETOOTH
• Enable BLUETOOTH
Bluetooth:
Discoverable:
Paired Devices
SBT4000
Bluetooth
3G
On
Yes
Add New Device
On an Android Phone
•
Go to SETTINGS > BLUETOOTH
Search for devices (Make sure Bluetooth is
turned ON)
Bluetooth settings
Bluetooth devices
Scanning
Bluetooth
Device name
SBT4000
Visible
Search for devices
Make device visible
12:12 PM
On other Cell Phones/Devices
•
Review the instruction manual that came
with your phone/device.
Searching for devices
Paired Devices:
1 f
ound
Stop
*Empty *
Bluetooth: Enabled
5. When the Bluetooth-enabled device finds
the turntable, select “PBT4000” from the list
of found devices.
6. If required, enter the password 0000. Select
OK or Yes to pair the two units.
7. After a successful pairing, the LED
Bluetooth indicator light will flash BLUE
slowly.
NOTE:
If you would like to connect the
speaker to another device, you must unpair
the unit from the currently paired device first.
On your device’s Bluetooth settings, select
“SBT4000,” then select “unpair.” The speaker
will return to pairing mode.
Powering ON/OFF
•
Turn the Power/Volume knob to the right to
turn the unit ON. Turn it all the
way to the left to turn the unit OFF.
• Check that your Bluetooth features are turned
ON. If you have already paired the turntable
with a Bluetooth enabled device, it will
automatically connect.
• If you are using the turntable for the first time,
go to the “PAIRING THE TURNTABLE” section of
this User Manual, and pair the turntable to your
desired Bluetooth device.
Adjusting the volume
• Turn the Power/Volume knob to the left (MIN) to
decrease the volume.
• Turn the Power/Volume knob to the right (MAX)
to increase the volume.
You can also adjust the volume from your
connected device’s volume control.
To enjoy listening to music wirelessly on your
Portable Turntable make sure you are connected
to a Bluetooth enabled device. Once connected
press PLAY on your Bluetooth device. After
playback starts, you can control the music with
your connected device or the buttons of the
Bluetooth speaker (with devices that have the
AVRCP Bluetooth profile).
Playing vinyl records
1. Place the record on the turntable and set the
needle on the record.
2. Turn the Power/Volume knob to the right to
turn the unit ON.
3. Move the Bluetooth/Turntable switch to the
Turntable position.
Adjusting the volume
•
Turn the Volume knob to the left to decrease
the volume.
• Turn the Volume knob to the right to increase
the volume.
My Bluetooth device is not able to pair with the
Portable Turntable.
I can pair the Portable Turntable with my
Bluetooth device, but I cannot hear any music.
I cannot get the Portable Turntable into
pairing mode.
1. Make sure the Portable Turntable is turned ON
before beginning the pairing process.
2. Move the Bluetooth/Turntable switch to the
Bluetooth position. The LED Bluetooth indica
tor light will quickly flash BLUE.
3. The turntable is now in pairing mode.
1. Make sure the Portable Turntable is turned ON
before beginning the pairing process.
2. Keep the Portable Turntable and Bluetooth
enabled device within 3 feet of each other
during the pairing process.
3. Move the Bluetooth/Turntable switch to the
Bluetooth position. The LED Bluetooth indicator
light will quickly flash BLUE.
4. Check that YOUR device’s Bluetooth feature is
turned ON.
5. Try repeating the pairing process, see “Pairing
the Turntable with a Bluetooth-enabled device”.
6. Make sure the turntable is fully charged.
1. Make sure your Bluetooth device supports A2DP
profile.
2. Turn up the volume on your Bluetooth device.
3. You may have to unpair the turntable, then
re-pair to your device.
4. Use your connected device to increase the
volume.
Troubleshooting Tips
Troubleshooting Tips
Using the speaker
Using the speaker
Charging the turntable
Charging the turntable
Charging via DC 5V port:
1. Connect the USB pin charging cable to the DC
5V charging port on the back of the turntable.
2. Connect the USB end of the USB pin charging
cable into your computer or other USB charging
device.
3. The LED charging indicator light is GREEN when
charging. It will shut off when the turntable is
fully charged.
Make sure you charge the turntable for
at least 8 hours before using it for the
first time.
MIN
MAX
O
N
O
FF
BLUET
OOTH
TURNTABLE
1
2
3
4
5
6
7
8
You can also adjust the volume from your
connected device’s volume control.
Using as a wired turntable
Using as a wired turntable
1. Turn the turntable ON.
2. Connect one red plug and white plug of the
included RCA Audio Cable to the corresponding
right and left speaker output ports on the back
of the turntable.
3. Connect the other ends of the RCA Audio cable
to an external speaker system’s input ports.
4. Open a media player on your device and click
on PLAY to start playing your music.
5. Use the controls on your connected device to
control music playback and volume.
NOTE:
The Turntable’s internal speaker volume can
be increased or decreased when connected to a
Bluetooth enabled device. It will also adjust the
volume to an external speaker when connected
with the included RCA Audio cable.
RCA Audio
Cable
USB Pin Charging
Cable
TOP PANEL
BACK PANEL


