background image

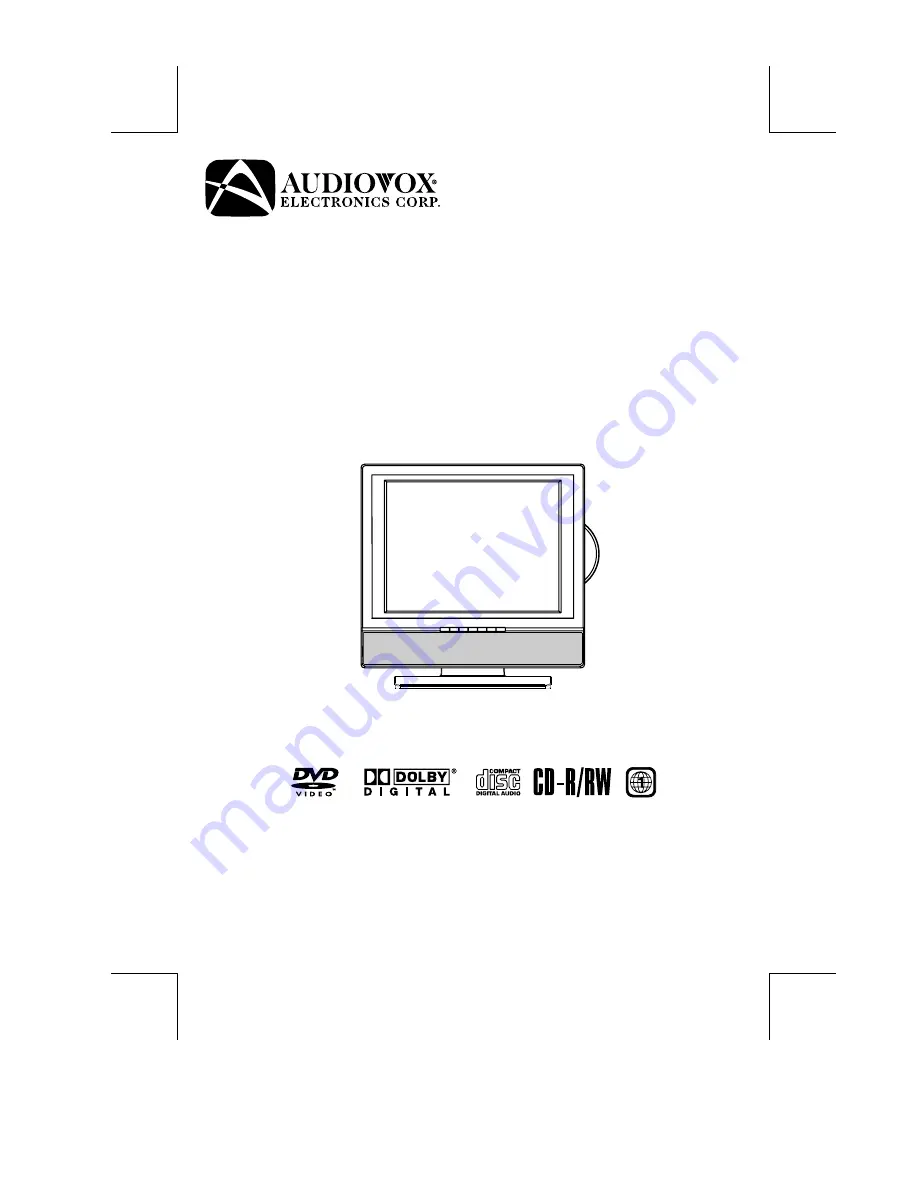
15” FLAT PANEL LCD TV 

WITH BUILT-IN DVD PLAYER

PLV21150CS1 - AUDIOVOX ENGLISH IB
I/B [P/N: 811-211591W200]
SIZE : 148 X 210MM
MATERIAL : 80g WOODSFREE PAPER
19-04-2007

OWNER'S MANUAL

Printed in China

811-211591W200

FPE1507DV

FOR ASSISTANCE CALL CUSTOMER SERVICE AT 1-800-645-4994
OR VISIT US AT WWW. AUDIOVOX.COM

128-8057

Summary of Contents for FPE1507DV - 15" LCD TV

Page 1: ...CS1 AUDIOVOX ENGLISH IB I B P N 811 211591W200 SIZE 148 X 210MM MATERIAL 80g WOODSFREE PAPER 19 04 2007 OWNER S MANUAL Printed in China 811 211591W200 FPE1507DV FOR ASSISTANCE CALL CUSTOMER SERVICE AT 1 800 645 4994 OR VISIT US AT WWW AUDIOVOX COM 128 8057 ...

Page 2: ... generates used in accordance with the instructions may cause harmful interference to radio communications However there is no guarantee that interference will not occur in a particular installation If this equipment does cause harmful interference to radio or television reception which can be determined by turning the equipment does cause harmful interference to radio or television SAFETY PRECAUT...

Page 3: ...n for help Shielded cables must be used with this unit to ensure compliance with the Class FCC limits NOTES ON COPYRIGHT It is forbidden by law to copy broadcast show broadcast on cable play in public or rent copyrighted material without permission Apparatus Claims of U S Patent Nos 4 907 093 5 315 448 and 6 516 132 licensed for limited viewing uses only This product incorporates copyright protect...

Page 4: ...onsult an electrician for replacement of the obsolete outlet 10 Protect the power cord from being walked on or pinched particularly at plug convenience receptacles and the point where they exit from the apparatus 11 Only use attachments accessories specified by the manufacture 12 Use only with the cart stand tripod bracket or table specified by the manufacturer or sold with the apparatus When a ca...

Page 5: ...t Reverse 20 Slow motion Play DVD 20 Audio Selection DVD 21 Subtitle Selection DVD 21 Angle Selection DVD 21 SPECIAL FUNCTIONS 22 Display Function DVD 22 Locating a Specific Title DVD 22 Locating a Specific Chapter Track 22 Locating a Specific Time 22 CD DVD PROGRAMMABLE MEMORY 23 Programmable Memory 23 Title Chapter Programmed Playback DVD 23 Track Programmed Playback CD 23 REPEAT PLAYBACK 23 24 ...

Page 6: ...ed and manufactured to respond to the Region Management Information that is encoded on DVD discs If the region number printed on the DVD disc does not correspond to the region number of this unit this unit cannot play that disc The region number of this unit is 1 Note Numbers identify each title chapter and track on a disc Most discs have these numbers recorded on them but some do not Notes on Una...

Page 7: ...ime remove the batteries to avoid damage caused by battery leakage corrosion Do not mix old and new batteries Do not mix ALKALINE standard CARBON ZINC or rechargeable NICKEL CADMIUM batteries WARNING Do not dispose of batteries in a fire or they may leak and or explode REMOTE CONTROL ACCESSORIES PLEASE LOCATE THE INCLUDED ACCESSORIES Remote control with battery x 1 AC Adapter x 1 Car Power Adapter...

Page 8: ...h captions 8 SLEEP Button Press to set the SLEEP timer The unit will remain on for the time that is set and will automatically shut off afterwards 9 TV MENU Button Press to display the on screenTV menu 10 VOLUME Buttons Press to adjust the volume level 11 DVD MENU Button While viewing a DVD press to enter the main menu 12 LAST CH Button Press to switch repeatedly between the last two channels disp...

Page 9: ...ing 28 SETUP Button Press to enter and exit the SETUP menu of the DVD player 29 CURSOR Buttons Press to highlight selections on a menu screen and adjust certain settings ENTER Button Press to confirm selections on a menu screen CH CH Button Press to change the TV channels 30 AUDIO Button Press to select audio soundtracks of a DVD or change the output mode of a CD 31 STOP Button Press to stop playi...

Page 10: ... Adjusts the volume level and highlight selections Left Right on the menu screen Buttons Selects a TV channel and highlight selections Up Down on the menu screen 6 Disc Door 7 PLAY Button Press to start or resume playback of a disc STOP Button Stops playing a disc PAUSE button Pause playback and frame advance PREV Button Press PREV button to go back to previous chapters tracks Press and hold to fa...

Page 11: ...Jacks Left Right 14 PC IN MONITOR VGA Jack 15 PC IN Audio Jack 16 YUV IN Component Video Input Jacks Y PB PR 17 YUV IN Audio Input Jacks Left Right 18 AV IN S Video Input Jack 19 Headphone Jack 20 TV Antenna Cable Terminal Coaxial TV Antenna Input UNIT REFERENCE GUIDE 9 10 11 12 14 15 16 17 18 20 13 19 2115CS1 DC 1 25 pmd 20 04 2007 15 18 11 ...

Page 12: ...put from a satellite receiver VCR or cable box TV ANTENNA CABLE CONNECTING AN AUDIO AMPLIFIER This connection allows you to use an audio amplifier and external speakers Connect the right red and left white audio OUTPUT from this unit to the right red and left white audio INPUT on your amplifier Refer to your amplifier s user manual for more information Note To control the audio both the TV and the...

Page 13: ...e not included Make sure you connect both audio and video from the same camcorder to the same input AV IN Note Please refer to the user manual for the camcorder for more information Connect to a VCR Connect the right red and left white audio output from the VCR to the right red and left white input on this unit Audio cable not included Connect the S VIDEO output from the VCR to the S VIDEO input o...

Page 14: ...onnect both audio and video from the same camcorder to the same input AV IN Note Please refer to the user manual for the camcorder for more information CONNECTIONS Connect to a VCR Connect the right red and left white audio output from the VCR to the right red and left white input on this unit Audio cable not included Connect the video yellow output from the VCR to the video input on this unit Vid...

Page 15: ...ation Note After connection please operate inTV AV mode For the reason of copyright protection the result copy may has bad picture and or sound CONNECTIONS Connect to a VCR PVR Connect the right red and left white audio input from the VCR PVR to the right red and left white output on this unit Audio cable not included Connect the video yellow input from the VCR PVR to the video output on this unit...

Page 16: ...uded Connect the right red and left white audio output from the source to the right red and left white input on this unit Audio cable not included Make sure you connect both audio and video from the same source to YUV IN Note When connecting a DVD player to the television the picture resolution is solely dependent upon the resolution supported by the DVD player attached DVD Player resolutions vary...

Page 17: ... power adapter allows the unit to be used with vehicles that have a 12 24V negative ground electrical system Cautions Use the provided car power adapter only Use with other car power adapters could damage the unit The car power adapter included with this unit is for its use only Do not use it with other equipment In the interest of traffic safety do not operate this unit or view videos while drivi...

Page 18: ...t be protected at all times when removing the base stand Be sure that no hard or sharp or anything that could scratch or damage the LCD display come in contact with it Do NOT place pressure on the front of the unit at any time because the screen could crack 1 Disconnect any cables or cords connected to the unit 2 Lay the unit down on a flat surface so the back side is facing up making sure to plac...

Page 19: ...tton to select your OSD language and press the button to the next step 3 Use the button to select your TV tuner source Antenna or Cable and press the button to the next step 4 Make sure RF aerial has been connected properly to TV ANTENNA input jack on the bottom of the system press the ENTER or button The system will automatically start to scan and preset all available TV channels 5 After scaning ...

Page 20: ...USE button To resume normal playback press the PLAY button Each time you press the PAUSE button the picture advances one frame SLOW MOTION PLAY DVD 1 Press the SLOW button on remote control in the play mode Two speeds are available Each time the SLOW button is pressed the speed of slow motion playback changes in the following sequence SF 1 2 SF 1 3 SF 1 4 SF 1 5 SF 1 6 SF 1 7 2 Press the PLAY butt...

Page 21: ...pressed within a few seconds playback continues without changing the current subtitle This function can only be used for discs on which subtitles have been recorded in multiple languages On some DVDs subtitles are activated from the main menu of the DVD Press the MENU button to activate the main menu ANGLE SELECTION DVD Some DVDs contain scenes which have been shot from a number of different angle...

Page 22: ...ins title numbers you can locate a specific title by directly selecting a title number 1 In stop mode press the GOTO button 2 Press the or button to highlight a specific field and press the corresponding number button s for the title you want 3 Press the ENTER button to confirm The unit will start playback about 3 seconds later LOCATING A SPECIFIC TIME You can move to a specific location by enteri...

Page 23: ...e the disc is playing press the REPEAT DISC button until the indicator displays on the screen The current chapter is played repeatedly REPEATING A TITLE You can play the same title repeatedly 2 While the disc is playing press the REPEAT DISC button until the indicator displays on the screen The current title is played repeatedly TO RESUME NORMAL PLAYBACK 3 While the disc is playing press the REPEA...

Page 24: ...E DISC 1 Press the PUSH OPEN button to open the disc door 2 Hold a picture file disc by its edge and gently push it onto the spindle with the label side facing up until you hear a click 3 Push the Disc Tray to close the disc door 4 The unit will load the disc and automatically display the contents of the disc on the screen while also beginning to play the picture file These files will then be play...

Page 25: ... selected setting 4 Repeat steps 2 and 3 above to adjust other options 5 To exit the SETUP MENU and return to the normal screen press the RETURN or SETUP button CUSTOMIZING THE DVD FUNCTION SETTINGS TV TYPE Pan Scan When wide screen video is played this mode clips the right and left sides of the image so that it can be viewed on a conventional screen Some wide screen DVDs that do not permit Pan Sc...

Page 26: ...tness of the picture Brighten or darken the whole picture Contrast Adjust to sharpen the picture quality The black portions of the picture become richer in darkness and the white become brighter Saturation Adjust the color saturation of the picture Tint Adjust the tint of the picture Toward purple Toward green Sharpness Adjust the sharpness level to improve detail in the picture Color Temperature ...

Page 27: ... if there is flicker of screen letters color misalignment or blurring Clock Adjusts the display clock to change width of the image AV YUV DVD PC MODE TV MODE Video Audio Setup Parental VGA Auto Adjust H Position V Position Phase Clock Select EXIT ENTER Enter 50 50 Return 3 127 AUDIO MENU 1 Press the TV MENU button 2 Use the or button to select Audio then press the ENTER or button to go into the Au...

Page 28: ...el Skip MTS Audio Language Cable Stereo English Video Audio TV Setup Parental Parental EXIT Exit Select Tuner mode Antenna over the air broadcasts or Cable cable satellite broadcasts mode are available Auto Scan Add CH Search for more usable stations and add them in memory The stations stored before are still kept Add Channel Search for more usable stations and add them in memory Channel Skip Skip...

Page 29: ...Time Press the or button to locate the position and press the number buttons to input power on time Power Off Time Press the or button to locate the position and press the number buttons to input power off time Time Setup Setting Video Audio TV Setup Parental Time Zone Time SleepTimer Time Setup EXIT Return Select EasternTime Off Video Audio TV Setup Parental Time Update Date Time Timer Power OnTi...

Page 30: ...al settings will not be erased Caption Setting Analog Closed Caption Select the analog closed caption or turn it off Digital Closed Caption Select the digital closed caption or turn it off Digital Caption Style Select As Broadcaster to use the default digital caption style of the broadcaster Select Custom to activate the caption style items and set you prefered detailed settings Note This function...

Page 31: ...for all ages PG PARENTAL GUIDANCE SUGGESTED Some material may not be suitable for children PG 13 PARENTS STRONGLY CAUTIONED Some material may be inappropriate for children under 13 R RESTRICTED Under 17 requires accompanying parent or adult guardian for viewing in movie theaters NC 17 No one 17 or under admitted in movie theaters X Adults Only C Children C8 Recommended for children age 8 and older...

Page 32: ...32 LANGUAGE CODE LIST 2115CS1 DC 26 36 pmd 20 04 2007 14 47 32 ...

Page 33: ...to clean the disc Do NOT use irregular shaped discs example heart shaped octagonal etc They may cause malfunctions CLEANINGTHE UNIT Be sure to turn the unit off and disconnect the AC power cord before maintaining the unit Wipe the unit with a dry soft cloth If the surfaces are extremely dirty wipe clean with a cloth that has been dipped in a weak soap and water solution and wrung out thoroughly Wi...

Page 34: ...decoded to have speaker output This unit is too hot Power off the unit for 30 minutes to cool down The region number of the disc doesn t match the region number of this unit Clean the disc The disc is scratched The plugs and jacks are dirty Wipe them with a cloth slightly moistened with alcohol Clean the disc There is no disc inside No Disc appears on the screen Insert the disc correctly with the ...

Page 35: ...at TV mode is selected Try a new channel to check for possible station trouble Make sure the antenna is connected properly Increase the volume Make sure the antenna or audio video source device is working properly Make sure all cables are firmly connected Check for local interference Make sure there are no unshielded electrical devices nearby that are causing interference Turn the TV off for 30 mi...

Page 36: ...Printed in China 811 211591W220 Unit INCH 4 1 8 16 3 4 14 3 8 6 5 8 7 1 2 10 1 2 11 8 2115CS1 DC 26 36 pmd 20 04 2007 14 47 36 ...

Reviews: