background image

OWNER’S
MANUAL

SERVICING

Should your DVD/VCR COMBINATION UNIT become inoperative, do not try to  
correct the problem by yourself. There are no user-serviceable parts inside.Turn
off, unplug the power plug, and take the unit to our Authorized Service Center.

Please read before using this equipment.
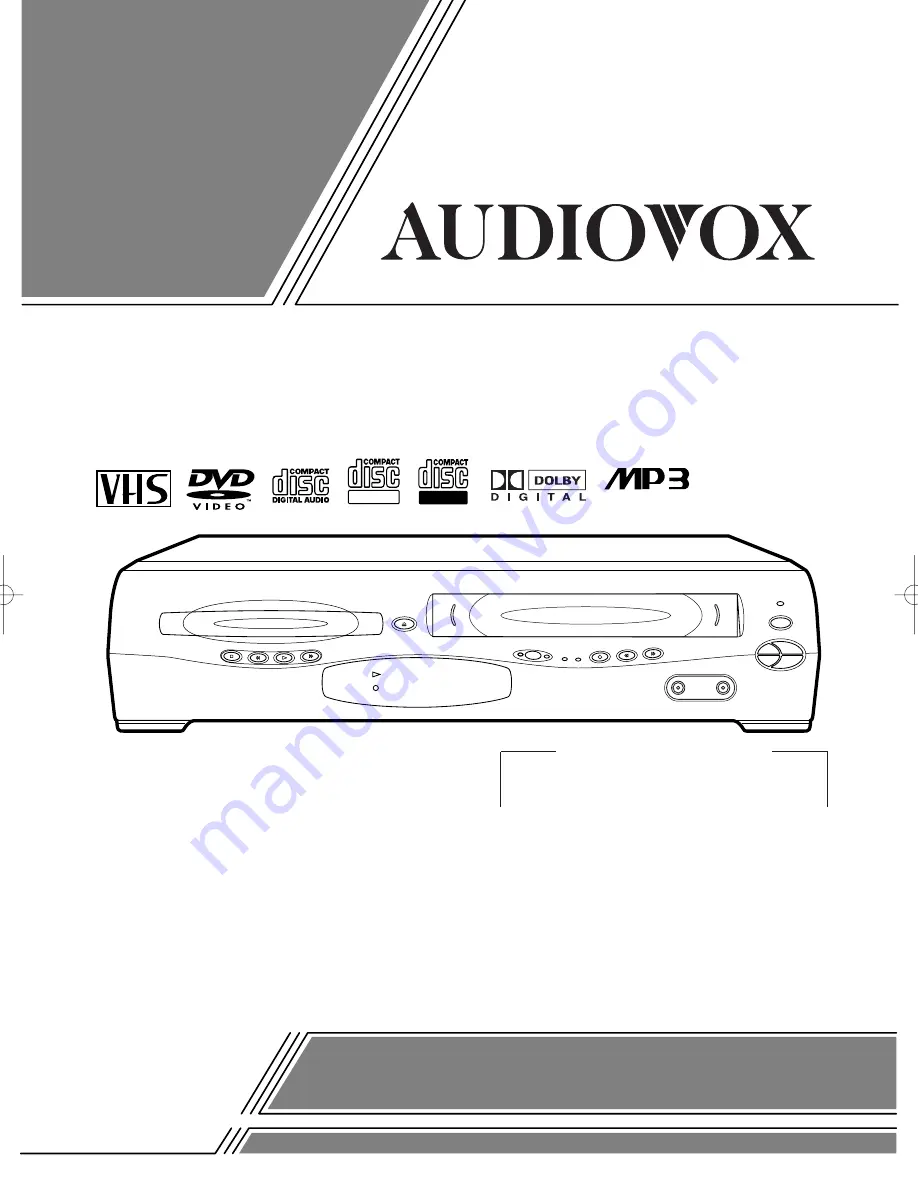
OPEN/CLOSE

OUTPUT

REC

REW

FF

VIDEO

AUDIO

CH-DOWN

POWER

CH-UP

STOP/EJECT

PLAY

DVD

VCR

TIMER

REC

STOP

PLAY

DISC IN

FWD

REV

PLAY

ReWritable

Recordable

DVD PLAYER with VIDEO CASSETTE RECORDER

AXWD2003

Summary of Contents for AXWD2003

Page 1: ...r serviceable parts inside Turn off unplug the power plug and take the unit to our Authorized Service Center Please read before using this equipment OPEN CLOSE OUTPUT REC REW FF VIDEO AUDIO CH DOWN POWER CH UP STOP EJECT PLAY DVD VCR TIMER REC STOP PLAY DISC IN FWD REV PLAY ReWritable Recordable DVD PLAYER with VIDEO CASSETTE RECORDER AXWD2003 ...

Page 2: ... DO NOT OPEN FCC WARNING This equipment may generate or use radio frequency energy Changes or modifications to this equipment may cause harmful interference unless the modifications are expressly approved in the instruction manual The user could lose the authority to operate this equipment if an unauthorized change or modification is made RADIO TV INTERFERENCE This equipment has been tested and fo...

Page 3: ...3 Outdoor Antenna Grounding If an outside antenna or cable system is connected to the video product be sure the anten na or cable system is grounded so as to provide some pro tection against voltage surges and built up static charges Article 810 of the National Electrical Code ANSI NFPA No 70 provides information with regard to proper ground ing of the mast and supporting structure grounding of th...

Page 4: ...s are prohibited This product incorporates copyright protection technology that is protected by method claims of certain U S patents and other intellectual property rights owned by Macrovision Corporation and other rights owners Use of this copyright protection technology must be authorized by Macrovision Corporation and is intended for home and other limited viewing uses only unless otherwise aut...

Page 5: ...EL FUNCIONAMIENTO Y SUS FUNCIONES 35 CAMBIO DE VCR DVD 38 CONEXIONES 39 DVD VCR A CONEXIÓN DE TV 39 CANAL DE SALIDA RF 39 CONECTANDO A UN TV 39 CONECTANDO A UN TV QUE TIENE TOMA DE ENTRADA DE S VÍDEO o TOMAS DE ENTRADA DE VÍDEO COMPONENTE 39 CONECTANDO A UN AMPLIFICADOR EQUIPADO CON TOMAS DE ENTRADA DIGITAL TALES COMO PLATINA MD O PLATINA DAT 39 CONECTANDO A UN DESCODIFICADOR DIGITAL DOLBY 39 CONE...

Page 6: ...frequency synthesiz er tuner with direct station call A cable converter box may be necessary to view scram bled cable channels Automatic functions Auto power on system Automatically turns the VCR on when you insert the cas sette Digital Auto Tracking DTR Playback Auto Repeat 2 Step Picture Search Operation Index Search Time Search Recording 1Year 8 events including Daily and Weekly Timer Recording...

Page 7: ...R COMBINATION UNIT DVD with region codes other than 4 or ALL DVD ROM DVD RAM Never play back otherwise malfunc tion may result CD ROM VSD CDV Only plays back the audio part CD G Only plays back the sound CD I Never play back otherwise malfunction may result SACD Photo CD Never play back otherwise malfunc tion may result Video CD Never play back otherwise malfunc tion may result Any other discs wit...

Page 8: ...wer on and off 7 POWER Light red Light appears when the power is on 8 STOP EJECT Button VCR EJECT Button Press to remove the tape from the VCR STOP Button Press to stop the tape motion 9 PLAY Button VCR page 18 Press to begin playback 10 CH ANNEL Buttons page 16 In VCR mode press to change TV channels on the VCR press to adjust the tracking during normal or slow motion playback press to remove ver...

Page 9: ...begin slow motion playback Press this button repeatedly to change the reverse speed of slow motion VCR mode page 18 Press to rewind the tape or to view the picture rapidly in reverse during the playback mode Rewind Search 32 STOP Button DVD mode Press to stop the disc motion VCR mode Press to stop the tape motion 33 RECORD Button page 19 Press once to start a recording 34 MENU Button DVD mode page...

Page 10: ... DVD picture step by step or one frame at a time VCR mode page 18 While recording press to temporarily stop the recording pause Press a second time to resume normal recording You can not pause a One Touch Recording Or press during tape playback to freeze the picture Press to advance the picture one frame at a time during still mode 52 SLOW Button page 18 During tape playback press to view the vide...

Page 11: ... of a decoder or audio receiver 62 DVD ANALOG AUDIO OUT Jacks Connect the supplied audio cables here and to the Audio In jacks of a television or other audio equip ment DVD only 63 S VIDEO OUT Jack Connect an optional S Video cable here and to the S Video In jack of a television DVD only 64 VIDEO IN Jack Connect a cable coming from the video out jack of a camcorder another VCR or an audio visual s...

Page 12: ...ITLE T SET DVD VCR OPEN CLOSE OUTPUT REC REW FF VIDEO AUDIO CH DOWN POWER CH UP STOP EJECT PLAY DVD VCR TIMER REC STOP PLAY DISC IN FWD REV PLAY OUTPUT DVD VCR OUTPUT button DVD OUTPUT Light VCR OUTPUT Light DVD button VCR button Press VCR on the remote control Verify that the VCR OUTPUT Light is lit VCR MODE Notes Pressing only OUTPUT on the front panel does not switch the mode of the remote cont...

Page 13: ...ded to call the CATV system installer s attention to Article 820 40 of the NEC that pro vides guidelines for proper grounding and in particular specifies that the cable ground should be connected to the grounding system of the building as close to the point of cable entry as practical HOOKUPS CAUTION Be sure to turn off the DVD VCR COMBINATION UNIT and equipment to be connected Read through the op...

Page 14: ... Y Cb Cr L R COMPONENT VIDEO OUT AUDIO IN VIDEO IN DVD VCR VCR DVD R L To COAXIAL DIGITAL AUDIO INPUT jack To COAXIAL DIGITAL AUDIO OUT jack Stereo Receiver Amplifier equipped with digital input jacks MD deck DAT deck etc Notes The audio source on a disc in the 5 1 channel Dolby Digital surround format cannot be recorded as digital sound by an MD or DAT deck Set DOLBY DIGITAL to OFF for audio outp...

Page 15: ...ver with Dolby Digital Decoder Fig 5 Manufactured under license from Dolby Laboratories Dolby and the double D symbol are trademarks of Dolby Laboratories If the output is Dolby Digital audio connect to a Dolby Digital decoder and set DOLBY DIGITAL to ON for audio output in the setup mode Unless connected to a Dolby Digital receiver set DOLBY DIGITAL to OFF for audio output in the setup mode Playi...

Page 16: ...or record a video tape If you want to play or record a video tape BEFORE programming the tuner you can cancel it by pressing CLEAR C RESET 1 You need to connect the antenna or cable to the VCR first Then connect the DVD VCR power plug to a standard AC outlet 2 Turn on the TV and set the TV to channel 3 If noise appears change the RF output channel of the VCR to channel 4 by pressing PLAY for 3 sec...

Page 17: ... 2 Select LANGUAGE SELECT by pressing K or L Then press B 3 Select ENGLISH FRANCAIS or ESPAÑOL by pressing K or L Then press CLEAR C RESET If you accidentally select Spanish or French and need English Press MENU and choose SELEC IDIOMA or SELECTION LANGUE Press B and select ENGLISH by pressing Kor L Finally press CLEAR C RESET VCR TO ADD DELETE CHANNELS When scanning some channels may be skipped d...

Page 18: ...e detail 3 Begin playback by pressing PLAY Tracking adjustment will be done automatically Digital Tracking function when you start playback To adjust the tracking manually press SKIP CH on the remote or CHANNEL UP DOWN on the VCR When a tape has reached the end the VCR will rewind the tape to the beginning and eject the tape 4 To stop playback press STOP If no corresponding symbols appear on the d...

Page 19: ... damage 2 Press STOP when the recording is completed Note When you wish to watch another program while recording select desired channel on your TV If noise appears press VCR TV This is not possible when using a cable box or satellite box VCR OTR One Touch Recording This feature allows you to set the recording length sim ply by pressing REC on the VCR 1 Press REC to begin OTR The TIMER light comes ...

Page 20: ...d channel number Then press B 2 Set the frequency of the recording For once Press K or L to point to ONCE For daily Monday Friday Press K or L to point to DAILY For weekly Press K or L to point to WEEKLY Then press B 3 Set the date PROGRAM NUMBER 4 DATE 05 12 MON START TIME 07 30 PM END TIME 08 30 PM CHANNEL 16 REC SPEED SP SP SLP ONE TIME PROGRAM 4 Set the start time First press K or L for the ho...

Page 21: ...the DVD VCR select L2 position by pressing 0 0 2 on the remote control or the CHANNEL UP DOWN 5 Press REC on the recording VCR 6 Begin playback of the tape in the playing VCR For best results during dubbing use the VCR s front panel controls whenever possible The remote con trol might affect the playing VCR s operation Always use video quality shielded cables with RCA type connectors Standard audi...

Page 22: ... disc pictures may stop for a moment This happens when the 1st layer switches to the 2nd layer This is not a mal function PLAYING A DISC 4 Press PLAY The tray will close automatically and playback will then start from the first chapter or track of the disc If the playback does not start automatically press PLAY When you playback the DVD which a title menu is recorded it may appear on the screen In...

Page 23: ... If disc menu is available on the disc audio language subtitle options chapters for the title and other options will appear for selec tion 4 Press Arrow L K s B to select an item and ENTER to confirm selection DVD V CALLING UP A MENU SCREEN DURING PLAYBACK For DVD Vs Press MENU to call up the DVD menu Press TITLE to call up the title menu Note Contents of menus and corresponding menu opera tions m...

Page 24: ...es Zooming function does not work while disc menu is shown x4 zoom is not available on some discs DVD V Using SKIP H G During playback press SKIP G to move the next track Press it repeatedly to skip subsequent tracks Press SKIP H to go back to beginning of the current track Press it repeatedly to go to the previous tracks If SKIP is pressed while the playback is paused the playback will be paused ...

Page 25: ...uence begins 3 To exit the sequence press REPEAT A B Notes The A B REPEAT section can only be set within the current title for DVDs or current track for audio CDs A B REPEAT is not available with some scenes in DVD To cancel the A point which was set press CLEAR C RESET A B REPEAT playback does not function during title chapter track or all repeat playback CD DVD V PROGRAM You may determine the or...

Page 26: ... Press TITLE to return to the first item 2 Press STOP to stop playback MP3 MP3 PLAYBACK Notes Folders are known as Groups files are known as Tracks MP3 files are accompanied by icon Maximum of 255 folders can be recognized Maximum of 256 files can be recognized Up to 8 hierarchies can be created This player recommends the use of files recorded at the below specifications Sampling frequency 44 1kHz...

Page 27: ...able playback 1 Press SUBTITLE during playback 2 Press SUBTITLE repeatedly to select your desired subtitle language The subtitle language will be displayed on the dis play bar at the top of the screen 3 To turn off subtitles press SUBTITLE repeatedly until OFF appears Notes Pressing AUDIO may not work on some DVDs with multiple audio languages e g DVDs which allow audio language setting on the dis...

Page 28: ...xceed your settings with a password or playback will stop This feature allows you to prevent discs with alterna tive scenes from being played by your children DVD V PARENTAL LEVEL Parental Level allows you to set the rating level of your DVD discs Playback will stop if the disc s rat ings exceed the level you set 1 Press SETUP in STOP mode 2 Press B to select CUSTOM then press ENTER 3 Press Arrow ...

Page 29: ... select AC at step 2 and press ENTER will erase all Markers To clear a marker using Arrow s B position the cursor on to the marker number to be cleared and press CLEAR C RESET You can mark up to 10 points 5 Press SEARCH MODE or RETURN to exit DVD SETUP AUDIO SETTING Choose the appropriate Audio settings for your equip ment as it only affect during the playback of DVD discs 1 Press SETUP in STOP mo...

Page 30: ...P in STOP mode 2 Press B to select CUSTOM then press ENTER CUSTOM mode will appear 3 Press Arrow s B to select DISPLAY then press ENTER to confirm 4 Press Arrow K L to select the below items then press ENTER TV ASPECT Press Arrow K L for an item selection then press ENTER Select 4 3 LETTER BOX for a black bars appears on top and bottom of the screen Select 4 3 PAN SCAN for a full height picture wi...

Page 31: ...vian 5961 Mongolian 5960 Nauru 6047 Nepali 6051 Norwegian NOR 6061 O R Occitan 6149 Oriya 6164 Oromo Afan 6159 Panjabi 6247 Pashto Pushto 6265 Persian 5247 Polish 6258 Portuguese POR 6266 Quechua 6367 Rhaeto Romance 6459 Romanian RUM 6461 Russian RUS 6467 S Samoan 6559 Sangho 6553 Sanskrit 6547 Scots Gaelic 5350 Serbian 6564 Serbo Croatian 6554 Sesotho 6566 Setswana 6660 Shona 6560 Sindhi 6550 Sin...

Page 32: ...t Then set it to the TV position by pressing VCR TV Video or color fades in and out You cannot copy a copyrighted video tape You are experiencing copy guard protection when making a copy of a video tape Cannot remove the tape Check if the player is in the VCR mode If not press VCR on the remote control to switch the mode No picture Connect the video cables firmly Insert a correct video disc that p...

Page 33: ... DISC HANDLING Use discs which have the following logos on them Optical audio digital discs Handle the discs so that fingerprints and dust do not adhere to the surfaces of the discs Always store the disc in its protective case when it is not used AUTO HEAD CLEANING Automatically cleans video heads as you insert or remove a cassette so you can see a clear picture Playback picture may become blurred...

Page 34: ...e 127 V AC 10 60 Hz 0 5 Power consumption 24 W standby 7 0 W Operating temperature 41 F 5 C to 104 F 40 C Dimensions W 17 1 8 435 mm H 4 99 mm D 8 7 10 218 mm Weight 8 16 lbs 3 7 kg Designs and specifications are subject to change without notice If there is a discrepancy between languages the default language will be English 0VMN03690 H9413MD Printed in China ...

Reviews: