background image

© 2006 Advanced American Telephones.
All rights reserved.
AT&T and the Globe Design are 
trademarks of AT&T Corp., licensed to 
Advanced American Telephones.

Printed in China. Issue 

Please also read

Part 1 — Important 
Product Information

User's Manual


Part 2

© 200

6

 Advanced American Telephones. All 

r

ights 

r

eserved.

AT&T and the Globe Design are trademarks of AT&T Corp., licensed to Advanced American Telephones.

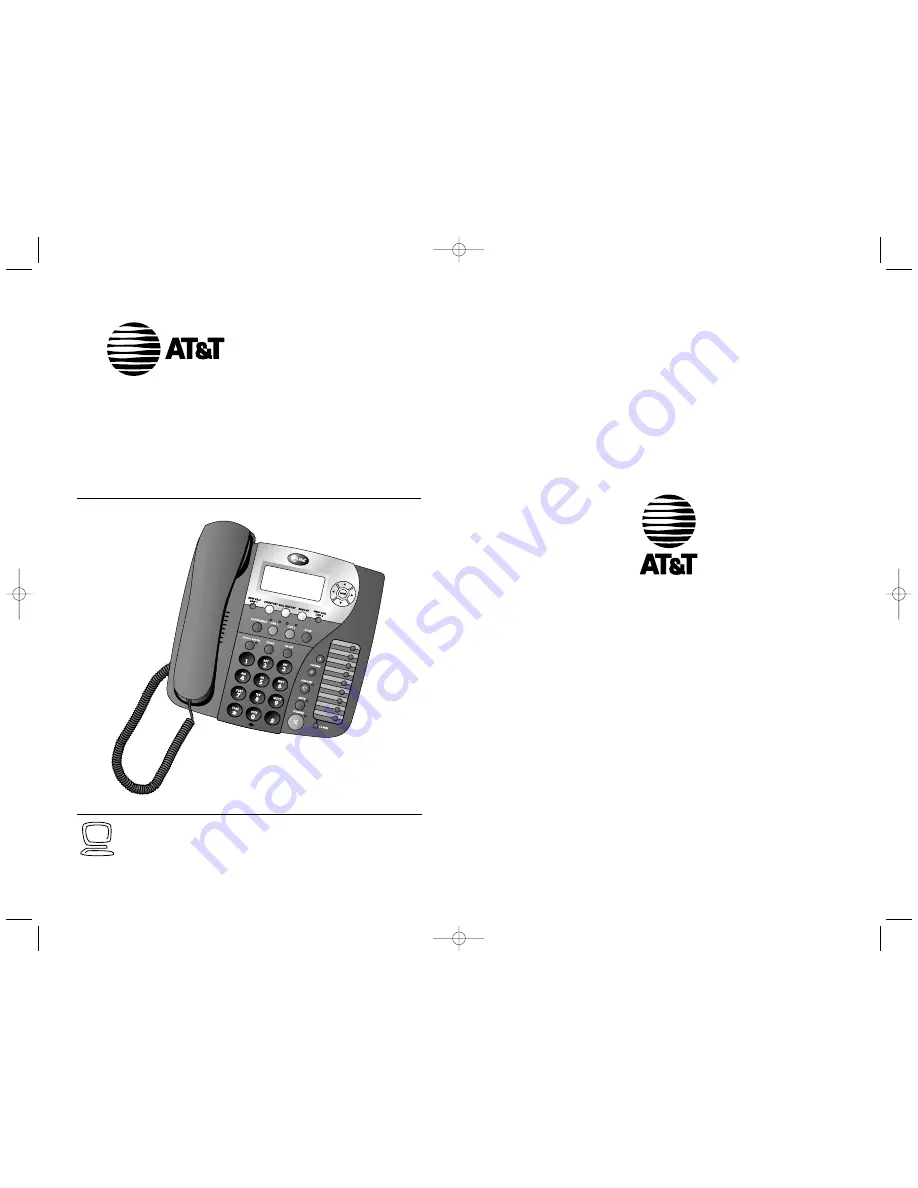
Two-Line Speakerphone with

Caller ID/Call Waiting 992

0992_CIB_1ATT_FINAL_022105  2/22/04  4:46 PM  Page II

 AT&T 05/06

6

www.telephones.att.com

 or call 1(800)222-3111.

In case of difficulty, visit our Service Center at

www.telephones.att.com.

1 (800) 222-3111, or visit our website at

Information, call our toll free number

For Customer Service or Product

Summary of Contents for 992

Page 1: ...Telephones All rights reserved AT T and the Globe Design are trademarks of AT T Corp licensed to Advanced American Telephones Two Line Speakerphone with Caller ID Call Waiting 992 0992_CIB_1ATT_FINAL_022105 2 22 04 4 46 PM Page II AT T 05 06 6 www telephones att com or call 1 800 222 3111 In case of difficulty visit our Service Center at www telephones att com 1 800 222 3111 or visit our website a...

Page 2: ...0992_CIB_1ATT_FINAL_022105 2 22 04 4 47 PM Page ...

Page 3: ...swer or End a Call 25 Switch Between Handset Headset and Speakerphone 26 Timer 27 Volume 27 i CONTENTS CONTENTS CONTENTS 0992_CIB_1ATT_FINAL_022105 2 22 04 4 46 PM Page IV Redial 28 Display Dial 28 Auto Redial 29 Hold 30 Switch Between Lines During a Call 30 Mute 31 Flash 31 Conference Calls 31 Low Battery Indicator 32 Lights and What They Mean 32 ONETOUCH OPERATION 33 Store a Number in a One Touc...

Page 4: ...ce Caller ID services are subscriber services available from many local telephone companies for a fee The backlit screen display allows you to view information on the screen even in low light conditions The 992 also features a 24 number memory for fast dialing and has a directory which can store up to 100 additional numbers with names This User s Manual contains detailed instructions for installin...

Page 5: ...users simply dial the seven digits of a telephone number to make a call within their own area code and 11 digits outside of their area code If this applies to you enter your own area code into the unit as the Home Area Code After programming if there is a call from within your Home Area Code the screen will display the seven digits of the telephone number You may however live in a region where for...

Page 6: ...label covering the display screen 2 Turn the telephone upside down 3 You may want to remove the desk wedge for easier access to the battery cover Push down on the tabs and lift the wedge up and away from the telephone 4 Press the tab and pull to remove the battery cover Insert one new 9V alkaline battery not included following the polarity markings in the battery compartment 5 Replace the battery ...

Page 7: ... then hang up continued on page 8 Table Desk Installation 1 Attach the desk wedge If the desk wedge is not already attached slide the tabs into the holes as shown Snap the wedge onto the base 2 Connect the line cord s to the telephone and your modular wall jack s If there is a single two line wall jack use only the black 4 connector line cord Plug one end into the jack labeled L1 OR L1 L2 on the b...

Page 8: ...LATION INSTALLATION INSTALLATION INSTALLATION Wall Installation 1 Remove the desk wedge If the desk wedge is attached remove it following the directions in Battery Installation beginning on page 5 Store the wedge in a safe place in case this telephone is used on a table or desk in the future 2 Reverse the handset tab Hold down the switchhook and slide the tab up and out of its slot Turn the tab so...

Page 9: ...N INSTALLATION Data port DATA SELECT switch Wall Installation continued from page 9 5 Connect the telephone line cord s to the telephone and the modular wall jack s If there is a single two line wall jack use only the short line cord Plug one end into the jack labeled L1 OR L1 L2 on the back of the telephone Place the cord in the channel under the telephone as shown Plug the other end into the wal...

Page 10: ...ss a key to continue menu operations within approximately 30 seconds the telephone automatically exits the menu When x is displayed on screen press or repeatedly to move through the menu Press E to choose the menu item currently displayed This may be a lower level menu an action or a feature settings screen For example When is displayed on screen press or to scroll through setting options Press or...

Page 11: ...the telephone is on hook automatically initiates a One Touch call or displays the One Touch number without dialing the call If you want to automatically dial the One Touch numbers by pressing a One Touch button without taking the telephone off hook first set Auto Speaker to To view the One Touch numbers on screen press a One Touch button while the telephone is on hook and set the Auto Speaker to T...

Page 12: ...e are set automatically with each incoming call You can set the time and date manually following these instructions 1 Press E to begin feature setup 2 Press until the screen display includes PHONE SETTINGS 3 Press E The screen display includes PRIMARY LINE 4 Press until the screen display includes SET TIME DATE 5 Press E The screen display includes Enter new time and the current setting 6 Use the ...

Page 13: ...TTINGS 3 Press E The screen display includes PRIMARY LINE 4 Press until the screen display includes LCD BACKLIGHT and the current setting 5 Press or to toggle between and 6 When the correct setting is shown press or E to save your choice The screen display includes SCROLL RATE 7 Proceed to step 5 in Set the Scroll Rate below to set the next feature Scroll Rate OR Press and hold E to return to the ...

Page 14: ...d keys and then press to save your entry and scroll to the next Local Area Code LOCAL 2 LOCAL 3 and LOCAL 4 6 When finished entering all of the area codes you need to program press until the screen display includes DONE then press E The screen display includes CALL HISTORY 7 Proceed to step 5 on page 22 to set the next feature Call History OR Press and hold E to return to the idle screen Turn NEW ...

Page 15: ...e 24 to set the next feature Caller ID with Call Waiting OR Press and hold E to return to the idle screen Set Call History You can choose whether or not to store calls in call history 1 Press E to begin feature setup 2 Press until the screen display includes CALLER ID 3 Press E The screen display includes AREA CODES 4 Press until the screen display includes CALL HISTORY and the current setting 5 P...

Page 16: ...med See Set a Primary Line on page 14 When answering a call it automatically selects the ringing line Make Answer or End a Call NOTES Handset To make a call lift the handset and dial the call The number appears on screen when dialing To answer a call lift the handset To override automatic line selection lift the handset then press and release a LINE button OR Press the LINE button for the desired ...

Page 17: ... page 25 Headset Make sure the headset is plugged into the headset jack You will hear an error tone if you press h when the headset is not plugged in To make a call press and release h The HEADSET light goes on Wait for a dial tone NOTE If speakerphone is programmed as the default then dial the call The number appears on screen when dialing To answer a call press h To override automatic line selec...

Page 18: ...aled Handset To dial the same number again lift the handset listen for the dial tone and press R Speakerphone or Headset To dial the same number again press K or h then press R The telephone automatically dials the last number using the Primary Line selected See Set a Primary Line on page 14 To dial the same number using a specific line press K or h press the desired LINE button then press R NOTE ...

Page 19: ...ue the conference call continued on page 32 Hold While on a call press H The red LINE light for the call will flash slowly while the call is on hold You can replace the handset in the cradle without disconnecting the call and the speakerphone or headset is automatically disabled To release hold and return to the call Press the LINE button for the call OR When Automatic Line Selection is set to you...

Page 20: ...1 Press H 2 Press the LINE button of the person with whom you wish to speak privately 3 Press C to continue the conference call To disconnect one party from a conference call and keep the other on the line press the LINE button of the call you want to continue Low Battery Indicator The screen displays when the battery needs to be replaced or when no battery is installed Lights and WhatThey Mean LI...

Page 21: ...o the idle screen If Auto Speaker is turned off see Turn Auto Speaker On or Off on page 14 you can also view the number stored in a One Touch location while the telephone is on hook by pressing the button s for the number to be viewed Store a Number in a One Touch Location NOTE You can store up to 24 digits in each One Touch location If you try to store more than 24 digits the screen will briefly ...

Page 22: ...uch location and leave it empty follow the directions in Store a Number in a One Touch Location beginning on page 34 but do not enter a number The screen display includes 36 ONE TOUCH OPERATION ONE TOUCH OPERATION This telephone can store up to 100 names and telephone numbers in the directory Names can be up to 16 characters long and numbers can be 24 digits long Because directory entries are stor...

Page 23: ...igit Store a Name and Number in the Directory 1 Press D to begin working with the directory 2 Press until the screen display includes ADD ENTRY 3 Press E The screen display includes Enter name 4 Use the dial pad keys and the chart below to enter the letters digits or symbols to be stored Press the key repeatedly until the desired character is shown on the screen For example press 2 once for A twic...

Page 24: ...aracter is displayed Then press or to scroll through the entries beginning with this character If there is no entry for the character you chose the screen will display No Entries OR Press E The screen displays the first directory entry Press or to scroll through the directory entries Edit a Directory Entry Edit a Name in the Directory 1 Find the directory entry you wish to change by following the ...

Page 25: ...s programmed See Home Area Code and Local Area Codes on page 3 for explanations of area codes See Program Home and Local Area Codes on page 21 for programming instructions If the call is from within your Home Area Code the screen displays only the 7 digit number without an area code If the call is from one of the Local Area Codes the screen displays 10 digits area code plus the 7 digit number If t...

Page 26: ...ame and telephone number are included in the display if sent by the caller s telephone company The incoming line number of the call also appears on screen L2 in the above example If two calls come in at the same time the screen displays information about both calls SMITH XJOHN 5550123XXXXXXXL1 BROWN XMARY 5550127XXXXXXXL2 12 08XPMX12 26 SMITH XJOHN 5550123XXXXXXXL2 0992_CIB_1ATT_FINAL_022105 2 22 ...

Page 27: ...istory for the selected line in the order they are received CALLXHISTORY L1X15XCLSX10XNew 05XCLSX00XNew ALLXLINESHHHHHHx 10 27XAMXXX11 12 SMITH XJOHN 5550123XXXXXX CL01 Message Waiting and NEW CALL Light There is a NEW CALL light for each line A NEW CALL light stays on when there is unreviewed call information on that line If you subscribe to a Voice Mail service a NEW CALL light flashes when ther...

Page 28: ...ess E The telephone automatically selects an idle line and dials the displayed number OR Press the LINE button for the desired line and press E to place the call The call is dialed in the preferred mode speakerphone or headset you programmed see Set Preferred Mode on page 16 NOTE To exit without dialing press display includes RETURN TO LIST then press E Dial Options You can change the format of a ...

Page 29: ...T then press E Save a Name and Number from Call History to the Directory 1 Locate the call record you wish to be saved see Review Records in Call History beginning on page 46 NOTE If a call record does not include a telephone number it cannot be saved to the directory 2 Press E The screen display includes DIAL 3 Press until the screen display includes COPY TO DIR 4 Press E to save the name and tel...

Page 30: ... finishing Retain the original packaging in case you need to ship it at a later date 53 GENERAL PRODUCT CARE GENERAL PRODUCT CARE GENERAL PRODUCT CARE 52 DEFAULT SETTINGS DEFAULT SETTINGS DEFAULT SETTINGS FEATURE DEFAULT SpeakerphoneVolume 5 HandsetVolume minimum HeadsetVolume minimum RingerVolume 3 Auto Speaker Off Primary Line Line 1 Automatic Line Selection On Preferred Mode Speakerphone Time a...

Page 31: ... 2 cannot be used Use Line 1 to make your call Unplug the telephone and connect it to another modular jack If it still does not work and other telephones in your home are working the problem is with this phone PROBLEM SOLUTION An ErrorTone Sounds If you try to exit area code programming During Area Code without entering a Home Area Code you Programming will hear an error tone Follow the instructio...

Page 32: ...onnected properly Lights Inspect the line cord connections at the modular jack s and at the telephone Also inspect the coiled handset cord connections at both ends PROBLEM SOLUTION A NEW CALL Light Make sure you have reviewed all of the new Flashes calls in call history If you have reviewed the entire call history and the NEW CALL light remains lit but is flashing your phone may have received a fa...

Page 33: ...allowed 34 3 12 13 37 3 12 13 37 12 3 12 13 37 3 12 13 37 x 12 34 A ADD ENTRY 38 All Calls 22 ALS ON OFF 15 alternate dialing formats 49 Auto Redial 29 R 28 29 34 39 Auto Speaker 14 35 36 automatic line selection 15 25 26 29 B 5 32 57 battery 5 32 55 battery cover 5 buzz 4 C Call Cannot Be Dialed or is Dialed Slowly 55 call history 21 23 44 46 50 56 C 46 47 call information 45 47 call record 48 50...

Page 34: ... 12 scroll button 13 scroll rate 18 Separate 23 speak privately 32 K 25 28 29 36 42 49 SPEAKER light 25 speakerphone 16 25 26 28 30 36 42 49 Speakerphone Does Not Work 57 switch lines 30 switchhook 31 T Telephone Does Not Ring 56 three ascending tones 4 three beeps 4 27 Three Way Calling 31 time 17 44 47 timer 27 V Voice Mail 19 46 56 volume 27 VOLUME 27 VOLUME 27 W W in display 35 wait 39 WAIT 35...

Reviews: