background image

USER’S MANUAL 

DH-900S/DH-902S/DH-903S/DH-905S 
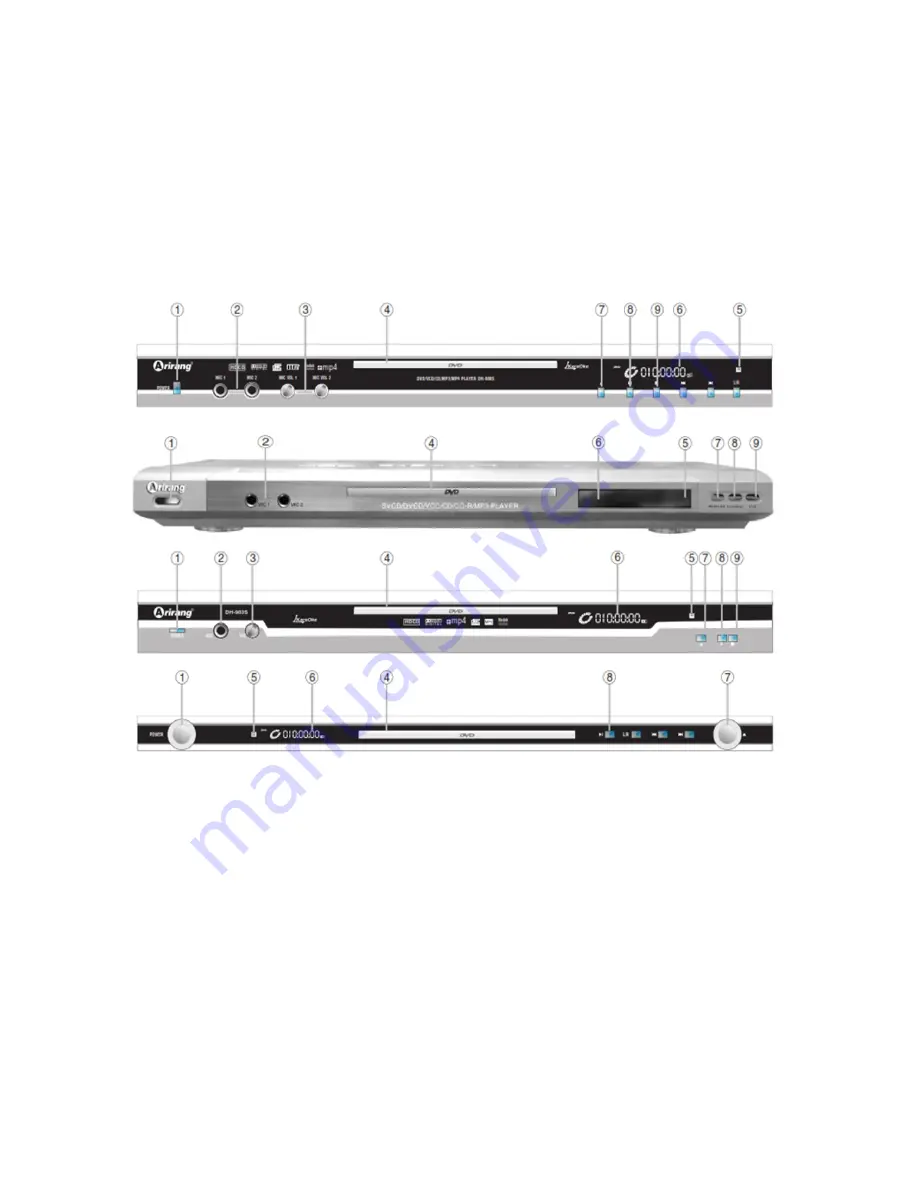
Name Of Each Part 

* Front panel 


(1)


POWER (Power) 

(2)


MICROPHONE JACKS (Mic port) 

(3)


MIC VOL (Adjust volume of micro) 

(4)


DOOR TRAY  (Disc tray) 

(5)


REMOTE SENSOR (Eye received signal from remote control) 

(6)


FLT DISPLAY (Display clock) 

(7)


OPEN/CLOSE (Load/eject disc tray) 

(8)


PLAY/PAUSE (Play/pause) 

(9)


STOP (Stop) 


Summary of Contents for DH-900S

Page 1: ...t Front panel 1 POWER Power 2 MICROPHONE JACKS Mic port 3 MIC VOL Adjust volume of micro 4 DOOR TRAY Disc tray 5 REMOTE SENSOR Eye received signal from remote control 6 FLT DISPLAY Display clock 7 OPEN CLOSE Load eject disc tray 8 PLAY PAUSE Play pause 9 STOP Stop ...

Page 2: ...d Rear panel 1 Audio 5 1 Output 5 1 audio port 2 Video Component Component video port 3 Video out Video port 4 Optical Optical digital audio port 5 S Video Super video port 6 Coaxial Coaxial digital audio port 7 Stereo L R Stereo L R audio port 8 Joystick 1 2 Game connection port 9 VGA Computer screen connection port 10 USB USB port ...

Page 3: ... be inserted in right polarity of the battery and remote control avoid the situation that the battery is inserted in incorrect polarity or the battery is tilted Open the cover Insert batteries into remote control Make sure for installing in right polarity Close the cover ...

Page 4: ... clip 18 STOP Stop the disc being played 19 PAUSE Pause the disc being played 20 MIC Allowed not allowed using Micro 21 VGA Select the mode outputting picture to monitor in order to connect with computer screen 22 P N Select audio mode according to Pal NTSC or Auto 23 OPEN CLOSE Load eject disc tray 24 NUMBER KEYS Keys of numbers to select track chapter 25 SEARCH Search for chapter track 26 TITLE ...

Page 5: ...ote Not illuminated by the light Not use poor quality battery not use an old battery and a new battery Connect to microphone Connect to Microphone 6 millimeter Jack Note Use micro with Analog audio output not connect to digital audio ...

Page 6: ...BASIC CONNECTIONS 1 Connect to TV 2 Connect to audio device TV Video AV port Component video port S Video audio port Audio AV port L R TV Video AV port Connect to Amplifier input Audio AV port ...

Page 7: ...ct the different video outputs at the same time Before connecting to audio devices read the instructions attached carefully Turn off the device before connecting to equipments Should not connect DVD device to Video VCR device 3 Connect to digital Amplifier 5 1 audio output Coaxial audio output Optical audio output Connect to amplifier output ...

Page 8: ...nter to setup screen Use Up Down Left Right key to move to items Use SELECT key to select SYSTEM SETUP SOURCE DISC USB TV SYSTEM VIDEO TV TYPE PASSWORD RATING DEFAULT EXIT SETUP 1 1 TV System Select color system appropriate with TV color system normally in Auto 1 2 Video ...

Page 9: ... appropriate with the wire connection at the back side of the device Normally select TV RGB for normal wire connection 1 3 TV Type 4 3 PS Play in full width of the screen 4 3 LB Play in full height of the screen 16 9 wide screen mode ...

Page 10: ...ating to set the lock scale Include 4 characters of number the original default of manufacturer is 0000 1 5 Rating Set the children lock scale to limit unwholesome movie contents Kid Safe highest lock scale Adult lowest lock scale 1 6 Default ...

Page 11: ... default of manufacturer II Language Setup OSD language displayed language Audio language voice over language Subtitle language caption language Menu language menu language 2 1 OSD Language Have 2 types of language for user to choose English Chinese ...

Page 12: ...nguage for user to choose Chinese English Japan French Spanish Portuguese Latin German 2 3 Subtitle Language Have 7 types of caption language for user to choose Chinese English Japan French Spanish Portuguese German If no need the caption select Off ...

Page 13: ...s of menu language for user to choose Chinese English Japan French Spanish Portuguese German Latin III Audio Setup AUDIO OUT Select audio output MIC SETUP Micro setup ECHO Adjust the echo MIC VOL Volume of micro KEY Adjust song key ...

Page 14: ...3 1 Audio Out SPDIF OFF use normal AV wire SPDIF RAM use fiber optic cable SPDIF PCM use coaxial cable 3 2 MIC Setup AUTO the device will automatically turn on micro when the user plug in OFF off ...

Page 15: ...3 3 Echo Adjust the echo for micro have 5 levels 3 4 Mic Vol Adjust volume of micro 3 5 Key ...

Page 16: ...t the song key move the slide bar to increase or decrease the key IV Video Setup Brightness Contrast Hue Saturation 4 1 Brightness Use to adjust the brightness for the screen have 7 levels for user to choose ...

Page 17: ...4 2 Contrast Use to adjust the contrast of picture have 7 levels to choose 4 3 Hue Use to adjust the color of picture have 7 levels for user to choose 4 4 Saturation ...

Page 18: ...evels for user to choose V Speaker Setup Use to change the speaker mixing method with rear audio signals in DVD play Have 4 levels LT RT STEREO VSS 5 1 CH Helps turn on off the subwoofer Have 3 modes for user to choose ALL LG SPK ALL SM SPK MIXED SPK ...

Page 19: ...to adjust the delay of center speaker only have in 5 1 speaker system Have 4 levels to choose Use to adjust the delay of rear speaker only have in 5 1 speaker system Have 4 levels to choose VI Digital Setup ...

Page 20: ...ode DYNAMIC RANGE linear compression rate DUAL MONO output signal 6 1 Op Mode Have 2 modes for user to choose LINE OUT RF MODE 6 2 Dynamic Range Use to adjust the linear compression rate of the signal 6 3 Dual Mono ...

Page 21: ...disc in 2 channels SPECIFICATIONS Voltage 110 220VAC 50 60Hz Power Consumption 20W Weight 2 0Kg Compatible with DVD DVD R SVCD VCD CD R CD RW Mp3 WMA Mp4 Jpeg Output Video 1VP P 750 S Video Y 1VP P 750 C 0 286 VP P 750 Component Y 1VP P 750 Pb 0 7 VP P 750 Pr 0 7 VP P 750 Audio 5 1CH 2Vrms max Input Microphone 10mV 600Ω ...

Reviews: