background image

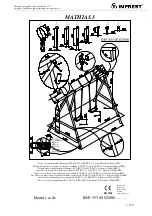
2 SEATER SWING HAMMOCK

Dimensions

Important


– Please read these instructions fully before starting assembly

If you need help or have damaged or missing parts, call the

 Customer Helpline: 

Argos = 0

345

 6400800  

Assembly Instructions 

- Please keep for future referenc e

Width -  151 cm
Depth -  113 cm
Height - 154 cm

ISTR.675 - 09/12/15

450/4272

Summary of Contents for 450/4272

Page 1: ...instructions fully before starting assembly If you need help or have damaged or missing parts call the Customer Helpline Argos 0345 6400800 Assembly Instructions Please keep for future referenc e Widt...

Page 2: ...ause damage Assemble the item as close to its nal position in the same room as possible Assemble on a soft level surface to avoid damaging the unit or your oor Parts of the assembly will be easier wit...

Page 3: ...00 Back leg x 2 137 5x4 5 cm 1 Front leg x 2 150x34 cm 2 Top x 1 178 x 35 cm 3 Roof bar x 2 118 x 17 cm 4 Roof pole x 2 169 x 1 5 cm 5 Seat support x 2 150 x 48 cm 6 Amrest x 2 66 x 21 cm 7 Seat suppo...

Page 4: ...some cases more ttings may be supplied than are required 0 5 10 15 20 25 30 35 40 45 50 55 60 65 70 75 80 85 90 95 100 110 115 120 125 130 135 140 145 150 155 160 165 170 105 Components Fittings The...

Page 5: ...below are the correct amount to complete the assembly In some cases more ttings may be supplied than are required x 2 V 28 x 8 O P N x 4 U 45 x 2 R 45 x 4 S x 8 T Components Fittings Spring x 2 x 2 2...

Page 6: ...2 1 2x 2x Insert the plastic foot Q onto the end of the back legs 1 Q 1 a Insert the plastic cap P into the end of front legs 2 Note Pay attention to the position of the holes b Insert the plastic fo...

Page 7: ...K K H 2 1 1 3 3 1 1 2 2 2x Assemble back leg 1 and front leg 2 together with plastic spacer O using screws A washers K and nuts H Note Do not fully tighten bolts Repeat with the remaining legs 1 2 O...

Page 8: ...D D L L L L I I 9 2 D L L I 2x x the plastic caps S onto the side bar 9 S 9 Assemble the side bar 9 with the legs using screws D washers L and nuts I Note Pay attention to the position of the holes 9...

Page 9: ...emble the cross bar 10 with the back legs using screws B washers L and nuts I Note Do not fully tighten bolts 10 I B L Insert the plastic caps V into the end of the other cross bar 10 10 V Assemble th...

Page 10: ...I I 7 7 7 E E L L L L I I 6 6 E E 2x Insert the plastic caps V into the end of the armrests 7 V 7 Assemble the two seat support 6 together using screws D washers L and nuts I 6 D I L Assemble the left...

Page 11: ...E E 8 F L 6 L I 8 F 4x Assemble the right armrest 7 with the seat support 6 using screws E washers L and nuts I 6 7 E L I Fix the plastic caps T onto the seat support bar 8 8 T Assemble the left back...

Page 12: ...ight back seat support bar 8 to the seat support 6 using screw F washers L and nuts I 6 8 L F I Assemble the left front seat support bar 8 to the armrest 7 using screw F washers L and nuts I 7 8 F L L...

Page 13: ...Instructions Step 21 Step 22 N 3 J J G G 3 Step 20 8 8 N N N 2x Insert the springs N into the seat support bars 8 8 N Fix the spring N to the top 3 N 3 Fix the nuts J to the pin G deep in the longest...

Page 14: ...t R by the shortest thread Push it as far as the nut J touches the plastic joint R G R R J Fix the plastic joint R to the top 3 using the washer L and the nut I Note the longest thread of the pins G h...

Page 15: ...4 5 5 Step 26 11 11 5 5 5 5 Insert the roof poles 5 into the canopy s slots 11 Note Let the roof poles pass through the complete slots 6 11 5 Insert the roof poles 5 into the assembled roof bar 4 5 4...

Page 16: ...15 Assembly Instructions Step 29 4 U M U M Fix the other roof bar 4 to the pin G using the washer M and the wheel U G M U 6 4 Tighten completely all bolts Assembly is complete...

Reviews: