ANT UNO G8 Series, User Manual
The ANT UNO G8 Series product offers cutting-edge technology and convenience. Ensure seamless installation and optimal performance by downloading the free User Manual from our website. Dive into advanced features and troubleshooting tips to maximize your product experience. Visit manualshive.com and experience hassle-free access to the comprehensive manual.
Share
Download


Reviews:
No comments
Related manuals for UNO G8 Series

UltraShift PLUS
Brand: Eaton Pages: 2

SR30
Brand: Earthworks Pages: 2

Authentics L8
Brand: JBL Pages: 16

Authentics L 16
Brand: JBL Pages: 17

SC-HC402
Brand: Panasonic Pages: 28

WM-5220
Brand: Toa Pages: 4

MICRO1470DABI
Brand: Goodmans Pages: 22

SG888ZB
Brand: Salus Pages: 76

KAI-1P
Brand: D-Box Pages: 12

CONNECTIONS
Brand: NAIM Pages: 31

Mic Mate Pro
Brand: MXL Pages: 6

TP - 100
Brand: W Audio Pages: 10

4E-CMP
Brand: 4EVAC Pages: 11

D.R.K.
Brand: MXL Pages: 2

Studio Pro 126-03
Brand: Sandberg Pages: 17

TCM 1150
Brand: Nady Systems Pages: 2

SC-PMX100B
Brand: Panasonic Pages: 24
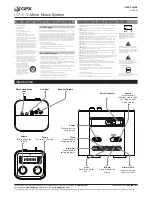
HM102B
Brand: GPX Pages: 2


