background image

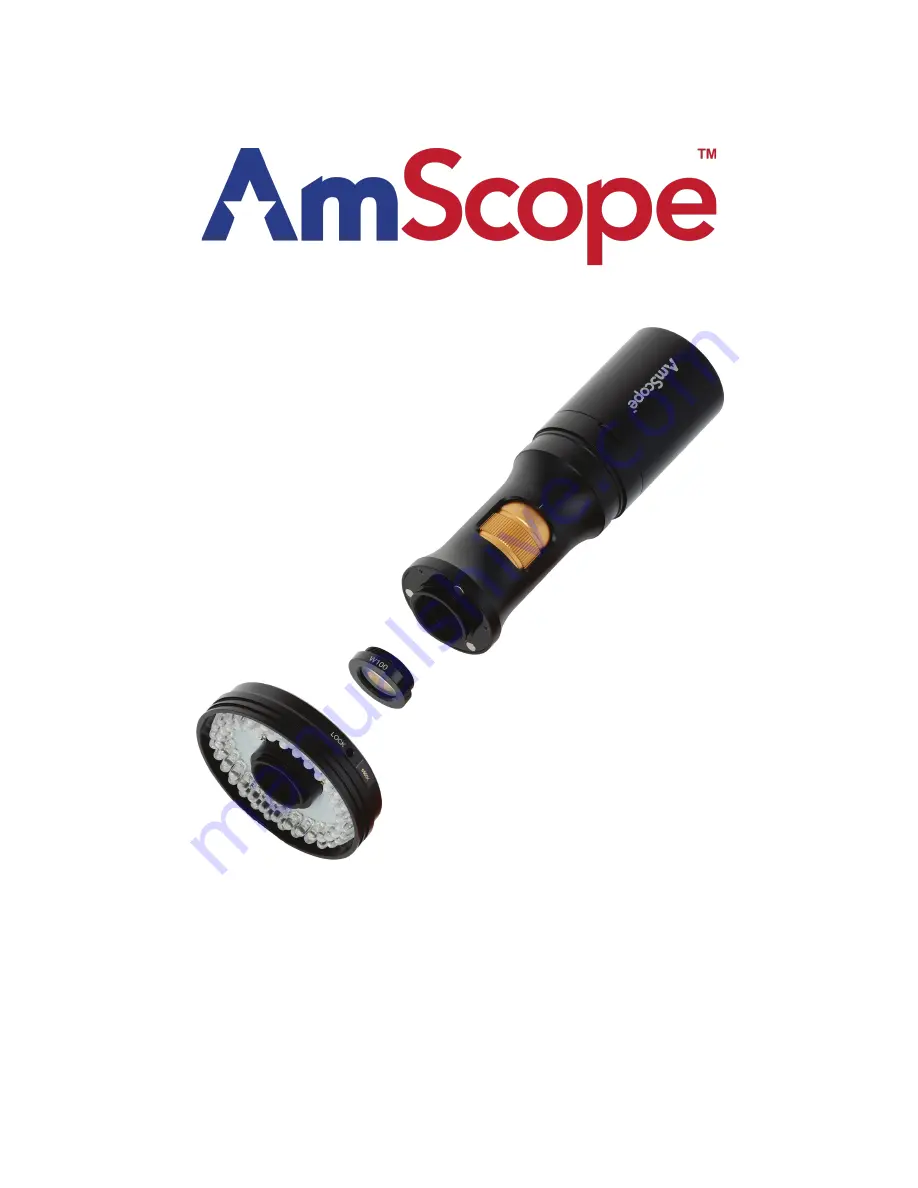
DM756 Series Digital Microscopes

Introduction

This manual applies to the DM756 line of digital microscopes and accessories. The information in this manual is provided 

to help you familiarize yourself with the assembly and use of the products. Please read thoroughly before using the prod-

ucts, and keep this manual with the product for reference.

This product line includes multiple variations with different specifications.

v1.0.202205

Summary of Contents for DM756 Series

Page 1: ...ssories The information in this manual is provided to help you familiarize yourself with the assembly and use of the products Please read thoroughly before using the prod ucts and keep this manual with the product for reference This product line includes multiple variations with different specifications v1 0 202205 ...

Page 2: ...se damage to the instrument If you should lose the included power adapter please contact AmScope for information about a replacement Do not dismantle Dismantling can result in damage to the instrument and potential exposure to dangerous materials or electric current Notices AmScope reserves the right to change specifications of the hardware and software at any time without notice Continuous effort...

Page 3: ...Collar 14 USB Models 15 USB Wi Fi Models 16 AmScope Imaging Software 16 ToupView App 16 USB Mode 16 Using a Computer 16 Wi Fi Mode 16 Connecting to a Power Source 16 Using a Computer 16 HDMI Models 17 Setup 17 User Interface 17 The Camera Control Panel 18 Image Exposure 19 Manual Exposure 19 Auto Exposure 19 Color 19 White Balance 19 The Measurement Toolbar 20 The Camera Control Toolbar 22 Setting...

Page 4: ...DM756 User Guide Page 4 1 3 way multi function switch 2 50mm mounting groove 3 zoom wheel 4 ring light 5 USB port 1 2 3 4 5 DM756 U830 ...

Page 5: ... Sensor Area 5 57mm x 3 13mm Shutter electronic rolling shutter Sensitivity 300mV 1 30s f 5 6 Exposure Time 0 01ms 1000ms Spectral Response 380 650nm with IR cut filter Capture Resolution and Maximum Framerate 30fps 3840x2160 30fps 1920x1080 30fps 1280x720 30fps 960x540 Connectivity USB 2 0 Power 5VDC 1A over USB AC adapter included Operating Conditions 10 C to 50 C 30 80 relative humidity Storage...

Page 6: ...DM756 User Guide Page 6 1 3 way multi function switch 2 50mm mounting groove 3 zoom wheel 4 ring light 5 antenna 6 wi fi activity LED 7 USB port 8 power LED 1 2 3 4 5 5 6 7 8 DM756 W1080 ...

Page 7: ... 13mm Shutter electronic rolling shutter Sensitivity 1300mV 1 30s f 5 6 Exposure Time 0 01ms 1000ms Spectral Response 380 650nm with IR cut filter Capture Resolution and Maximum Framerate 50fps 1920x1080 USB 50fps 1920x1080 wi fi Connectivity USB 2 0 wi fi Wi Fi Standard 802 11b g n Wi Fi Mode access point AP Power 5VDC 1A over USB AC adapter included Operating Conditions 10 C to 50 C 30 80 relati...

Page 8: ...uide Page 8 1 3 way multi function switch 2 50mm mounting groove 3 zoom wheel 4 ring light 5 HDMI port 6 power LED 7 USB mouse port 8 12VDC power port 9 Secure Digital reader recorder 1 2 3 4 5 8 9 7 6 DM756 H1080 ...

Page 9: ...ronic rolling shutter Sensitivity 1300mV 1 30s f 5 6 Exposure Time 0 01ms 1000ms Spectral Response 380 650nm with IR cut filter Capture Resolution and Maximum Framerate 60fps 1920x1080 HDMI 50 60fps 1920x1080 SD Connectivity HDMI video out v1 4 standard USB input mouse Media Reader Writer Secure Digital SDIO 3 0 standard Video Format H264 H265 encoded MP4 Power 12VDC 1A Operating Conditions 10 C t...

Page 10: ...ond stage is performed by the internal zoom optics which provide 0 7X 5 6X magnification These stages compound to create the optical magnifications which are typically listed A third stage is used to compensate for the format of the digital image sensor This document refers to this stage as integrated reduction since the purpose is to reduce the size of the image to optimize the field of view for ...

Page 11: ...ightness in stepped graduations The illuminator must be compatible with the microscope s magnetic mount for the switch to function Move the switch to the left to decrease the illuminator s brightness Move the switch to the right to increase the illuminator s brightness When the switch is pressed inward it will actuate the camera to capture an image For standalone HDMI models the image will be capt...

Page 12: ...otating the wheel to the left will increase the magnification until it reaches 5 6X The instrument s overall optical magnification depends on the attached objective lens For this reason the magnifications associated with the zoom wheel are considered multipliers rather than absolute For example when the zoom wheel is set to 2X and the standard 1X objective lens is attached the optical magnificatio...

Page 13: ...nting surface of the microscope It is possible to attach the ring light without proper alignment of the pins but the attachment will not receive power Once the pins are aligned guide the ring light toward the micro scope s mounting surface until it snaps in place The ring light will have a hex screw attached to the outer sleeve This can be used to secure the attachment Using a 1 5mm hex wrench rot...

Page 14: ...bove the zoom dial at which point the microscope should be properly seated and unable to be lowered any further Rotation of the microscope can verify that it is properly seated Align the logo on the microscope with the front of the collar then tighten any locking screws enough to prevent further rotation Mounting to a 76mm Collar To mount the microscope to a 76mm collar the AD SZ76 adapter must be...

Page 15: ...essed from the software s menu under Help USB type B left and USB type A right connectors A split USB cable is included for connecting to a computer The cable s three connectors include one type B and two type A Begin by plugging the type B connector into the microscope s USB port The primary data Type A connector has two wires attached and should be plugged into a USB 2 0 or faster port on the co...

Page 16: ...he top left corner a camera list will display the model of the microscope Click on the appropriate model to initialize the live video feed More information regarding the software is available in the software s help file which can be accessed from the software s menu under Help Wi Fi Mode When the microscope is connected to a power source other than a computer it will default to wi fi mode In this ...

Page 17: ...itor Once everything is connected a cursor will appear on the viewing device User Interface The HDMI model uses an on screen UI to operate The camera controls are located in the panel on the left side of the window the measurement toolbar on the top and additional display controls and settings are on the bottom By default the panels will only display when the mouse cursor is hovering over the appr...

Page 18: ...but will result in increased noise levels Red Manually adjust the proportional Red level of the RGB video Green Manually adjust the proportional Green level of the RGB video Blue Manually adjust the proportional Blue level of the RGB video Auto White Bal ance Continuously adjusts RGB levels automatically based on the overall video content Manual White Balance Enables the manual RGB controls to adj...

Page 19: ...he subject changes the amount of light collected will also change Auto exposure can continuously compensate for these changes This method assumes that the optimal amount of light would create an image with levels which would average to a middle tone Because of this images of light subjects may appear too dark and images of dark subjects may appear too bright For this reason adjustment can be done ...

Page 20: ... Point Angle Point Arbitrary Angle Line 3 Point Lines Horizontal Line Vertical Line Parallel 3 Points Vertical Line Rectangle Ellipse 5 Point Ellipse Circle 3 Point Circle Annulus Concentric Circles The Measurement Toolbar The Measurement Toolbar will pop up when moving the mouse cursor toward the upper edge of the video window This panel contains tools and settings for performing measurements ...

Page 21: ...he use of a micrometer slide Export measurement information to CSV file Delete measurement object Exit measurement mode Left clicking on a measurement object will open the Object Location Properties Con trol Bar The icons on the control bar Move Up Move Down Move Left Move Right Adjust Color Delete When the Pin icon is clicked to lock the Measurement Toolbar the Camera Control Panel will not be di...

Page 22: ...e viewer Global Precision Sets the decimal scale number of digits after a decimal point Calibration Line Width Sets the width of lines used for calibration Color Sets the color of lines used for calibration Endpoint Sets the shape used at each endpoint of a line Includes null or rectangle Point Angle Line Horizontal Line Vertical Line Rectangle Circle Ellipse Annulus Two Circles Polygon Curve Each...

Page 23: ...n of the objective lens used and additional information pertaining to the microscope or camera used Resolution The number of pixels per meter Clear All Clears all saved calibration data Delete Clears the selected calibration data Image Format Image Format settings allow you to determine whether measurement objects will be merged into saved images or em bedded as a separate layer Measurement Object...

Page 24: ...os Video Encode H264 Older AVC video codec with better compatibility across multimedia de vices but less efficient compression compared to H265 H265 Newer HEVC video codec with improved compression while retaining high quality Storage Storage displays the format of the current SD card s file system such as FAT32 exFAT and NTFS Unformatted cards must be formatted on a computer or other device Langu...

Page 25: ...uto Exposure mode Setting a lower number can improve the frame rate ROI Color Select the color of the Region of Interest ROI frame Camera Parameters Import Import previously saved parameters from the SD card Camera Parameters Export Export current parameters to the SD card Reset to Factory defaults Restore all parameters to the factory default values ...

Reviews: