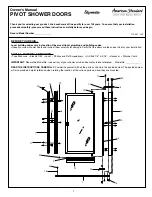
background image

1

Owner’s Manual

PIVOT SHOWER DOORS

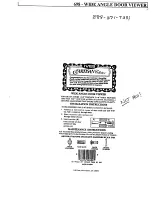
Thank you for selecting our product...the benchmark of fine quality for over 100 years. To ensure that your installation 
proceeds smoothly--please read these instructions carefully before you begin.

7 1 0 0 0 7 - 1 0 0

BEFORE YOU BEGIN...

Local building codes vary by location. Observe all local plumbing and building codes.

Unpack your new shower doors and inspect them carefully for damage. Verify that the doors are the correct size for your installation. 

TOOLS & MATERIALS REQUIRED...

• Tape Measure   • Electric Drill   • Level   • Phillips and Flat Screwdrivers   • Drill Bits 1/8" & 3/16"   • Hacksaw   • Silicone Caulk

IMPORTANT

: Record the Model No. (see carton) of your shower or tub enclosure for future reference.     Model No. ____________

READ THE INSTRUCTIONS CAREFULLY

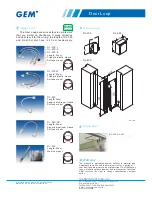
: Familiarize yourself with all the parts as shown in the exploded view. The exploded view 

will also provide a helpful reference when relating the location of the various parts and how they are mounted. 

22

18

19

8

21

6

12

13

11

23

5

3

15

4

14

22

10

9

24

16

20

17

7

1

Record Model Number _______________

Summary of Contents for Showerite Owner’s

Page 1: ...oors are the correct size for your installation TOOLS MATERIALS REQUIRED Tape Measure Electric Drill Level Phillips and Flat Screwdrivers Drill Bits 1 8 3 16 Hacksaw Silicone Caulk IMPORTANT Record the Model No see carton of your shower or tub enclosure for future reference Model No ____________ READ THE INSTRUCTIONS CAREFULLY Familiarize yourself with all the parts as shown in the exploded view T...

Page 2: ...threshold which will be pivot side Mark the OPPOSITE end for drilling Cut threshold to size W measured in step 1 5 Attach top pivot arm to top of the pivot jamb using three 8 x 5 8 Phillips head screws Ensure pivot jamb fits in slot in pivot arm 8 x 5 8 Flat Head Screw Actual Size 6 Position assembled pivot jamb to wall with threshold centered on the shower base Mark holes in jamb for drilling Use...

Page 3: ... or plastic walls use a 1 8 drill bit and do not use screw anchors Apply 1 4 bead of silicone caulk where bottom of pivot jamb and threshold meet see inset detail Mount assembled pivot jamb to wall using six 8 x 1 1 2 flat head screws 9 Subtract door panel width DW from length W in step 1 If difference is from 1 3 4 to 3 1 8 use the minimum hole If difference is from 3 1 8 to 4 1 2 use maximum hol...

Page 4: ...CREW 8 X 2 PAN HEAD SCREW ADJUSTMENT SCREW 8 X 1 FLAT HEAD SCREW FOR NS MODELS ADJUSTMENT RAIL MOUNTING SCREW 8 X 1 1 2 FLAT HEAD SCREW FOR NS MODELS ADJUSTMENT SCREW 8 X 5 8 FLAT HEAD SCREW 15 Caulk where wall jamb meets wall for entire height of unit on both inside and outside of shower Caulk where threshold meets base on outside of unit only Allow 24 hours for silicone to cure before using show...

Page 5: ...SITIONING SPACER FW269 FW269 1 17 SCREW ANCHOR PSA1 PSA2 12 18 8 x 1 FLAT HEAD SCREW 81 F 858 F 3 19 8 x 2 1 2 FLAT HEAD SCREW 8212 F 82 F 3 20 PLASTIC PLUG DCP1 DCP2 1 21 8 x 2 PAN HEAD SCREW 82 P 8112 F 3 22 WALL JAMB CAP WJC WJC 1 23 8 x 5 8 FLAT HEAD SCREW 858 F 858 F 3 24 8 x 1 PAN HEAD SCREW 81 P 81 P 1 HOW TO CARE FOR YOUR ENCLOSURE Do not use scouring powder pads or sharp instruments on me...

Page 6: ...a o el concesionario a quien o mediante quien se adquirió el producto o que se envíe una solicitud de servicio incluyendo una descripción del modelo del producto y del defecto a los siguientes junto con un comprobante de compra o el recibo original AS AMERICA INC LIMITED LIFETIME WARRANTY FOR SHOWER DOORS AS America Inc American Standard warrants to the original consumer purchaser that it will at ...

Reviews: