ALW SuperPlane 4, Installation Instructions Manual
The ALW SuperPlane 4 is a high-performance aircraft equipped with state-of-the-art features. Ensure a seamless installation process by referring to our comprehensive Installation Instructions Manual. This essential manual is available for free download, exclusively at manualshive.com, providing step-by-step guidance for an effortless setup and optimal utilization of your SuperPlane 4.
Share
Download


Reviews:
No comments
Related manuals for SuperPlane 4
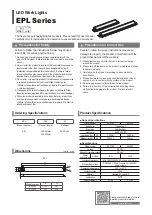
EPL Series
Brand: Qlightec Pages: 2

Emmy
Brand: ZAZU Pages: 33

Metalux WE Series
Brand: Cooper Lighting Pages: 1

KAGULUX
Brand: BaltLED Pages: 3

Protozoa
Brand: Stoane Lighting Pages: 4

TY623-1914-1
Brand: Home Accents Holiday Pages: 2

EXP-EMG-EXT-LE6-4L
Brand: Larson Electronics Pages: 9

PEL01012
Brand: Pro-Elec Pages: 4

CKU-2060
Brand: ColorKey Pages: 9

Westek BL-BR33M-SW
Brand: AmerTac Pages: 2

ULTRA HEX PAR3
Brand: ADJ Pages: 14

3MC
Brand: Klarstein Pages: 84

66433
Brand: Chicago Electric Pages: 11

COMBOLIGHT GRF Series GRF420
Brand: RSA Lighting Pages: 1

XR8 SPOT
Brand: DTS Pages: 36

Mini Par 12
Brand: Solena Pages: 13

MotionDrape LED
Brand: Chauvet Pages: 16

Nexus
Brand: Chauvet Pages: 32


