
DOCK
4
2
3
1
4
5
6
A
B
C
2
C
1
3
5
6
3.5”
A
2.5”
B
5
1
2
3
4
Highlights and Application
Operating Instructions
Your order has been carefully packaged and inspected. The following should be included in your package. Please
inspect the contents of the package to ensure that you have received all items and that nothing has been damaged.
If you discover a problem, please contact us immediately for assistance.
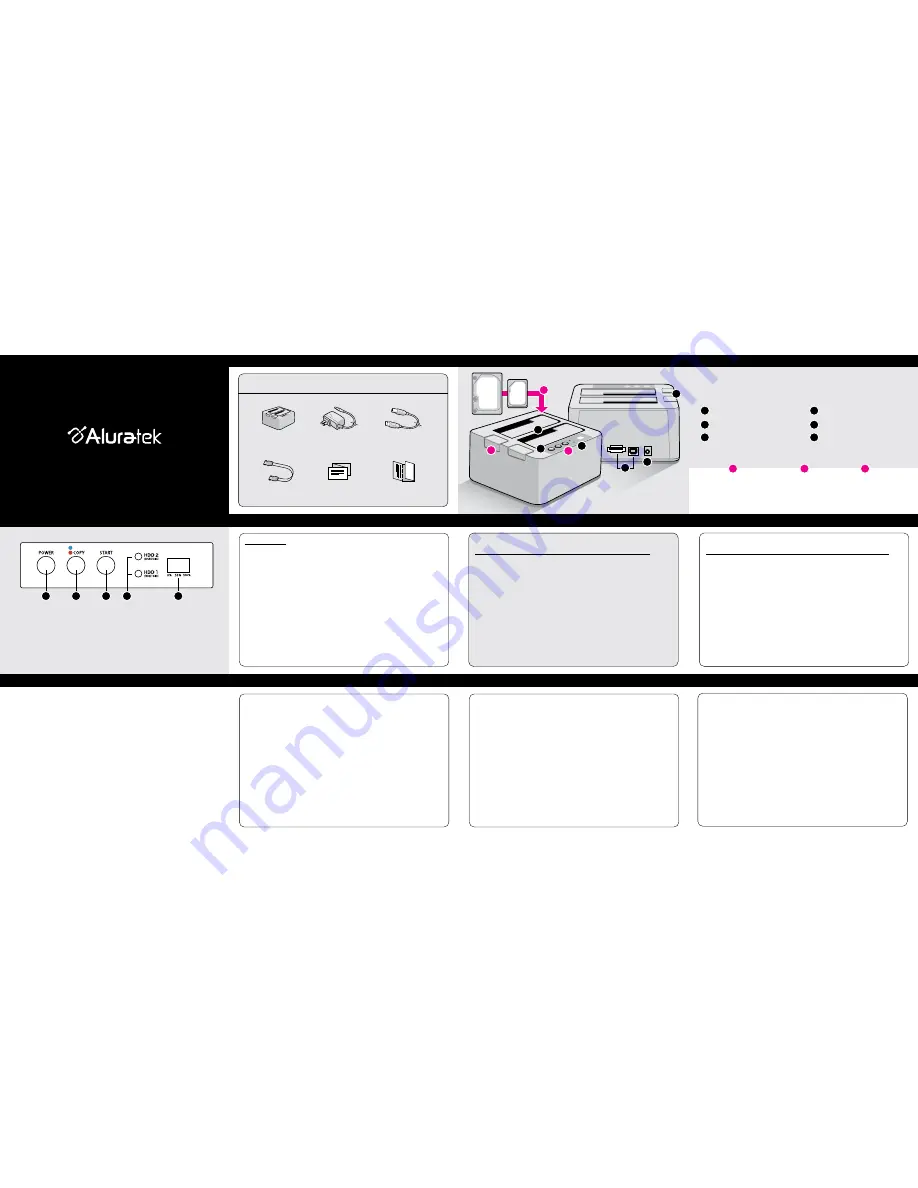
Package Contents
Radio and TV Interference Statement
Aluratek warrants this product against defect in material or workmanship for
1 YEAR
from the date of purchase.
This warranty becomes invalid if the factory-supplied serial number or "warranty void"
sticker has been removed or altered on the product.
This warranty does not cover:
A) Cosmetic damage or damage due to acts of God
B) Accident, misuse, abuse, negligence or modification of any part of the product.
C) Damage due to improper operation or maintenance, connection to improper equipment,
or attempted repair by anyone other than Aluratek.
D) Products sold AS IS or WITH FAULTS.
IN NO EVENT SHALL ALURATEK'S LIABILITY EXCEED THE PRICE PAID FOR THE
PRODUCT FROM DIRECT, INDIRECT, SPECIAL, INCIDENTAL, OR CONSEQUENTIAL
DAMAGES RESULTING FROM THE USE OF THE PRODUCT, IT'S ACCOMPANYING
SOFTWARE, OR IT'S DOCUMENTATION.
Aluratek makes no warranty or representation, expressed, implied, or statutory, with
respect to it's products, contents or use of this documentation and all accompanying
software, and specifically disclaims it's quality, performance, merchantability, or fitness for
any particular purpose. Aluratek reserves the right to revise or update it's product, software
or documentation without obligation to notify any individual or entity.
Warranty
External SATA Hard Drive Duplicator
qsg Q10113
Copyright © 2012 Aluratek, Inc. All Rights Reserved.
aluratek.com
Quick Start Guide
AHDDUB100
Control Panel Close-Up
SATA HDD Duplicator
Warranty & Registration Card
USB 2.0 Cable
Power Adapter
Quick Start Guide
sSATA Cable
If you need further assistance, please contact the Aluratek support department
for troubleshooting prior to returning this device.
E-mail:
Web:
www.aluratek.com/support
Local (Tustin, CA):
714-586-8730
Toll free:
1-866-580-1978
Technical Support
WARNING!!! This equipment has been tested and found to comply with the limits
of a Class B digital device, pursuant to part 15 of the FCC rules. These limits are
designed to provide reasonable protection against harmful interference in a
residential installation.
This equipment generates, uses and can radiate radio frequency energy and, if
not installed and used in accordance with the instruction, may cause harmful
interference to radio communications. However, there is no guarantee that
interference will not occur in a particular installation. If this equipment does cause
harmful interference to radio or television reception, which can be determined by
turning the equipment off and on, the user is encouraged to try to correct the
interference by whatever measures may be required to correct the interference.
Insert either a 2.5”
or 3.5” hard drives
into the dock slots
Push the button to
release the HDD
from the dock
One touch button
backup to create a
duplicate copy of
your hard drive
Power ON / OFF button
Power adapter port
USB 2.0 port and eSATA port
SATA Hard Drive docking slots
HDD release button
Operating buttons and LEDs
Creates a duplicate bootable copy of your SATA Hard Drive
Getting Started:
To make a duplicate copy of your hard drive, please remove the hard drive from
your computer.
Please make sure the target/blank drive has the same or higher capacity than
your source hard drive. The duplication will not start if the target drive has
smaller capacity than the source drive.
It is recommended to use the same capacity blank/target hard drive as your
source drive because you are making an exact ghost copy of your original hard
drive. For example, if your original hard drive (source with data) is 80GB, the
duplicated/ghost copy will also be 80GB even if you use a higher capacity drive.
Warning: All data on the target drive will be erased.
Use AHDDUB100 as a Duplicator:
(Please make sure that AHDDUB100 is not connected to the computer)
Step 1
: Connect the power adapter to AHDDUB100
Step 2
: Insert the hard drive that you want to copy (the one with data) into the
slot labeled “HDD 2 / Source Disk”
Step 3
: Insert the blank hard drive into the slot labeled “HDD 1/Target Disk”
Step 4
: Press the “POWER” button to power on AHDDUB100
Step 5
: Press and hold the DOCK / COPY button for 3 seconds
(the LED will turn from Blue to Red)
Step 6
: Press the “START” button to start the duplication process (During the
duplication process, the source and target LED will flash in pink color)
Step 7
: The duplication process is completed when you see the status bar at 100%
Step 8
: Press the “POWER” button to power off AHDDUB100 and remove the
hard drives
Use AHDDUB100 as a Hard Drive Docking Station:
(Please make sure that the power adapter is not connect to AHDDUB100)
Step 1
: Connect the USB Type-B connector or eSATA cable to AHDDUB100
Step 2
: Connect the USB Type-A connector or eSATA cable to your computer
Step 3
: Connect the power adapter to AHDDUB100
Step 4
: Insert 1 or 2 drives into the slots
Step 5
: Press the “Power” button to power on AHDDUB100
Step 6
: For drives that are formatted, you will see the drives in “My Computer”.
For non-formatted drives, you will need to go to “Disk Management” to format
the drive before you can access the drive.
Note: The computer eSATA port needs to support port multiplier to see both
hard drives at once if using eSATA connection.
1
: Power button
2
: Duplication mode button (AHDDUB100 defaults to docking mode when turned on)
3
: Start button for duplication process
4
: HDD 1 (Target Disk) and HDD 2 (Source Disk) LEDs
5
: Duplication status bar


