ReServ1
- 1 -
Overview:
ReServ1 Video Surveillance UPS is designed to simultaneously provide power for 12VDC and 24VAC cameras during
normal or power outage conditions. True sine wave regulated AC output.
Specifications:
Input:
• 115VAC 60 Hz, 1.9 amps.
Output:
• 12 individually fuse protected outputs
configured as follows:
• Eight (8) outputs @ 24VAC.
• Four (4) outputs @ 12VDC
.
• Unit will provide:
• Blade type output fuses are rated at:
AC fuses rated @ 3 amp / 32V.
DC fuses rated @ 3 amp / 32V.
Battery Backup:
• Built-in charger for sealed lead acid or gel type batteries.
• Automatic switchover to stand-by battery
when AC fails.
Visual Indicators:
• AC/DC power LED indicators.
• Individual power LED indicators.
• Low voltage input and
Shutdown LED indicators.
Supervision:
• AC fail supervision (form "C" contacts).
• Low battery supervision (form "C" contacts).
Special Features:
• True sine wave regulated AC output.
• Power ON/OFF switch.
• Spare fuses included.
• Unit maintains camera synchronization.
• Ease of installation saves time and eliminates costly labor.
Enclosure:
• Enclosure accommodates up to two (2)
12VDC/7AH batteries.
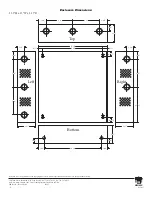
• Enclosure dimensions:
13.5"H x 13"W x 3.25"D
Installation Instructions:
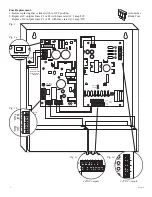
1. Mount unit in desired location. Mark and predrill holes in the wall to line up with the top two keyholes in the
enclosure. Install two upper fasteners and screws in the wall with the screw heads protruding. Place the enclosure’s
upper keyholes over the two upper screws, level and secure.
Mark the position of the lower two holes. Remove the enclosure. Drill the lower holes and install the two fasteners.
Place the enclosure’s upper keyholes over the two upper screws. Install the two lower screws and make sure to tighten
all screws
(Enclosure Dimensions, pg. 4)
. Secure enclosure to earth ground.
2. Slide power switch to OFF position
(Fig. 1a, pg. 2)
.
3. Connect AC power mains to terminals marked [L & N], connect ground to terminal marked [G]
(Fig. 1, pg. 2)
.
Use 18 AWG or larger for all power connections (Battery, DC output)
(Fig. 1, pg. 2)
.
Use 18 AWG to 22 AWG for power limited circuits (AC Fail/Low Battery reporting)
(Fig. 1b, pg. 2)
.
4. Slide power switch to ON position
(Fig. 1a, pg. 2)
.
5. Measure output voltage before connecting devices. This helps avoid potential damage.
6. Slide power switch to OFF position
(Fig. 1a, pg. 2)
.
7. Connect devices to output terminals using the following procedure.
Connect 24VAC cameras to terminals marked [24VAC, N-P]
(Fig. 1c, pg. 2)
.
Connect 12VDC cameras to terminals marked [12VDC, + 1 -- ] carefully observing the correct polarity
(Fig. 1d, pg. 2)
.
8. Slide power switch to ON position
(Fig. 1a, pg. 2)
.
9. Green LED on the power supply board will illuminate when power is present.
10. Upon completion of wiring, secure enclosure door with screws (supplied).
WARNING:
To reduce the risk of fire or electric shock, do not expose the unit to rain or moisture. This instal-
lation should be made by qualified service personnel and should conform to all local codes and in accordance
with the National Electrical Code.
ReServ1 - Video Surveillance UPS
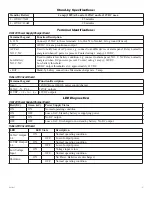
24VAC Output
12VDC Output
4 amp (max.)
---
3.5 amp (max.)
1 amp (max.)
3 amp (max.)
2 amp (max.)


