


ShareTime HDMI CABLE
User’s Guide
400-0619-001
1
Welcome!
Everyone at Altinex greatly appreciates your purchase of the
ShareTime Retractable HDMI cable. We are confident that you
will find it to be reliable and simple to use. If you need support,
please do not hesitate to call us at 714-990-2300.
At Altinex, we are committed to developing unique and state of
the art Signal Management Solutions® for demanding audiovisual
installations. Welcome to the Altinex family of satisfied customers
around the world!
1. Precautions and Safety Warnings
Please read the manual entirely before using your ShareTime
Cable. You can download a full version of this manual at
. These safety instructions are to ensure the
reliable operation of your ShareTime and to prevent fire and
shock hazards. Please read carefully and heed all warnings.
1.1 General
ShareTime Cable CB300-101 contains a micro USB
programming connector that allows users to update the
firmware of their unit when additional capabilities are
developed by our engineering team.
ShareTime Cable CB300-101 contains a Li-Ion battery to
provide the desired features and capabilities.
1.2 Installation Precautions
To prevent fire or shock, do not expose this unit to water or
moisture. Do not place the ShareTime Cable CB300-101 in
direct sunlight, near heaters or heat-radiating appliances, or
near any liquid. Exposure to direct sunlight, smoke, or steam
can harm internal components.
Handle the unit with care; dropping or jarring can cause
damage.
Do not abusively pull any cables that are attached to the
CB300-101. Hold the CB300-101 firmly.
1.3 Cleaning
Clean the ShareTime Cable CB300-101 with a dry cloth only.
Never use strong detergents or solvents such as alcohol or
thinner. Do not use a wet cloth or water to clean the
connectors.
1.4 FCC Notice
This device complies with Part 15 of the FCC Rules.
Operation is subject to the following two conditions: (1) This
device may not cause harmful interference, and (2) this device
must accept any interference received, including interference
that may cause undesired operation.
This equipment has been tested and found to comply with the
limits for a Class B digital device, pursuant to Part 2 of the
FCC Rules. These limits are designed to provide reasonable
protection against harmful interference when the equipment is
operated in a commercial environment. This equipment
generates, uses, and can radiate radio frequency energy and,
if not installed and used in accordance with the instructions
found herein, may cause harmful interference to radio
communications. Operation of this equipment in a residential
area is likely to cause harmful interference in which case the
user will be required to correct the interference at their
expense.
Any changes or modifications to the unit not expressly
approved by Altinex
, Inc. could void the user’s authority to
operate the equipment.
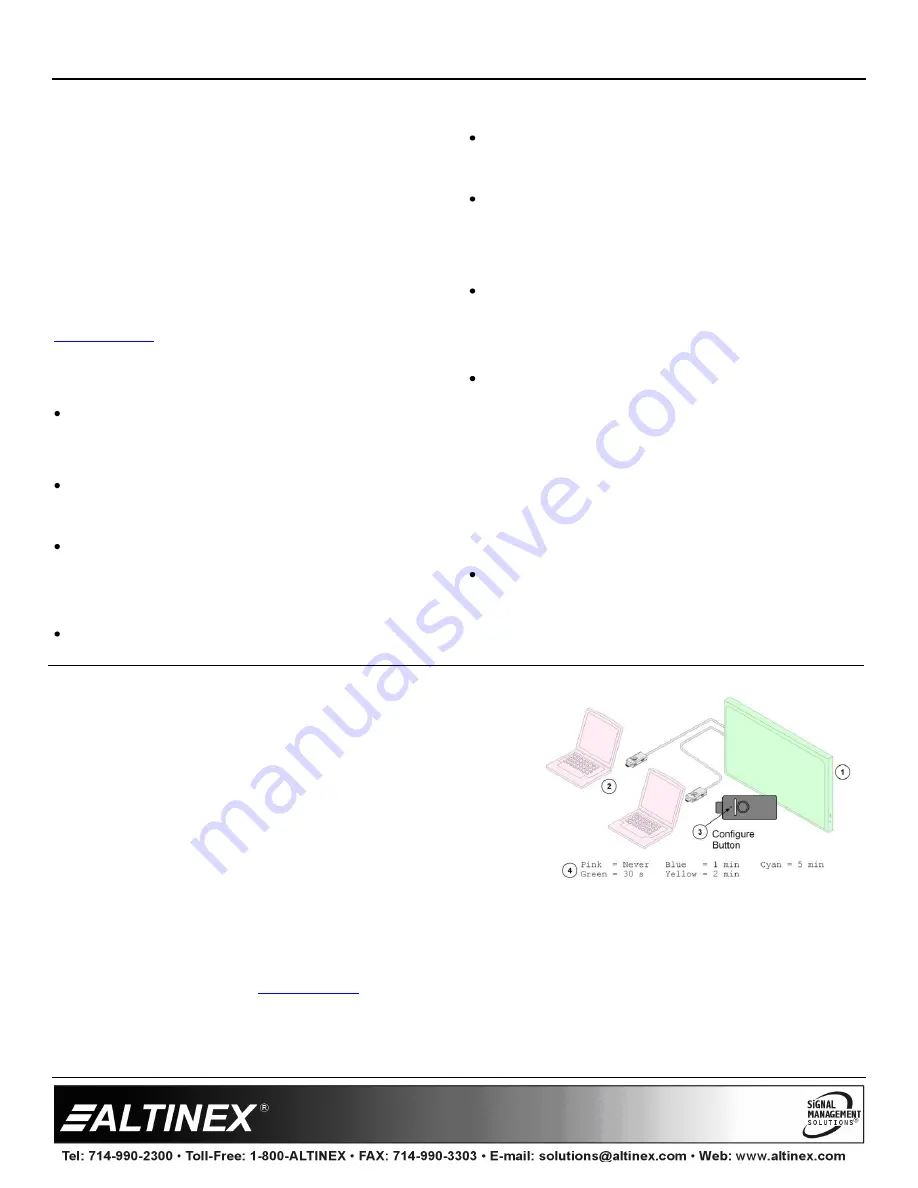
2. Installation Procedures
Step 1. Connect CB300-101 cable to a CEC capable display or switcher.
Make sure CEC capability is enabled on the monitor. Some
monitors have it defaulted to OFF.
Step 2. Plug the ShareTime control side of CB300-101 into the laptop HDMI
source. The LED flashes white briefly indicating a connection, then
it flashes to indicate the input number and green to indicate that the
video is on the display. If the TV is off, the ShareTime turns it on.
Step 3. To configure the CB300-101 shutdown time, press the configuration
button with a paper clip.
Step 4. The various flashing colors represent the choices available. To
select a time, wait for the desired color to start blinking and then
press the button again. The LED turns solid on the selection.
The CB300-101 is now ready for operation. Section 7 of this manual will explain how to setup configuration button user features and
operational features through the circular touchpad just once.
3. Warranty and Return Policies
Please visit the Altinex website at
for details on warranty and return policies. In the case of a unit needing repair,
please fill out the RMA (return material authorization) form located on the bottom left hand corner of the Altinex homepage. Once filled
out, please email the form to [email protected].


