ALDI OL 250-L-17, User Manual
The ALDI OL 250-L-17 comes with a comprehensive User Manual, ensuring you'll easily navigate and optimize its features. This essential manual is available for free download from our website, giving you quick access to all the information you need. Maximize your experience with this product by referring to our user-friendly manual at manualshive.com.
Share
Download


Reviews:
No comments
Related manuals for OL 250-L-17
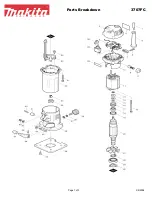
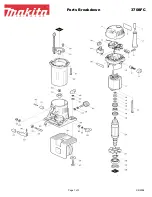
3707FC
Brand: Makita Pages: 3
3708FC
Brand: Makita Pages: 3

Inspire Plus A4
Brand: GBC Pages: 6

DOCUSEAL 1200
Brand: GBC Pages: 16

HEATSEAL H100
Brand: GBC Pages: 8

DWE6000
Brand: DeWalt Pages: 56

00050016
Brand: Hama Pages: 10

BA-FS27
Brand: Banner American Pages: 14

425LM-1
Brand: GBC Pages: 5

LX-570
Brand: Brother Pages: 9

LX-900
Brand: Brother Pages: 50

LX-200
Brand: Brother Pages: 177

AL-3400
Brand: acropaq Pages: 29

62FM
Brand: GBC Pages: 41

QuikFinish PL100
Brand: Banner American Pages: 2


