


1 of 6
AvalonN Add a Plate
Configure AvalonN and Apogee Prepress for a new plate size
Follow these steps to add and configure a new plate size for use with the AvalonN platesetter
and Apogee Prepress.
Audience: Customer, Technical
Product: Apogee Prepress, AvalonN
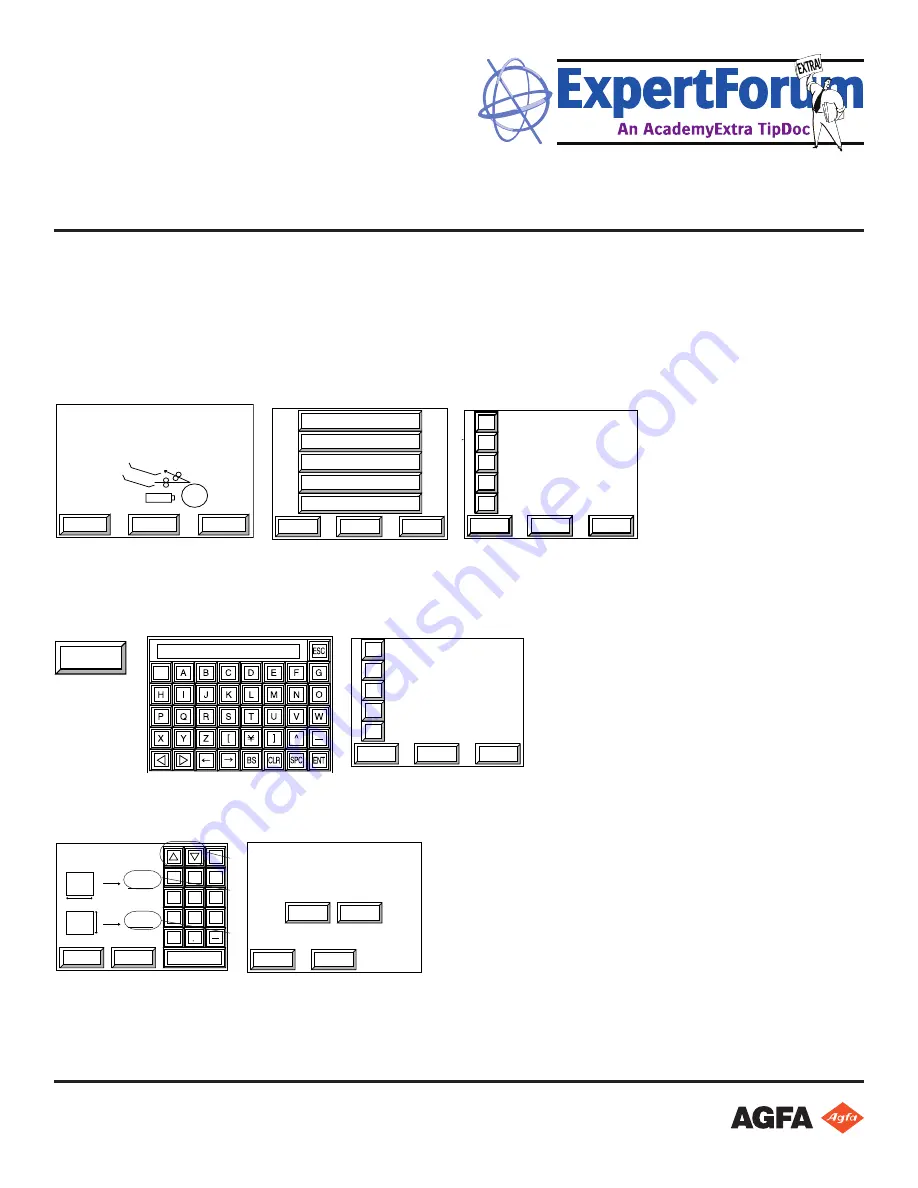
Add the plate to the AvalonN engine
At the AvalonN engine press Offline, press Set plate and OK. Click on the next available plate and OK.
PT-R8300/PT-R8600 USERS MANUAL
4-8
4.4 Online mode
After turning on the power and initialization is complete, the PT-R enters online mode
and the online (Ready) screen. During online mode, image data is received from the
host computer and plate exposures are carried out.
Ready
1: Plate 1
OFFLINE
OPEN
Plates are loaded manually and ex posed. Use the information shown below to set
the plates.
“4.4.1 Manually setting a plate on exposure request from the host computer”
“4.4.2 Load plate before an exposure instruction comes from the host computer”
“4.4.3 Set next plate while exposure is in progress”
4.4.1 Manually setting a plate on exposure request from the host computer
This is the normal procedure for exposure.
1) Send the command to begin exposure from the host computer. The PT-R opera-
tion panel will show the following screen and the buzzer will beep repeatedly.
OK
Set plate listed below and close door.
No. 1 A4-8page
2) Press [OK]. The buzzer sound will stop and the following screen will appear.
CANCEL
OPEN
Set plate listed below and close door.
No. 1 A4-8page
Press [Open] button to open door.
PT-R8300/PT-R8600 USERS MANUAL
5-2
5.1 Offline mode
5.1.1 Overview of the offline mode screen
Press [OFFLINE] in the [ONLINE] screen to display the offline screen.
The offline screen hierarchy is shown below. Press [ESC] in any of these screens to
return to the previous screen. Press [ONLINE] to return to the online screen.
User maintenance
Set exposure mode
Set media type
Set plate
OK
NEXT
ONLINE
Set printing machine
Service
Set punch name
Information
OK
NEXT
ONLINE
Pressing [NEXT].
Cont. on next page
5
4
3
2
OK
NEXT
ESC
1
Plate 1
Plate 2
Plate 3
Plate 4
Plate 5
5
4
3
2
OK
NEXT
ESC
1
Printing machine 1
Printing machine 2
Printing machine 3
Printing machine 4
Printing machine 5
5
4
3
2
OK
NEXT
ESC
1
Media Type 1
Media Type 2
Media Type 3
Media Type 4
Media Type 5
Select [Set printing machine] and
press [OK].
Select [Set plate] and press [OK].
Select [Set media type] and
press [OK].
Click Comment. Enter the plate name using the touchpad Use the < > arrow keys to change screens of
characters. Press ENT after each new entry.
Press ENT after each new entry or the value will not be stored!
Choose a Media Type from the list.
PT-R8300/PT-R8600 USERS MANUAL
5-4
5.1.2 Description of buttons
The buttons available in the online screen, such as [NEXT] and [ESC], are described
below.
[NEXT]
If the displayed screen consists of multiple pages, the [NEXT] button is displayed.
Press the [NEXT] button to display the next page.
5
4
3
2
OK
NEXT
ESC
1
Printing machine 1
Printing machine 2
Printing machine 3
Printing machine 4
Printing machine 5
->
10
9
8
7
OK
NEXT
ESC
6
Printing machine 6
Printing machine 7
Printing machine 8
Printing machine 9
Printing machine 10
[ESC]
Press [ESC] to return to the previous screen (level up in the hierarchy).
[OK]
Press [OK] to confirm your entry and move to the next screen.
[Comment]
Press [Comment] to display the keyboard screen. Enter a comment into the icon for
the keyboard window and press [ENT]. The previous screen appears and the com-
ment inputted will be displayed under the [Comment] button.
: Switch through the entry
screens for upper case
letters, lower case letters, and
symbols/numbers.
: Move the cursor indicating the
entry position.
BS
: Delete the letter to the left of the
cursor.
CLR
: Clear the entered comment.
SPC
: Enter a space.
OK
Comment
Plate
Copy from
ESC
Printing machine 1
Plate 1
Comment
5-5
Chapter 5 User menu
[Copy from]
Use this to copy data that is already registered. Press [Copy from] to display the page
containing the copy source. Press the number button for the data you want to copy
and press [OK] to copy that data and return to the previous screen.
OK
Comment
Copy from
ESC
Media Type 1
Posi
Nega
->
15
14
13
12
OK
NEXT
ESC
11
Media Type A 0.20mm
Media Type B 0.20mm
Media Type C 0.24mm
Media Type D 0.24mm
Media Type E 0.24mm
The Fine Screen window displays. Click OK to skip. In the Plate Size window, enter the correct plate size in
millimeters. Save and click Yes to save new plate data.
5-19
Chapter 5 User menu
to be used for the Normal mode and the Fine mode will be the same. (The media
type information specified in the first page will be used in both modes.) After a
number from [0] to [20] has been selected, the specified media type setting will
be used when exposure is performed in the Fine mode.
(Cont. on “5.3.3 Setting the plate size”)
5.3.3 Setting the plate size
Set the plate size. The size to be set is the total area including the print area and the
leading and trailing grip settings.
NOTE
• The maximum plate size that can be set is 1160 x 940 mm, and the minimum size is 450 x
370 mm.
SAVE
ESC
Size [mm]
830.0
645.0
CLR
7
8
9
4
5
6
1
2
3
0
ENT
1) Enter the plate width and then press [ENT]. The highlight will move to the plate
length setting.
2) Enter the plate length and then press [ENT].
3) After input is complete, press [SAVE]. The save confirmation screen will appear.
OK
YES
NO
ESC
Save Data ?
4) Press [YES] and then [OK] to save all of the entered information as Plate 1 data.
The data is saved, and the screen returns to the first screen in “5.3 Set plate”.
These keys also move the
highlighted portion.
Plate width
Plate length
5-15
Chapter 5 User menu
5.2.8 Fine adjustment of the image position
Perform fine adjustment (shifting the print area) of the image output position on the
plate.
These keys also move the highlight.
Shift amount in the secondary
scanning (horizontal) direction
Shift amount in the primary
scanning (vertical) direction
1) Enter the desired shift in the secondary scanning (horizontal) direction and then
press [ENT]. The highlight will move to the shift setting in the primary scanning
direction.
2) Enter the desired shift amount in the primary scanning (vertical) direction and
then press [ENT].
3) After input is complete, press [SAVE]. The save confirmation screen appears.
OK
YES
NO
ESC
Save Data ?
4) Press [YES] and then [OK] to save all the information you set as printing machine
1 data. The data is saved and the screen returns to the first screen in “5.3 Set
plate”.
SAVE
ESC
Paper Position H
Paper Position V
0.0 mm
0.0 mm
R
R
CLR
7
8
9
4
5
6
1
2
3
0
ENT
Note: Media Type should have been defined by service during install. If the desired media thickness is not in
the list, contact service. A new Media Type with correct laser and focus settings needs to be created.


