background image

P/N 330052-01, Rev. A

1

H

IVE

AP 170

I

NSTALLATION

 G

UIDE

This guide explains how to mount a HiveAP 170 to a pole or flat surface in virtually any outdoor 
setting, and connect it to HiveManager over the network. To register, get product documentation, see 
compliance information, and download software updates, visit 

www.aerohive.com/support

.

K

IT

 C

ONTENTS

, R

EQUIRED

 A

CCESSORIES

AND

 T

OOLS

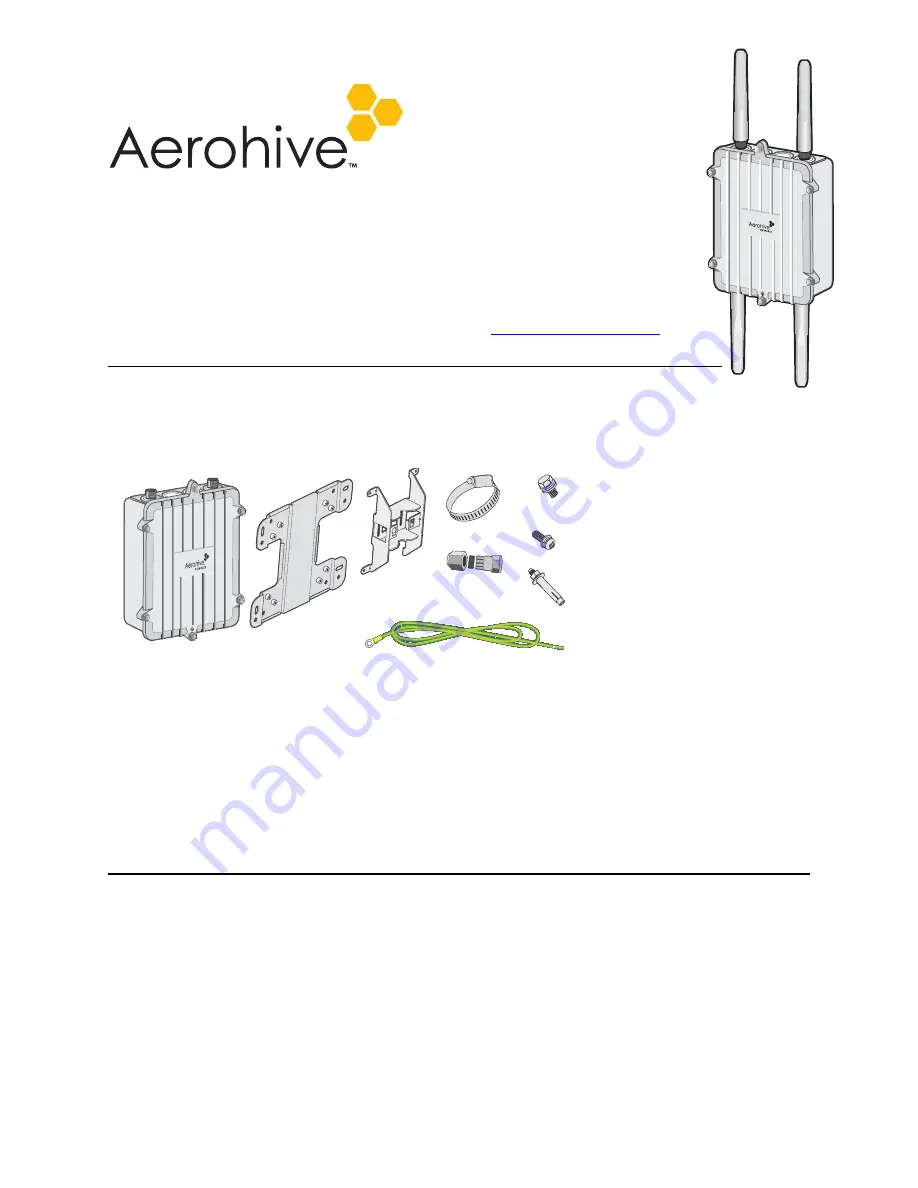
The HiveAP 170 kit includes the items shown in 

Figure 1

.

Figure 1 

HiveAP 170 kit contents

To install your HiveAP 170, you will need the following accessories (ordered separately) and tools:

(2) 2.4 GHz antennas (AH-ACC-170-ANT-2G)

(2) 5 GHz antennas (AH-ACC-170-ANT-5G)

A switch that provides PoE power, or a PoE provisioning device

(1) shielded cat5 Ethernet cable rated for outdoor use; length not to exceed 328 feet (100 m)

Crosshead screwdriver for 1/4” (6 mm) x 3/8” (10 mm) screws

Drive sockets (nut drivers) for 3/8” (10 mm) nuts

Flat blade screwdriver to tighten hose clamp

S

AFETY

 I

NSTRUCTIONS


AND

 S

ITE

 H

AZARD

 W

ARNINGS

Read and follow these safety instructions and hazard warnings before installing a HiveAP 170 outdoors. Keep these 
instructions for future reference.

To comply with RF (radio frequency) exposure limits, do not place the HiveAP 170 within 8" (20 cm) of people.

You can install the HiveAP 170 in wet, windy locations. Therefore, make sure to install the Ethernet cable 
housing for a complete waterproof connection.

To protect the HiveAP 170 from lightning, do not place it at the highest point of a building or structure.

Plane Bracket (1)

HiveAP 170

Base

Bracket (1)

(4) Sleeve Bolt Assembly 

Sleeve, 5/8” (16 mm),
Bolt 1 15/16” (5 cm), 
Hex nut 3/8” (10 mm), 
Washer 5/8” (16 mm) 

(4) Round Head Screw 1/4” (6 mm)
Lock Washer, Flat Washer

(4) Hex Head Bolt, 3/8”x1/2” 
(10 mm x 13 mm) 
Lock Washer, Flat Washer  1/2” (13 mm)

Hose Strap (1)

Ground Cable (1)

Ethernet 

Housing (1)

Summary of Contents for HIVEAP 170

Page 1: ...d screwdriver for 1 4 6 mm x 3 8 10 mm screws Drive sockets nut drivers for 3 8 10 mm nuts Flat blade screwdriver to tighten hose clamp SAFETY INSTRUCTIONS AND SITE HAZARD WARNINGS Read and follow these safety instructions and hazard warnings before installing a HiveAP 170 outdoors Keep these instructions for future reference To comply with RF radio frequency exposure limits do not place the HiveA...

Page 2: ...ty 165 mph 266 kph Environmental compliance IP68 Make sure that the HiveAP 170 is connected to a suitably installed ground conductor Contact the appropriate electrical inspection authority if you are uncertain that suitable grounding is available Do not locate the HiveAP 170 enclosure near overhead power lines or other electric light or power circuits or where it can come into contact with such ci...

Page 3: ...ibed below The device and mounting accessories required for mounting the HiveAP 170 are shown in Figure 2 Figure 2 HiveAP 170 mounted on a vertical pole with major devices and accessories called out PoE Connections In most cases you can connect an Ethernet cable directly from your HiveAP 170 to a PoE enabled switch or to a PoE injector inside the building see Figure 2 If you are not using a PoE en...

Page 4: ... strap around the pole and tighten the clamp with a 1 4 2 cm slotted screwdriver or a 5 16 8 mm drive socket or nut driver 5 Connect the grounding cable to the grounding lug on the unit as shown in Figure 3 on page 7 Connect the other end of the cable to an appropriate ground Attach the plane bracket to the back of the unit using 4 3 8 x 1 2 10 mm x 13 mm hex head bolts and 1 2 13 mm lock washers ...

Page 5: ...d of the cable to an appropriate ground When attaching the HiveAP 170 to a horizontal pole such as the arm of a street light make sure that the face of the device is perpendicular to the Earth for optimal RF coverage Attach the plane bracket to the back of the unit using 4 3 8 x 1 2 10 mm x 13 mm hex head bolts and 1 2 13 mm lock washers and flat washers Attach the base bracket to the plane bracke...

Page 6: ... using a hex nut lock washer and flat washer on each bolt to tighten the unit to the surface As you tighten the nuts the flanges on the back of the bolt sleeve will expand in the hole securing the device in place 6 Connect the grounding cable to the grounding lug on the unit as shown in Figure 3 on page 7 Connect the other end of the cable to an appropriate ground Note If you are not installing th...

Page 7: ... labeled To connect the antennas screw them onto the antenna connectors by hand turning them clockwise until tight Note It is extremely important to properly ground your device to complete your installation Note You do not need to use a tool to tighten the antennas or apply self amalgamating PTFE polytetrafluoroethylene tape around the threads of the connectors to create a waterproof seal Remove t...

Page 8: ...rnet network and it is receiving PoE power it automatically attempts to get its network settings through DHCP and contact HiveManager The process typically takes about five minutes to complete If you see the HiveAP listed on the Monitor Access Points HiveAPs page in the HiveManager GUI the initial setup is complete and you can begin managing the HiveAP through HiveManager Figure 4 Connecting the H...

Page 9: ...P first uses whatever settings are configured on it to reach the redirection server which might be on the other side of an HTTP proxy server or firewall that only permits outbound HTTP traffic Then the redirection server might supply the HiveAP with different settings so that the HiveAP can reach a standalone HiveManager instance which might be on the same side of the HTTP proxy server or firewall...

Page 10: ...redirection server saves the relevant settings on the HiveAP so it will continue using the HTTP proxy server when connecting to HiveManager If the redirection server does not have the HiveAP serial number the ACL ignores the CAPWAP connection attempts and the HiveAP repeats the connection cycle shown in Figure 6 Figure 6 Accessing the virtual console C Ethernet adapter Wireless Network Connection ...

Page 11: ...g in to myaerohive com and then click Redirector Monitor HiveAP Access Control List If the serial number is not in the ACL click Enter type the serial number in the HiveAP Serial Number field and then click Save When done reboot the HiveAP Use these commands To do the following show interface Check the status of both wired and wireless interfaces show interface mgt0 See the network settings IP add...

Page 12: ...d or use a pin to press the Reset button on the chassis and hold it down for at least 10 seconds WHERE TO GO FOR MORE INFORMATION Technical Documentation Aerohive provides various technical documents for its products For information about CLI commands see the CLI reference guides available in HTML format For information about HiveManager and HiveAP hardware and software topics see the Aerohive Dep...

Reviews: