background image

ZDW103 Instructions, Release 1.1

P/D 102406

HomePro

by ADVANCED CONTROL TECHNOLOGIES, INC.

0703-01

1

Radio Frequency Controlled, 800W, 120 VAC,

Wall Mounted 3-Way Dimmer Receiver, Release 1.1

ZDW103

ZDW103 WALL MOUNTED DIMMER

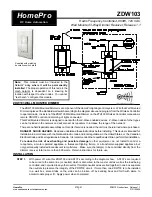
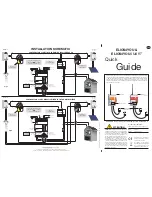
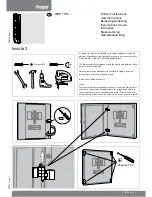
The ZDW103 Wall Mounted Dimmer is a component of the HomePro lighting control system.   Wire the Wall Mounted
Dimmer in place of the standard wall switch according to the diagram above and program from the Wireless Controller
to operate loads.   Inclusion of the ZDW103 Wall Mounted Dimmer on the ZTH100 Wireless Controller menu allows
remote ON/OFF control and dimming of lights connected.
This Wall Mounted Dimmer is designed to work with other Z-Wave enabled devices.  Z-Wave nodes of other types
can be Included in the network and will also act as repeaters to increase the range of the network.
There are no field repairable assemblies on this unit. If service is needed, the unit must be returned where purchased.

DANGER!  SHOCK HAZARD. 

 Read and understand these instructions before installing.  This device is intended for

installation in accordance with the National Electric code and local regulations in the United States, or the Canadian
Electrical Code and local regulations in Canada.  It is recommended that a qualified electrician perform this installation.

To reduce the risk of overheating and possible damage 

to other equipment, do not install to control a

receptacle, a motor operated appliance, a fluorescent lighting fixture, or a transformer-supplied appliance, but

only permanently installed incandescent lamp fixtures

.  Make sure the lamp(s) to be controlled directly from the

dimmer receiver total no more than 800 watts.  Retain instructions for future use.

INSTALLATION

STEP 1.

    With power off, wire this ZDW103 and AS101’s according to the diagram show.   AS101’s are required

to be wired to the same line (or neutral) which is also wired to the master unit as well as the load being
controlled, and not wired to any other neutral. If multiple neutral wires are tied together in one box separate
the neutrals to preserve the integrity of the ZDW103 circuit.  If more than one ZDW103 is to be installed
in a wall box, scored tabs on the side can be broken off by bending back and forth with pliers, to
accommodate proper fit.  Apply power when completed.

HomePro

RF Home Automation

Supplied with matching

decorative switch plate

Note:

  This module must be “Included in the

Network” 

only where it will be permanently

installed

.  The proper operation of  this node in the

mesh network is dependent on it knowing its
location with respect to other nodes.  You cannot
“test bench” configure this module.

Summary of Contents for HomePro ZDW103

Page 1: ...anada It is recommended that a qualified electrician perform this installation To reduce the risk of overheating and possible damage to other equipment do not install to control a receptacle a motor operated appliance a fluorescent lighting fixture or a transformer supplied appliance but only permanently installed incandescent lamp fixtures Make sure the lamp s to be controlled directly from the d...

Page 2: ...ill then blink at a 1 second rate If another five minutes passes and the temperature is still too high the output power will be reduced to 10 The LED will then blink at a very fast rate Reduce the total wattage to avoid damage Local and Remote DIM BRIGHT Control of the load will not be available while in this state Local DIM BRIGHT control of the affected ZDW103 from associated Z Wave dimmers devi...

Page 3: ...ands are ZDW103 will not respond to ALL ON or the ALL OFF command ZDW103 will respond to ALL OFF command but will not respond to ALL ON command ZDW103 will respond to ALL ON command but will not respond to ALL OFF command ZDW103 will respond to ALL ON and the ALL OFF command default Association The ZDW103 supports the Association command The ZDW103 can be set to control other Z Wave devices Those ...

Page 4: ... The Dim command has a start level embedded in it A dimmer receiving this command will start dimming from that start level if this bit is set to 0 If the bit is set to 1 the dimmer will ignore the start level and instead start dimming from its current level Suspend Group 4 Parameter No 2 Length 1 Byte Valid Values 0 or 1 default 0 You may wish to disable transmitting commands to Z Wave devices tha...

Page 5: ...m rate is when the dimmer is locally controlled Parameter 9 and 10 3 One set to control how fast the dim rate is when the dimmer receives an ALL ON or ALL OFF command Parameter 11 and 12 These values can be changed instantly to allow various scenes and effects The first of these parameters is the dim step dim rate parameter It can be set to a value of 1 to 99 This value indicates how many levels t...

Page 6: ...e RF transmit power level of a node and test specific links between nodes with specific RF transmit power Refer to your controller s instructions if it supports this command for more information This command is typically used by professional installer SUC Support There must be a Static Update Controller in your Z Wave system for this feature to work A Static Controller is one that is not moved aft...

Page 7: ...al device pursuant to part 15 of the FCC Rules These limits are designed to provide reasonable protection against harmful interference in a residential installation This equipment generates uses and can radiate radio frequency energy and if not installed and used in accordance with the instructions may cause harmful interference to radio communications However there is no guarantee that interferen...

Reviews: