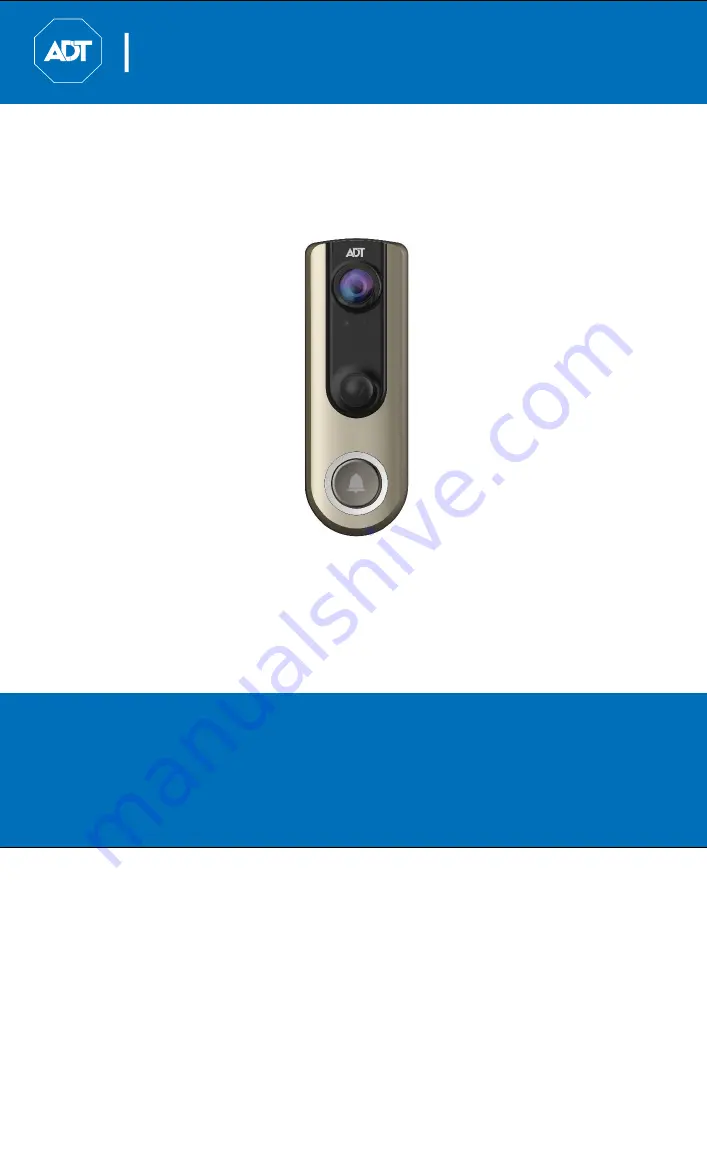
background image


ADT Video Doorbell 

Quick Installation Guide


ADT Pulse

®

 Interactive Solutions 

DBC835 Wireless HD Doorbell Camera 


Property of ADT, LLC. Information accurate as of published date and is 

provided “as is” without warranty of any kind. 

© 2017ADT LLC dba ADT Security Services. All rights reserved. ADT, the 

ADT logo, 800 ADT.ASAP and the product/service names listed in this 

document are marks and/or registered marks. Unauthorized use is strictly 

prohibited. 

AOWDG-DBC835

Summary of Contents for Pulse DBC835

Page 1: ...opertyofADT LLC Informationaccurateasofpublisheddateandis provided as is without warranty of any kind 2017ADTLLCdbaADTSecurityServices Allrightsreserved ADT the ADT logo 800ADT ASAPandtheproduct servicenameslistedinthis documentare marks and or registered marks Unauthorized use is strictly prohibited AOWDG DBC835 ...

Page 2: ...n 1 Introduction This section provides information about the Doorbell Camera features components and capabilities Packaging Contents The following items are included in the package 1 Doorbell Camera x 1 2 Two Mounting Brackets Small Slim Gang Plate size 3 Wedge Kit 15 30 Angles 15 Wedge 30 Wedge 15 Tilt ...

Page 3: ...deo Doorbell Quick Installation Guide INTRODUCTION 3 DBC835 Wireless Doorbell Camera Installation 4 No 1 Screw Anchor x 2 5 No 2 Screw x 2 6 N0 3 Screw x 2 7 No 4 Screw x 2 8 Bubble Level 9 Always On Bracket ...

Page 4: ...Physical Details The DBC835 supports both analog and digital chimes within 8 24 AC voltage range The operation temperature is 4 F to 122 F 20 C to 50 C The battery will not be charged when the temperature is 32 F or discharge when internal temperature is 138 F Figure 1 1 Front Panel Figure 1 2 Rear Panel ...

Page 5: ... Solid After connected to network LED color will change to Blue solid Network Disconnected Red Medium Blinking When power up sequence is completed the LED will flash RED until connected to network FW Download In progress Green Medium Spinning LED spinning green indicates FW is being downloaded Once complete update takes place and doorbell reboots LED then goes into power up mode A C Disconnected R...

Page 6: ...t for 20 seconds until the LED turns to flashing red Note The internal battery supports about 40 minutes of operation If you don t see the camera powering up please charge the doorbell camera via Micro USB cable with USB charger for 45 min before installation Figure 2 1 Power LED 2 Enroll the Camera in ADT Pulse This process is described in section 3 ADT Pulse Enrollment 3 Mounting the Doorbell Ca...

Page 7: ...y enroll the HD Camera to gateway via the ADT Pulse portal or Installer App Using WPS with PIN 1 Power up the camera and wait for the LED to turn flashing red as described in the previous chapter 2 Launch web browser and log into the Pulse portal or installer app 3 Enter the Manage Devices screen using one of the following methods For the Pulse portal select the System tab and click Manage Devices...

Page 8: ...ra Installation 5 Click the Add Using WPS button at the bottom of screen as shown in Figure 3 2 Figure 3 2 Clicking Add Using WPS Button 6 Locate the camera PIN number on the label on the rear of the camera Enter the PIN number in the WPS PIN field as shown in Figure 3 3 Figure 3 3 Entering the PIN ...

Page 9: ...tton to initiate the WPS process Figure 3 4 Clicking Continue Button 8 Press the doorbell button the LED will blink green during WPS process Note This WPS process must be completed within 2 minutes or else it will be timed out The remaining time is displayed in the upper left portion of the screen Figure 3 5 Add Camera Using WPS Screen ...

Page 10: ...led the Camera Details screen will be displayed Name the device and select the desired bandwidth chime type Click Save after entering or change settings Figure 3 6 Saving Camera Details 10 The newly added device will be shown in the Camera List then click Go Back at the top left of the screen as shown in Figure 3 7 Figure 3 7 Clicking Go Back Button ...

Page 11: ...k System page to verify the device enrollment Figure 3 9 System Screen 13 Move the doorbell to where it will be mounted and check the LED and site diagnostics to verify Wi Fi signal strength Note If the Wi Fi cannot reach the doorbell camera you will see the LED blinking red Relocate the Pulse gateway TS or Cloud Link if possible or add a Wi Fi repeater to improve the signal strength to the doorbe...

Page 12: ...vice will ding dong C If not already enrolled the device will go into WPS mode and blink green D Press and hold the reset button on the back until you hear a ring about 10 seconds then release to start the reset process E If you don t hear the ring press the doorbell button again to ensure it is awake and perform step D again F The unit may need to be charged via USB is the battery is too low to p...

Page 13: ...nfigured and enrolled in ADT Pulse before permanently mounting 1 Turn off the breaker circuit before disconnecting legacy doorbell button Figure 4 1 Breaker Circuit 2 Unscrew the legacy doorbell to locate two power wires The recommended installation height is between 47 60 inches Figure 4 2 Mounting Location Note Check the voltage at the doorbell to ensure voltage is between 9 24 VAC If the voltag...

Page 14: ...e regular mounting bracket that will cover the hole of the legacy doorbell button The larger bracket should be used with gang boxes Please check the Always On Bracket Installation section for more details Figure 4 3 Choosing Mounting Bracket 4 Connect the power wires from the existing doorbell to the screw terminals of the bracket Figure 4 4 Connecting the power Wires ...

Page 15: ... avoid damaging the rubber seal of the pogo pins please attach the camera to the mounting bracket flush Mounting bracket should lay flat against the wall Over torqueing can warp the bracket and cause it to lose contact with pins Figure 4 6 Attaching the Camera to the Bracket 7 Turn on the breaker circuit 8 Check that the chime is working normally by pushing the doorbell button If the AC wires are ...

Page 16: ...for better view and motion detection The wedge kit comes with 3 plates which can be used to tilt the camera forward or sideways by 15 30 degrees 1 Use the two screws No 1 to install the wedge into the wall The larger bracket should be used with gang box Figure 4 7 Install the Wedge 2 Secure the bracket to the wedge with the two screws No 3 or No 4 Figure 4 8 Attaching the Bracket to the Wedge ...

Page 17: ...RDWARE INSTALLATION 17 DBC835 Wireless Doorbell Camera Installation 3 Attach the doorbell camera to the bracket Figure 4 9 Attaching the Camera to the Bracket 4 Apply the Audio Video Surveillance Sticker Figure 4 10 Audio Video Surveillance Sticker ...

Page 18: ...l camera will be in always on mode which brings back the 5 second pre buffer connects live view faster and removes the need for the internal battery to be charged 1 Choose the mounting bracket that will cover the hole of the legacy doorbell button The larger bracket should be used with gang boxes Figure 4 11 Choosing Mounting Bracket 2 Connect the power wires from the existing doorbell to the scre...

Page 19: ...13 Installing the Screws 4 Attach the doorbell camera to the mounting bracket Make sure the doorbell camera is firmly fixed and working properly Caution To avoid damaging the rubber seal of the pogo pins please attach the camera to the mounting bracket flush Mounting bracket should lay flat against the wall Over torqueing can warp the bracket and cause it to lose contact with pins Figure 4 14 Atta...

Page 20: ...ech Model UT 27103 02 Utilitech Model UT 2735 02 Utilitech Model UT 7574 02 IQ America Model DW 2403A Hampton Bay Model HB 7621 02 Honeywell Model RCW102N Hone5ywell Model RCW251N NuTone Model LA100WH NuTone Model LA126WH Heath Zenith Model DC3360 Warning Other digital chimes may work but there is a possibly the chime will sound inadvertently at times ...

Page 21: ...and on the user is encouraged to tryto correct the interference by one ormore ofthe following measures Reorient or relocate the receiving antenna Increase the separation between the equipment and receiver Connect the equipment into an outlet on a circuit different from that to which the receiver is connected Consult the dealer or an experienced radio TV technician for help Toassurecontinuedcomplia...

Page 22: ...mêmesilebrouillageestsusceptibled encompromettrelefonctionnement This transmitter must not be co located or operating in conjunction with any otherantennaortransmitter Thisequipmentshouldbeinstalledandoperated with a minimumdistanceof 20 centimetersbetweentheradiatorandyour body Cet émetteur nedoit pasêtreCo placé ou nefonctionnant en mêmetemps qu aucuneautreantenneouémetteur Cetéquipementdevraitê...

Reviews: