

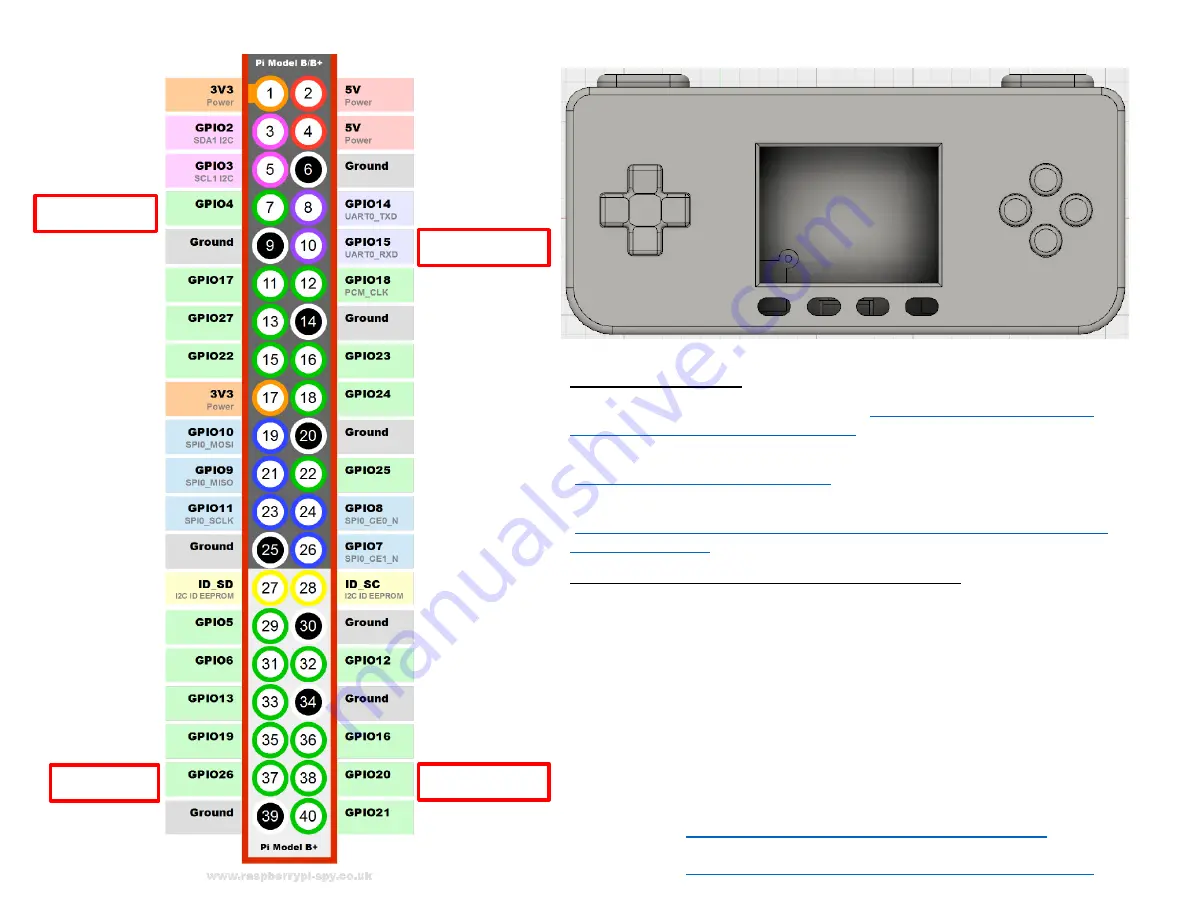
Down
Up
B
I2S - LRC
Y
A
X
R (Shoulder)
I2S – DIN
Right
TFT Button 2
I2S - BCLK
L (Shoulder)
TFT Button 3
TFT Button 1
TFT Button 4
Left
Start
Select
How to Setup PiGRRL Zero w/ Adafruit I2S Amplifier & Speaker including Controller Button Configuration
B
A
X
Y
Up
Right
Down
Left
L (Shoulder)
R (Shoulder)
TFT Buttons
1
2
3
4
Parts for External Audio
Adafruit MAX98357 I2S Class-D Mono Amp (
https://learn.adafruit.com/adafruit-
max98357-i2s-class-d-mono-amp/overview
)
Adafruit Mini Metal Speaker w/ Wires - 8 ohm 0.5W
(
https://www.adafruit.com/product/1890
)
16mmx2mm 10K ohm Stereo Volume Control Wheel Potentiometer B103
(
https://www.amazon.com/gp/product/B00O9Y766Y/ref=oh_aui_detailpage_o08_
s00?ie=UTF8&psc=1
)
Instructions for Wiring Setup on ControlPad’s to PiTFT
1. Follow the Adafruit tutorial all the way through at least once. I think it’s
best to totally understand the way PiGRRL Zero works first before you
modify it to add external audio
2. When you go to connect the Control Pads to the PiTFT and want to
incorporate the I2S amplifier from Adafruit, go ahead only move the
following buttons (Y, L, R, and Left) to the RED highlighted areas on the
left image. I solder these right on top of the Pi Zero when it’s all
connected, but you can do it any way you want.
3. Use the instructions on the next page to setup the audio connection to the
GPIO.`
4. Make sure to install the modified Retropie.IMG on your SD card (Kudos to
Thanos for configuring this!). The links for this are at:
Link #1 -
https://1drv.ms/u/s!AnCVLuZAuu8OcGzhwqFJflp1qw4
Link #2 -
https://mega.nz/#F!gthVGZ5S!ETTRXWXzraNZ2UgGyAz29A


