background image

®

Aspire 4743/4743G/4743Z/4743ZG

SERVICE

GUIDE

Summary of Contents for Aspire 4743

Page 1: ... Aspire 4743 4743G 4743Z 4743ZG SERVICEGUIDE ...

Page 2: ... the buyer not the manufacturer distributor or its dealer assumes the entire cost of all necessary servicing repair and any incidental or consequential damages resulting from any defect in the software Copyright 2010 Gateway Inc All rights reserved Gateway Gateway Country the Gateway stylized logo and the black and white spot design are trademarks or registered trademarks of Gateway Inc in the Uni...

Page 3: ...rocess names are shown in italics Example the DRS5 User s Guide usr local bin fd the TPH15spool_M program Computer output text that represents information displayed on a computer screen such as menus prompts responses to input and error messages are shown in constant width Example 01 The server has been stopped User input text that represents information entered by a computer user such as command ...

Page 4: ...ese localized features are not covered in this generic service guide In such cases contact your regional offices or the responsible personnel channel to provide you with further technical details When ordering FRU parts Check the most up to date information available on your regional Web or channel If for whatever reason a part number change is made it may not be noted in this printed service guid...

Page 5: ...eight 1 7 Power Adapter and Battery 1 7 Special Keys and Controls 1 8 Software 1 9 Warranty 1 10 Environment 1 10 Notebook Tour 1 11 Top View 1 11 Closed Rear View 1 13 Left View 1 13 Right View 1 14 Base View 1 15 Indicators 1 16 Touchpad Basics 1 16 Using the Keyboard 1 17 Lock Keys 1 18 Windows Keys 1 19 Hotkeys 1 20 Special Keys 1 21 Specification Tables 1 23 CHAPTER 2 System Utilities BIOS Se...

Page 6: ...Equipment 3 5 Replacement Requirements 3 5 Pre disassembly Instructions 3 6 Disassembly Process 3 7 External Module Disassembly Process 3 8 External Modules Disassembly Flowchart 3 8 Removing the Battery Pack 3 9 Remove the Dummy Card 3 10 Removing the Base Door 3 11 Removing the HDD Module 3 13 Removing the WLAN Module 3 16 Removing the DIMM Module 3 18 Removing the ODD Module 3 19 Main Unit Disa...

Page 7: ... 3 58 Replacing the Camera Board 3 59 Replacing the Microphone 3 60 Replacing the LCD Brackets 3 61 Replacing the LCD Panel 3 62 Replacing the LCD Bezel 3 65 Main Unit Reassembly Process 3 67 Replacing the LCD Module 3 67 Replacing the CPU 3 70 Replacing the Thermal Module 3 72 Replacing the RTC Battery 3 74 Replacing the Mainboard 3 75 Replacing the Bluetooth Module 3 77 Replacing the USB Board 3...

Page 8: ...ure 4 9 Internal Speaker Failure 4 10 Microphone Failure 4 12 USB Failure 4 13 WLAN Failure 4 14 Bluetooth Failure 4 15 Card Reader Failure 4 16 Thermal Unit Failure 4 17 Other Functions Failure 4 18 Intermittent Problems 4 19 Undetermined Problems 4 19 Error Codes 4 20 BIOS Beep Codes 4 21 POST Codes 4 26 CHAPTER 5 Jumper and Connector Locations Clearing Password Check and BIOS Recovery 5 5 Clear...

Page 9: ...d Diagrams 6 4 Main Assembly 6 4 LCD Assembly 6 5 CHAPTER 7 Model Definition and Configuration Aspire 4743 4743G 4743Z 4743ZG 7 3 CHAPTER 8 Test Compatible Components Microsoft Windows 7 Environment Test 8 4 CHAPTER 9 Online Support Information Introduction 9 3 ...

Page 10: ...10 ...

Page 11: ...CHAPTER 1 Hardware Specifications ...

Page 12: ...1 8 Software 1 9 Warranty 1 10 Environment 1 10 Notebook Tour 1 11 Top View 1 11 Closed Rear View 1 13 Left View 1 13 Right View 1 14 Base View 1 15 Indicators 1 16 Touchpad Basics 1 16 Using the Keyboard 1 17 Lock Keys 1 18 Windows Keys 1 19 Hotkeys 1 20 Special Keys 1 21 Specification Tables 1 23 Computer specifications 1 23 Processor 1 24 Processor Specifications 1 25 System Memory 1 25 Graphic...

Page 13: ... Supported Resolution GPU Supported Resolution 1 31 Bluetooth Interface 1 32 Bluetooth Module 1 32 Camera 1 32 Mini Card 1 32 Audio Codec and Amplifier 1 33 Audio Interface 1 33 Wireless Module 802 11b g n 1 34 Battery 1 34 VRAM 1 34 USB Port 1 34 HDMI Port 1 35 AC Adapter 1 35 System Power Management 1 35 Card Reader 1 35 System LED Indicator 1 36 System DMA Specification 1 36 ...

Page 14: ...1 4 ...

Page 15: ...800 1600 MHz 35 W supporting Intel 64 architecture Intel Smart Cache Intel Pentium P6200 processor 3 MB L3 cache 2 13 GHz DDR3 800 1600 MHz 35 W P6300 processor 3 MB L3 cache 2 26 GHz DDR3 800 1600 MHz 35 W Mobile Intel HM55 Express Chipset System Memory 0 Dual channel DDR3 SDRAM support Up to 4 GB of DDR3 1066 1333 MHz memory upgradable to 8 GB using two soDIMM modules Display 0 14 HD 1366 x 768 ...

Page 16: ...technologies Two built in 2 watt 15 cc chamber speaker size 18phi True 5 1 channel surround sound output High definition audio support S PDIF Sony Philips Digital Interface support for digital speakers MS Sound compatible Built in microphone Optical Media Drive 0 4X Blu ray Disc writer DVD Super Multi double layer drive Read 24X CD ROM 24X CD R 24X CD RW 8X DVD ROM 8X DVD R 8X DVD R 6X DVD ROM DL ...

Page 17: ...esolution Acer Video Conference Manager software featuring Video Quality Enhancement VQE technology supporting 640 x 480 resolution online video calls Wireless and networking 0 WLAN IEEE 802 11b g n WPAN Bluetooth 3 0 HS LAN Gigabit Ethernet Wake on LAN ready Privacy Control 0 BIOS user supervisor HDD passwords Kensington lock slot Dimensions and Weight 0 Dimensions 0 342 W x 245 D x 32 2 33 9 H m...

Page 18: ...ernet scroll key international language support Touchpad 0 Multi touch touchpad supporting two finger scroll pinch rotate flip I O Ports 0 Multi in 1 card reader SD MMC MMCplus MS MS PRO xD Three USB 2 0 ports HDMI port with HDCP support External display VGA port Headphone speaker line out jack with S PDIF support Microphone in jack Ethernet RJ 45 port DC in jack for AC adapter Optional Items 0 1 ...

Page 19: ... York Times Reader US only Norton Online Backup Security 0 McAfee Internet Security Suite Trial MyWinLocker except China Hong Kong Multimedia 0 Acer Arcade Deluxe Acer InstantOn Arcade NTI Media Maker Gaming 0 Oberon GameZone except US Canada Hong Kong Korea WildTangent US Canada only Communication and ISP 0 Acer Crystal Eye Acer Video Conference Manager Microsoft Silverlight Skype Windows Live Es...

Page 20: ...hortcut 2009 Canada France Germany Italy Mexico Spain UK US only Netflix shortcut US only Warranty 0 One year International Travelers Warranty ITW Environment 0 Temperature Operating 5 C to 35 C Non operating 20 C to 65 C Humidity non condensing Operating 20 to 80 Non operating 20 to 80 ...

Page 21: ...ew No Icon Item Description 1 Integrated webcam Web camera for video communication only for certain model 2 Display screen Also called Liquid Crystal Display LCD displays computer output Configuration may vary by models 3 Power button Turns the computer on and off 4 Keyboard For entering data into your computer 5 Touchpad Touch sensitive pointing device which functions like a computer mouse ...

Page 22: ...us Charging The light shows amber when the battery is charging Fully charged The light shows blue when in AC mode HDD indicator Indicates when the hard disk drive is active Communication indicator Indicates the computer s wireless connectivity device status 8 Click buttons left and right The left and right buttons function like the left and right mouse buttons 9 Palm rest Comfortable support area ...

Page 23: ...computer s battery pack Table 1 3 Left View No Icon Item Description 1 DC in jack Connects to an AC adapter 2 Ethernet RJ 45 port Connects to an Ethernet 10 100 1000 based network 3 External display VGA port Connects to a display device e g external monitor LCD projector 4 HDMI port Supports high definition digital video connections 5 USB 2 0 port Connect to USB 2 0 devices e g USB mouse USB camer...

Page 24: ...Lights up when the optical drive is active 6 Optical drive eject button Ejects the optical disk from the drive 7 Emergency eject hole Ejects the optical drive tray when the computer is turned off Note Insert a paper clip to the emergency eject hole to eject the optical drive tray when the computer is off 8 Kensington lock slot Connects to a Kensington compatible computer security lock Note Wrap th...

Page 25: ...o Icon Item Description 1 Battery bay Houses the computer s battery pack 2 Battery release latch Releases the battery for removal 3 Hard disk bay Houses the computer s hard disk secured with screws 4 WLAN module bay Houses the computer s WLAN module 5 Memory compartment Houses the computer s main memory ...

Page 26: ...nd execution functions These two buttons are the equivalent of the left and right buttons on a mouse Tapping on the TouchPad is the same as clicking the left button Table 1 6 Indicators Icon Item Description Power indicator Indicates the computer s power status Battery indicator Indicates the computerís battery status Charging The light shows amber when the battery is charging Fully charged The li...

Page 27: ...a separate cursor windows key lock function keys special and full sized keys Figure 1 7 Keyboard Table 1 7 Touchpad Function Left Button 2 Right Button 3 Main Touchpad 1 Execute Quickly click twice Rapidly tap twice Select Click once Tap once Access context menu Click once Movie Music Play pause Stop Previous Next Mute ...

Page 28: ... following definitions When On the system boots with external keyboard keypad Num Lock status On Internal keyboard overlay numeric keys are disabled The key can be turned on off via the internal keyboard Fn F11 or the external keyboard keypad Num Lock affects the external keyboard keypad only Shift state is NOT used for the cursor movement by the numeric keys The state of the Num Lock is not chang...

Page 29: ...top F1 Show the Help window E Open Windows Explorer F Search for a file or folder D Display the desktop CTRL F Search for computers if you are on a network CTRL L Lock your computer if you are connected to a network domain or switch users if you re not connected to a network domain CTRL TAB Moves focus from Start menu to the Quick Launch toolbar to the system tray use RIGHT ARROW or LEFT ARROW to ...

Page 30: ...nd Off using a pop up window Fn F4 Sleep Puts the computer in Sleep mode Fn F5 Display toggle Switches display output between the display screen external monitor if connected and both Fn F6 Display off Turns Off the LCD back light Fn F7 Touchpad toggle Turns the touchpad On and Off Fn F8 Speaker toggle Turns the speakers On and Off Fn Home Play Pause Play or pause a selected media file Fn Pg Up St...

Page 31: ...oftware do not support the Euro symbol See www microsoft com typography faq faq12 htm for more information The US dollar sign 0 1 Open a text editor or word processor 2 Hold Shift and then press the 4 key at the upper center of the keyboard NOTE NOTE This function varies according to the language settings Fn Brightness Up Increases the screen brightness Fn Brightness Up Increases the screen bright...

Page 32: ...1 22 Hardware Specifications and Configurations System Block Diagram Figure 1 10 System Block Diagram ...

Page 33: ... Operating not writing to optical disc 0 C to 35 C 32 F to 95 F Operating writing to optical disc 5 C to 35 C 41 F to 95 F Nonoperating 20 C to 60 C 4 F to 140 F Relative humidity Operating 10 to 90 Nonoperating 5 to 95 Maximum altitude unpressurized Operating 15 m to 3 048 m 50 ft to 10 000 ft Nonoperating 15 m to 12 192 m 50 ft to 40 000 ft Shock Operating 125 g 2 ms half sine Nonoperating 200 g...

Page 34: ...TH BU12 V3 0 Wireless Foxconn Atheros HB97 2x2 BGN Liteon Atheros HB97 2x2 BGN QMI Atheros HB97 2x2 BGN Foxconn Atheros HB95 Foxconn BCM 43225 2x2 BGN PCMCIA N A Audio codec Realtek ALC271 Card reader Realtek RTS5138 Item Specification CPU type Intel Core i5 560M 480M Processor Intel Core i3 390M 380M Processor Intel Pentium P6200 P6300 processor CPU package PGA988 Core Logic Four execution cores ...

Page 35: ...2 26 2 2 5 GT s 32 nm 3 MB PGA988 1 075 1 175 V P6200 2 13 2 2 5 GT s 32 nm 3 MB PGA988 1 075 1 175 V CPU Temperature Fan Speed RPM SPL Spec dBA 50 2600 28 58 3000 31 66 3300 34 74 3700 37 85 4000 40 Throttling 50 On 95 C OFF 80 C OS shut down at 100C H W shut down at 92 C Item Specification Memory controller Built in at CPU Memory size 1GB 2GB 4GB DDR3 RAM DIMM socket number 2 Supports memory siz...

Page 36: ... 2 MB Total Memory MB 0 1024 1024 0 2048 2048 1024 0 1024 1024 1024 2048 1024 2048 3072 2048 0 2048 2048 1024 3072 2048 2048 4096 Item Specification Chipset NVidia N12PGS A1 40nm 29mm 29mm GB2 128 package NVidia N12PGV OP B A1 40nm 29mm 29mm GB1 128 package Memory support 512MB 1GB 2GB DDR3 Item Specification Chipset NVidia N12PGS A1 N12PGV OP B A1 Package 29x29mm GB1 128 package Interface N A Com...

Page 37: ...ws 7 logo program Microsoft SLP 1 0 support Microsoft OA 2 0 2 1 support Refer to Acer BIOS specification Item Specification LAN Chipset Atheros AR8151L LAN connector type RJ45 LAN connector location RJ45 at the left side Features Supports 10 100 1000 Mbps Integrated 10 100 BASE T transceiver Wake on LAN support compliant with ACPI 2 0 PCI v2 2 Item Specification Type AC4T flat keyboard Total numb...

Page 38: ...n Digital WD5000BP VT 22HXZT 1 Toshiba MK6465GS X Western Digital WD6400BP VT 22HXZT 1 Hitachi HTS547575 A9E384 Toshiba MK7559GS XP Seagate ST9750423 AS Western Digital WD7500BP VT 22HXZT 1 Capacity GB 250 320 500 640 750 Bytes per sector 512 512 512 4096 4096 4096 Data heads 2 3 2 2 4 4 4 4 4 4 4 Drive Format Disks 1 1 2 2 2 2 2 2 2 Spindle speed RPM 5400 Performance Specifications Buffer size 8 ...

Page 39: ... RAM DVD R DVD R DL DVD RW CD CD DA Red Book Standard Audio CD CD TEXT CD ROM Yellow Book Mode1 2 Standard Data CD ROM XA Mode2 Form1 2 Photo CD Multi Session CD I Green Book Mode2 Form1 2 Ready Bridge CD Extra CD Plus Blue Book Audio Text Video Video CD White Book MPEG1 Video CD R Orange Book Part CD RW HSRW Orange Book Part Volume1 Volume 2 Super Audio CD SACD Hybrid type US US RW DVD DVD ROM Bo...

Page 40: ...k MPEG1 Video CD R Orange Book Part CD RW HSRW Orange Book Part Volume1 Volume 2 Super Audio CD SACD Hybrid type US US RW DVD DVD ROM Book 1 02 DVD Dual DVD Video Book 1 1 DVD R Book 1 0 3 9G DVD R Book 2 0 4 7G General Authoring DVD R Version 1 0 DVD RW DVD RW Non CPRM CPRM DVD R Dual Blu Ray BD R BD R DL BD RE BD RE DL Loading mechanism Load Manual Release a Electrical Release Release Button b R...

Page 41: ...10 Lower 45 Right 45 Left 15 Upper 30 Lower Resolution 16 bits 32 bits Intel NVIDIA 800x600p 60Hz 16 9 Y Y Y Y 1024x768p 60Hz 16 9 Y Y Y Y 1280x600 60Hz 16 9 N A N A N A N A 1280x720 60Hz 16 9 Y Y Y Y 1280x768 60Hz 16 9 Y Y Y Y 1360x768 60Hz 16 9 Y Y Y Y 1366x768 60Hz 16 9 Y Y Y Y Item Specification VGA Chip NVidia N12PGS A1 40nm 29mm 29mm GB2 128 package NVidia N12P GV OP B A1 40nm 29mm 29mm GB1 ...

Page 42: ...it s Protocol 3 0 Interface USB 2 0 Connector type SM08B SURS TF JST SM06B XSRK ETB SM08B SURS TF Supported protocol A2DP Item Specifications Controller FOXCONN BCM2070 V2 1 FOXCONN BCM2070 V3 0 FOXCONN ATH BU12 V3 0 Features Mini USB module with built in antenna Bluetooth 3 0 Item Specification Vendor and Model Suyin 1 3M HF1316 P80A SS03 Liteon 1 3M 10P2TF103 Type 1 3 M Item Specification Number...

Page 43: ...Panel Realtek Audio Manager to enhance user experience Provides 10 foot GUI for easy menu navigation on Windows Media Center Microphone Acoustic Echo Cancellation AEC Noise Suppression NS and Beam Forming BF technology for voice application Smart multiple streaming operation HDMI audio driver for AMD platform Dolby PCEE program optional software feature DTS CONNECT optional software feature SRS Tr...

Page 44: ...I socket for wireless module Item Specification Vendor Model name Sanyo AS10D Sony AS10D Samsung AS10D Panasonic AS10D Simplo AS10D LGC AS10D Battery Type Li ion Pack capacity 4400 mAh Number of battery cell 6 Package configuration 3S2P Item Specification Chipset Hynix H5TQ1G63BFR Hynix H5TQ1G63DFR Hynix H5TQ2G63BFR Samsung K4W1G1646G Samsung K4W2G1646C Memory size 512MB 1GB 2GB Interface DDR3 Ite...

Page 45: ...fication Mech Off G3 All devices in the system are turned off completely Soft Off G2 S5 OS initiated shutdown All devices in the system are turned off completely Working G0 S0 Individual devices like CPU and hard disc can be power managed Suspend to RAM S3 CPU set power down VGA Suspend PCMCIA SuspendAudio Power Down Hard Disk Power Down CD ROM Power Down Super I O Low Power mode Save to Disk S4 A...

Page 46: ...ce is active Power button backlight Blue color solid on System on Blue color off System off Battery state Charging Amber solid on Battery charging with AC Blue color solid on Battery full Amber blinking Battery abnormal stop charge or batter in low power state Discharging Amber and blinking Battery in critical low state Amber color off Discharging state Legacy Mode Power Management DMA0 Free DMA1 ...

Page 47: ...use IRQ15 Not in use I O address hex System Function shipping configuration 0000 001F Direct Memory Access Controller 0000 0CF7 PCI bus 0020 0021 Programmable Interrupt Controller 0024 0025 Programmable Interrupt Controller 0028 0029 Programmable Interrupt Controller 002C 002D Programmable Interrupt Controller 002E 002F Motherboard resources 0030 0031 Programmable Interrupt Controller 0034 0035 Pr...

Page 48: ...r 00A0 00A1 Programmable Interrupt Controller 00A4 00A5 Programmable Interrupt Controller 00A8 00A9 Programmable Interrupt Controller 00AC 00AD Programmable Interrupt Controller 00B0 00B1 Programmable Interrupt Controller 00B2 00B3 Motherboard resources 00B4 00B5 Programmable Interrupt Controller 00B8 00B9 Programmable Interrupt Controller 00BC 00BD Programmable Interrupt Controller 00C0 00DF Nume...

Page 49: ...r 1820 183F Intel 5 Series 4 Port SATA AHCI Controller 1840 185F Intel 5 Series 3400 Series Chipset Family SMBus Controller 2000 207F Atheros AR8151 PCIE Gigabit Ethernet Controller 2000 2FFF Intel 5 Series 3400 Series Chipset Family PCI Express Root Port1 FE00 FE00 Motherboard resources FFFF FFFF Motherboard resources FFFF FFFF Motherboard resources I O address hex System Function shipping config...

Page 50: ...1 40 Hardware Specifications and Configurations ...

Page 51: ...CHAPTER 2 System Utilities ...

Page 52: ...4 Main 2 6 Security 2 8 Boot 2 12 Exit 2 13 BIOS Flash Utilities 2 14 DOS Flash Utility 2 15 WinFlash Utility 2 15 Remove HDD BIOS Password Utilities 2 16 Removing HDD Password 2 16 Removing BIOS Passwords 2 17 Cleaning BIOS Passwords 2 18 Using DMI Tools 2 19 LAN EEPROM Utility 2 19 ...

Page 53: ...set the parameter to Enabled To change the boot device without entering the BIOS SETUP press F12 during POST to enter the multi boot menu Navigating the BIOS Utility 0 Six menu options are Information Main Security Boot Exit To navigate through the following Menu use the left and right arrow keys Item use the up and down arrow keys Change parameter value press F5 or F6 Exit Press Esc Load default ...

Page 54: ...master IDE0 Serial Number Serial number of HDD0 installed on primary IDE master ATAPI Model Name Model name of Optical device installed in system System BIOS Version System BIOS version Phoenix SecureCore tm Setup Utility CPU Type CPU Speed IDE0 Model Name IDE0 Serial Number ATAPI Model Name System BIOS Version VGA BIOS Version KBC Version Serial Number Asset Tag Number Product Name Manufacturer N...

Page 55: ...BC Version Keyboard controller version Serial Number Serial number of unit Asset Tag Number Asset tag number of system Product Name Product name of the system Manufacturer Name Manufacturer of system UUID Universally Unique Identifier Table 2 1 BIOS Information Continued Parameter Description ...

Page 56: ...ory for video N A Quiet Boot Shows OEM original equipment manufacturer screen during system boot instead of traditional POST screen Option Enabled or Disabled Network Boot Option to boot system from LAN local area network Option Enabled or Disabled Item Specific Help System Time System Date Total Memory Video Memory Quiet Boot Network Boot F12 Boot Menu D2D Recovery SATA Mode F1 Esc Help Exit Sele...

Page 57: ...ot menu during POST Option Enabled or Disabled D2D Recovery Option to use D2D Recovery function Option Enabled or Disabled SATA Mode Option to set SATA controller mode Option AHCI or IDE Table 2 2 BIOS Main Continued Parameter Description Format Option ...

Page 58: ...ear or Set Set Supervisor Password Option to set supervisor password N A Set User Password Option to set user password N A Set HDD Password Option to set HDD0 password N A Password on Boot Shows if password is required during system boot Disabled or Enabled Item Specific Help Supervisor Password controls access of the whole setup utility It can be used to boot up when Password on boot is enabled S...

Page 59: ...sword the computer sets the User Password parameter to Set NOTE NOTE Users can opt to enable the Password on Boot parameter 4 Press F10 to save changes and exit BIOS Setup Utility Removing a Password 0 Perform the following 1 Use the and keys to highlight Set Supervisor Password and press Enter The Set Supervisor Password dialog box appears Figure 2 5 Set Supervisor Password 2 Type current passwor...

Page 60: ...rm New Password field Figure 2 7 Setup Notice 4 Press Enter Computer sets Supervisor Password parameter to Set NOTE NOTE Users can enable the Password on boot parameter 5 Press F10 to save changes and exit BIOS Setup Utility If the verification is OK the screen shows as follows Figure 2 8 Setup Warning Invalid Password The password setting is complete after the user presses Enter Set Supervisor Pa...

Page 61: ...he current password entered does not match the current password the screen shows the Setup Warning dialog Figure 2 9 Figure 2 9 Setup Warning Passwords Do Not Match Setup Warning Passwords do not match Re enter Password Continue ...

Page 62: ...igure 2 10 BIOS Boot Item Specific Help Use or to select a device then press F6 to move it up the list or F5 to move it down the list Press Esc to escape the menu Boot Priority Order F1 Esc Help Exit Select Item Select Menu Change Values Select Sub Menu F5 F6 Enter F9 F10 Setup Defaults Save and Exit 2 IDE CD DVD XXXXXXX XX XXX XXXXXX 3 Network Boot XXXX XXX XXXX XXXX 4 USB HDD 5 USB FDD 6 USB CD ...

Page 63: ...ithout saving setup item changes to system Load Setup Default Load default values for all setup items Discard Changes Load previous values of all setup items Save Changes Save setup item changes to system Main Item Specific Help Exit System Setup and save your changes to CMOS F1 Esc Help Exit Select Item Select Menu Change Values Select Sub Menu F5 F6 Enter F9 F10 Setup Defaults Save and Exit Info...

Page 64: ...used NOTE NOTE Use AC adaptor power supply when running Flash utility If battery pack does not contain power to finish loading BIOS Flash do not boot system Perform the following to run Flash 1 Rename the BIOS file as XXXXXXX FD 2 Copy the XXXXXXX FD file to a bootable USB device containing the Crisis Recovery disk files 3 Turn off the computer 4 Insert the USB device containing the renamed BIOS f...

Page 65: ...ing to use the WinFlash Utility 1 Double click the WinFlash executable file 2 Click OK to begin the update Item Specific Help Use or to select a device then press F6 to move it up the list or F5 to move it down the list Press Esc to escape the menu Boot Priority Order F1 Esc Help Exit Select Item Select Menu Change Values Select Sub Menu F5 F6 Enter F9 F10 Setup Defaults Save and Exit 1 IDE 0 XXXX...

Page 66: ...igure 2 13 Password Error Status To reset the HDD password perform the following 1 Open the computer in a DOS environment 2 Enter the unlock6 XXXXX 0 where XXXXX is the HDD password error code command Figure 2 14 Unlock Key Code 3 Press Enter to display the command options Figure 2 15 Password Encoding 4 Select option 2 Upper case ASCII code then press Enter 5 Write down the generated master passw...

Page 67: ...ssword generated in step 5 then press Enter Removing BIOS Passwords 0 To clear a lost BIOS password User or Supervisor password you need to short the clear password hardware gap G2 located on the mainboard Refer to Clearing Password Check for detailed instructions Figure 2 16 G2 Hardware Gap ...

Page 68: ...an the User or Supervisor passwords perform the following steps 1 At the DOS prompt enter clnpwd exe 2 Press 1 or 2 to clean the desired password shown on the screen Figure 2 17 Clean BIOS Password 3 The on screen message shows function success or failure ...

Page 69: ...u item and move the entry USB HDD to the first position Figure 2 18 BIOS Boot 5 Connect the USB HDD and reboot the computer 6 At the command prompt navigate to the MAC folder 7 Execute the MAC BAT file 8 At prompt type in MAC address 9 Press Enter 10 Reboot when the process has completed Item Specific Help Use or to select a device then press F6 to move it up the list or F5 to move it down the lis...

Page 70: ...2 20 System Utilities ...

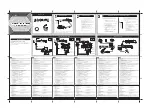
Page 71: ...CHAPTER 3 Machine Maintenance ...

Page 72: ...bly Flowchart 3 22 Removing the Keyboard 3 23 Removing the Palmrest Module Upper Cover 3 26 Removing the Speakers 3 28 Removing the Power Button Board 3 31 Removing the Touchpad Board 3 33 Removing the USB Board 3 35 Removing the Bluetooth Module 3 37 Removing the RTC Battery 3 38 Removing the Mainboard 3 39 Removing the Thermal Module 3 42 Removing the CPU 3 44 Removing the LCD Module 3 45 LCD Mo...

Page 73: ...ing the Mainboard 3 75 Replacing the Bluetooth Module 3 77 Replacing the USB Board 3 78 Replacing the Touchpad Board 3 80 Replacing the Power Button Board 3 82 Replacing the Speakers 3 84 Replacing the Palmrest Module Upper Cover 3 87 Replacing the Keyboard 3 90 External Module Reassembly Process 3 92 Replacing the ODD Module 3 92 Replacing the DIMM Module 3 95 Replacing the WLAN Module 3 96 Repla...

Page 74: ...3 4 ...

Page 75: ...onents vary in size During the disassembly process group the screws with the corresponding components to avoid mismatch when putting back the components The product previews seen in the disassembly procedures may not represent the final product color or configuration Recommended Equipment 0 To disassemble the computer the following tools are suggested Wrist grounding strap and conductive mat for p...

Page 76: ...ceeding with the disassembly procedure make sure that you do the following 1 Turn off the power to the system and all peripherals 2 Unplug the AC adapter and all power and signal cables from the system Figure 3 1 AC Adapter 3 Place the system on a flat stable surface ...

Page 77: ...lustrate the entire disassembly sequence Observe the order of the sequence to avoid damage to any of the hardware components For example if you want to remove the main board you must first remove the keyboard then disassemble the inside assembly frame in that order Table 3 1 Main Screw List Screw Quantity Acer Part Number M2 5 x L6 21 86 00E12 536 M3 x L4 2 86 9A524 4R0 M2 x L3 15 86 FR901 001 M2 ...

Page 78: ...uantity Acer Part Number Base Door Disassembly M2 5 x L6 3 86 00E12 536 HDD Module Disassembly M2 x L3 1 86 FR901 001 HDD Bracket Disassembly M3 x L4 2 86 9A524 4R0 WLAN Module Disassembly M2 x L3 1 86 FR901 001 ODD Module Disassembly M2 5 x L6 1 86 00E12 536 ODD Bracket Disassembly M2 x L3 1 86 FR901 001 BATTERY PACK DUMMY CARD ODD MODULE DIMM MODULES WLAN MODULE BASE DOOR HDD MODULE ...

Page 79: ... battery release latch to release the battery from the battery bay Figure 3 3 Battery Pack 3 Remove the battery from the battery bay Figure 3 4 Battery Pack NOTE NOTE The battery has been highlighted with the yellow oval in Figure 3 4 Disconnect the battery and follow local regulations for disposal ...

Page 80: ...3 10 Machine Maintenance Remove the Dummy Card 0 1 Press the dummy card in to allow it to spring out Figure 3 5 Dummy Card 2 Pull the dummy card out Figure 3 6 Dummy Card ...

Page 81: ...ack 2 Release the three 3 screws securing the base door Figure 3 7 Base Door 3 Insert a non marring plastic scribe on the base door s notch to release the base door from the computer Figure 3 8 Base Door Table 3 3 Screws Step Screw Quantity Screw Type Base Door Disassembly M2 5 x L6 3 ...

Page 82: ...3 12 Machine Maintenance 4 Lift the base door to remove Figure 3 9 Base Door ...

Page 83: ...fer to Removing the Base Door 2 Remove the HDD screw Figure 3 10 HDD Module 3 Grasp the black mylar tab and use it to disengage the HDD from its connector Figure 3 11 HDD Module Table 3 4 Screw Step Screw Quantity Screw Type HDD Module Disassembly M2 x L3 1 ...

Page 84: ...nance 4 Lift the HDD from its compartment Figure 3 12 HDD Module 5 Remove the two 2 screws securing the HDD bracket Figure 3 13 HDD Module Table 3 5 Screws Step Screw Quantity Screw Type HDD Bracket Disassembly M3 x L4 2 ...

Page 85: ...Machine Maintenance 3 15 6 Detach the bracket from the HDD Figure 3 14 HDD Bracket ...

Page 86: ...a cables from the WLAN module IMPORTANT Note which color black and white cable corresponds to the Main black and Auxiliary white connectors Figure 3 15 WLAN Module 3 Remove the screw securing the WLAN module Figure 3 16 WLAN Module Table 3 6 Screw Step Screw Quantity Screw Type WLAN Module Disassembly M2 x L3 1 ...

Page 87: ...Machine Maintenance 3 17 4 Pull the WLAN module out of the slot Figure 3 17 WLAN Module ...

Page 88: ...Module 0 1 Refer to Removing the Base Door 2 Push out the latches on both sides of the memory slot clips outward Figure 3 18 DIMM Module 3 Hold the module and pull it out of its slot Figure 3 19 DIMM Module 4 Repeat for additional memory modules ...

Page 89: ...moving the Base Door 2 Remove the screw securing the ODD module Figure 3 20 ODD Module 3 Use the non marring plastic scribe to push the ODD out of the drive bay Figure 3 21 ODD Module Table 3 7 Screw Step Screw Quantity Screw Type ODD Module Disassembly M2 5 x L6 1 ...

Page 90: ...Maintenance 4 Slide the ODD out completely Figure 3 22 ODD Module 5 Remove the screw securing the ODD bracket Figure 3 23 ODD Bracket Table 3 8 Screw Step Screw Quantity Screw Type ODD Bracket Disassembly M2 x L3 1 ...

Page 91: ...Machine Maintenance 3 21 6 Detach the bracket from the module Figure 3 24 ODD Bracket 7 Pry the ODD bezel off the module Figure 3 25 ODD Bracket ...

Page 92: ...sassembly M2 5 x L6 10 86 00E12 536 M2 x L3 3 86 FR901 001 Speakers Disassembly M2 x L3 4 86 FR901 001 Power Button Board Disassembly M2 x L3 1 86 FR901 001 Mainboard Disassembly M2 5 x L6 1 86 00E12 536 Thermal Module Disassembly N A 5 N A LCD Module Disassembly M2 5 x L6 4 86 00E12 536 KEYBOARD BLUETOOTH MODULE THERMAL MODULE RTC BATTERY EXTERNAL MODULES PALMREST MODULE UPPER COVER POWER BUTTON ...

Page 93: ...process Take care not to use excessive force when removing 1 Refer to Removing the Base Door 2 Refer to Removing the HDD Module 3 Refer to Removing the ODD Module 4 Remove the two 2 screws securing the keyboard Figure 3 27 Keyboard Screws Table 3 10 Screws Step Screw Quantity Screw Type Keyboard Disassembly M2 5 x L6 2 ...

Page 94: ...rn the computer over and open the LCD panel 6 Use a plastic flat blade screwdriver to push the latches on the top side of the keyboard Figure 3 28 Keyboard 7 Flip the keyboard over to access the keyboard cable Figure 3 29 Keyboard ...

Page 95: ...Machine Maintenance 3 25 8 Open the connector latch then detach cable to remove keyboard Figure 3 30 Keyboard ...

Page 96: ... on the upper cover Figure 3 31 Upper Cover Screw 3 Open the power button board cable and touchpad cable connector latches then remove the cables Figure 3 32 Power Button Board and Touchpad Cables Table 3 11 Screw Step Screw Quantity Screw Type Upper Cover Disassembly M2 5 x L6 1 Touchpad cable Power button board cable ...

Page 97: ...e top side of the upper cover and insert a small flat blade screwdriver or non marring scribe into each gap to separate the upper cover from the lower cover Once the upper cover is separated lift it from the lower cover Figure 3 34 Upper Cover Table 3 12 Screws Step Screw Quantity Screw Type Upper Cover Disassembly M2 5 x L6 9 M2 x L3 3 ...

Page 98: ...ing the Speakers 0 1 Refer to Removing the Palmrest Module Upper Cover 2 Disconnect the speaker cable from the power button board Figure 3 35 Speaker Cable 3 Release the speaker cable from the adhesive tab Figure 3 36 Speaker Cable ...

Page 99: ...e mylar tape from the speaker cable Figure 3 37 Speaker Cable 5 Remove the four 4 screws securing the speakers Figure 3 38 Speakers Figure 3 39 Speaker Cable Table 3 13 Screws Step Screw Quantity Screw Type Speakers Disassembly M2 x L3 4 ...

Page 100: ...3 30 Machine Maintenance 6 Lift the speakers from the upper cover Figure 3 40 Speaker Cable ...

Page 101: ...Removing the Palmrest Module Upper Cover 2 Open the connector latch then remove the power button cable Figure 3 41 Power Button Cable 3 Detach the mylar tape from the power button cable and remove the power button cable from the upper cover Figure 3 42 Power Button Cable ...

Page 102: ...screw securing the power button board Figure 3 43 Power Button Board 5 Lift the power button board from the upper cover Figure 3 44 Power Button Board Table 3 14 Screw Step Screw Quantity Screw Type Power Button Board Disassembly M2 x L3 1 ...

Page 103: ...the Touchpad Board 0 1 Refer to Removing the Palmrest Module Upper Cover 2 Open the connector latch then remove the touchpad cable Figure 3 45 Touchpad Cable 3 Detach the adhesive tape securing touchpad board Figure 3 46 Touchpad Board ...

Page 104: ...e palm rest s underside and carefully pry the board loose Remove the touchpad board from the palm rest Figure 3 47 Touchpad Board NOTE NOTE A circuit board that is 10cm2 has been highlighted with a yellow rectangle in Figure 3 47 Follow the local regulations for disposing this type of circuit board ...

Page 105: ...moving the USB Board 0 1 Refer to Removing the Palmrest Module Upper Cover 2 Open the connector latch then remove the USB board cable Figure 3 48 USB Board Cable 3 Release the USB board from its securing tab Figure 3 49 USB Board ...

Page 106: ...3 36 Machine Maintenance 4 Lift the USB board from the lower cover Figure 3 50 USB Board ...

Page 107: ...7 Removing the Bluetooth Module 0 1 Refer to Removing the Palmrest Module Upper Cover 2 Disconnect the Bluetooth cable Figure 3 51 Bluetooth Cable 3 Detach the Bluetooth module from the mainboard Figure 3 52 Bluetooth Module ...

Page 108: ... 2 Insert a small flat blade screwdriver between the battery and spring latch to dislodge the battery then remove the battery Figure 3 53 RTC Battery NOTE NOTE The RTC battery has been highlighted with a yellow circle in Figure 3 47 Detach the RTC battery and follow the local regulations for disposing it ...

Page 109: ... Removing the Mainboard 0 1 Refer to Removing the Palmrest Module Upper Cover 2 Open the connector latch then remove the USB board cable Figure 3 54 USB Cable 3 Disconnect the LCD cable from the mainboard Figure 3 55 LCD Cable ...

Page 110: ...the screw from the mainboard Figure 3 56 Mainboard Screw 5 Carefully pull the mainboard out of the base enclosure then flip it over Figure 3 57 Mainboard Table 3 15 Screw Step Screw Quantity Screw Type Mainboard Disassembly M2 5 x L6 1 ...

Page 111: ...oard Figure 3 58 DC input Cable 7 Remove the mainboard from the lower cover Figure 3 59 Mainboard NOTE NOTE A circuit board that is 10 cm2 has been highlighted with a yellow rectangle in Figure 3 59 Follow the local regulations for disposing this type of circuit board ...

Page 112: ...al module fan cable from the mainboard Figure 3 60 Fan Cable 3 Loosen the five 5 spring loaded captive screws securing the thermal module Follow the screw sequence indicated on the image below Figure 3 61 Thermal Module Screws Table 3 16 Screws Step Screw Quantity Screw Type Thermal Module Disassembly N A 5 N A ...

Page 113: ...Machine Maintenance 3 43 4 Remove the thermal module from the mainboard Figure 3 62 Thermal Module Screws ...

Page 114: ...ance Removing the CPU 0 1 Refer to Removing the Mainboard 2 Use a flat blade screwdriver to turn the CPU socket lock screw counter clockwise Figure 3 63 CPU Socket Screw 3 Remove the CPU from the mainboard Figure 3 64 CPU ...

Page 115: ...g the LCD Module 0 1 Refer to Removing the Mainboard 2 Release the antenna cables from its latches Figure 3 65 Antenna Cables 3 Release the antenna cables from the adhesive tabs and the latches securing them Figure 3 66 Antenna Cables ...

Page 116: ...3 46 Machine Maintenance 4 Pull the antenna cables out of the lower cover Figure 3 67 Antenna Cables 5 Remove the DC input cable from the lower cover Figure 3 68 DC input Cable ...

Page 117: ...7 6 Remove the four 4 screws securing the LCD module Figure 3 69 LCD Module 7 Lift the LCD module from the lower cover Figure 3 70 LCD Module Table 3 17 Screws Step Screw Quantity Screw Type LCD Module Disassembly M2 5 x L6 4 ...

Page 118: ...lowchart Table 3 18 Screw List Step Screw Quantity Acer Part Number LCD Bezel Disassembly M2 5 x L5 2 86 TK501 001 LCD Panel Disassembly M2 5 x L4 4 86 00H36 534 LCD Brackets Disassembly M2 x L3 4 86 FR901 001 LCD BEZEL LCD PANEL WEB CAMERA ANTENNAS LCD COVER MICROPHONE LEFT LCD BRACKET LCD FPC CABLE RIGHT LCD BRACKET LCD MODULE ...

Page 119: ...LCD Module 2 Remove the two screw covers at the bottom of the LCD bezel Figure 3 72 LCD Bezel Screw Covers 3 Remove the two screws D at the bottom of the LCD bezel Figure 3 73 LCD Bezel Screws Table 3 19 Screws Step Screw Quantity Screw Type LCD Bezel Disassembly M2 5 x L5 2 ...

Page 120: ...y pry loose the LCD bezel from the LCD cover Start on the bottom side continue to the left and right sides and finally the top side Remove the front panel Figure 3 74 LCD Bezel 5 Remove the bezel from the LCD module Figure 3 75 LCD Bezel ...

Page 121: ...er to Removing the LCD Bezel 2 Disconnect the camera board cable Figure 3 76 Camera Board Cable 3 Remove the four 4 screws securing the LCD panel Figure 3 77 LCD Panel Screws Table 3 20 Screws Step Screw Quantity Screw Type LCD Panel Disassembly M2 5 x L4 4 ...

Page 122: ...3 52 Machine Maintenance 4 Disconnect the microphone cable Figure 3 78 Microphone Cable 5 Lift the panel from the LCD cover Figure 3 79 LCD Panel ...

Page 123: ...Machine Maintenance 3 53 6 Turn the LCD on its front to access the LCD webcam cable and peel off the LCD cable from the LCD panel Figure 3 80 LCD Cable 7 Disconnect the LCD cable Figure 3 81 LCD Cable ...

Page 124: ...0 1 Refer to Removing the LCD Panel 2 Remove the four 4 screws securing the left and right LCD brackets then remove the left and right brackets Figure 3 82 LCD Brackets Table 3 21 Screws Step Screw Quantity Screw Type LCD Brackets Disassembly M2 x L3 4 ...

Page 125: ...3 55 Removing the Microphone 0 1 Refer to Removing the LCD Panel 2 Release the microphone cable from the adhesive tabs securing them Figure 3 83 Microphone 3 Remove the microphone from the LCD cover Figure 3 84 Microphone ...

Page 126: ...3 56 Machine Maintenance Removing the Camera Board 0 1 Refer to Removing the LCD Panel 2 Carefully pry the camera board off the LCD cover Figure 3 85 Camera Board ...

Page 127: ...Removing the Antennas 0 1 Refer to Removing the LCD Panel 2 Release the antenna cables from the cable guides and detach the tin foil tapes Figure 3 86 Antennas 3 Remove the antenna cables from the LCD cover Figure 3 87 Antennas ...

Page 128: ...CD Reassembly Process 0 Replacing the Antennas 0 1 Place the antenna cables on the LCD cover Figure 3 88 Antennas 2 Secure the cables with the tin foil tapes and route the antenna cables to the cable guides Figure 3 89 Antennas ...

Page 129: ...Machine Maintenance 3 59 Replacing the Camera Board 0 1 Place the camera board on the LCD cover and press down to secure in place Figure 3 90 Camera Board ...

Page 130: ...3 60 Machine Maintenance Replacing the Microphone 0 1 Place the microphone on the LCD cover Figure 3 91 Microphone 2 Secure the microphone with the adhesive tabs Figure 3 92 Microphone ...

Page 131: ...ng the LCD Brackets 0 1 Attach the LCD left and right brackets to the LCD panel then secure the brackets with the four 4 screws Figure 3 93 LCD Brackets Table 3 22 Screws Step Screw Quantity Screw Type LCD Brackets Assembly M2 x L3 4 ...

Page 132: ... Maintenance Replacing the LCD Panel 0 1 Connect the LCD cable to the LCD panel Figure 3 94 LCD Cable 2 Press down the LCD cable to the LCD panel then secure the adhesive tape to the LCD cable Figure 3 95 LCD Cable ...

Page 133: ...Machine Maintenance 3 63 3 Place the LCD panel on the LCD cover Figure 3 96 LCD Cable 4 Connect the microphone cable Figure 3 97 Microphone Cable ...

Page 134: ...nce 5 Secure the LCD panel with the four 4 screws Figure 3 98 LCD Panel Screws 6 Connect the camera board cable Figure 3 99 Camera Board Cable Table 3 23 Screws Step Screw Quantity Screw Type LCD Panel Assembly M2 5 x L4 4 ...

Page 135: ...ce NOTE NOTE Make sure that the LCD webcam microphone and antenna cables are properly routed on the hinge sides and there is no gap between the bezel and the assembly lid Figure 3 100 LCD Bezel 2 Secure the bezel with the two 2 screws Figure 3 101 LCD Bezel Screws Table 3 24 Screws Step Screw Quantity Screw Type LCD Bezel Assembly M2 5 x L5 2 ...

Page 136: ...3 66 Machine Maintenance 3 Secure the bezel with the two 2 screw covers Figure 3 102 LCD Bezel Screw Covers ...

Page 137: ...ess 0 Replacing the LCD Module 0 1 Position the LCD module on the lower cover Figure 3 103 LCD Module 2 Secure LCD module with the four 4 screws Figure 3 104 LCD Module Table 3 25 Screw Step Screw Quantity Screw Type LCD Module Disassembly M2 5 x L6 4 ...

Page 138: ...e Maintenance 3 Insert the DC input cable into the lower cover Figure 3 105 DC input Cable 4 Secure the antenna cables to the latches then place the mylar tapes over the cables as shown below Figure 3 106 Antennas ...

Page 139: ...e Maintenance 3 69 5 Insert the antenna cables into the opening on the lower cover as shown below Figure 3 107 Antennas 6 Secure the antenna cables to the cable guides on the lower cover Figure 3 108 Antennas ...

Page 140: ...CPU 0 1 Place the CPU into the socket Figure 3 109 CPU 2 Make sure the gold arrow on the corner of the CPU is aligned with the beveled corner of the socket The CPU will easily fit into the socket if you oriented it properly Figure 3 110 CPU ...

Page 141: ...Machine Maintenance 3 71 3 Use a flat blade screwdriver to turn the socket lock screw in a 180 clockwise direction to secure the CPU in place Figure 3 111 CPU Socket Screw ...

Page 142: ... of thermal grease from the CPU using a lint free cloth or cotton swab and Isopropyl Alcohol Acetone or other approved cleaning agent 2 Apply a small amount of thermal grease to the centre of the CPU there is no need to spread the grease manually the force used during the installation of the thermal module is sufficient 3 Place the thermal module on the mainboard Make sure to align the screw holes...

Page 143: ...ermal module in place Follow the sequence of the number beside each screw when securing the thermal module Figure 3 113 Thermal Module Screws 5 Connect the fan cable to the mainboard Figure 3 114 Fan Cable Table 3 26 Screws Step Screw Quantity Screw Type Thermal Module Assembly N A 5 N A ...

Page 144: ...Machine Maintenance Replacing the RTC Battery 0 1 Place the RTC battery into the empty socket on the mainboard with the symbol facing up then press down to secure it to the mainboard Figure 3 115 RTC Battery ...

Page 145: ... Connect the DC input cable to the mainboard Figure 3 116 DC input Cable 2 Slide the mainboard toward the left of the lower cover with the I O ports of the mainboard extruding from the holes in the lower cover then lower into place Figure 3 117 Mainboard ...

Page 146: ...intenance 3 Secure the mainboard with a screw Figure 3 118 Mainboard Screw 4 Connect the LCD cable to the mainboard Figure 3 119 LCD Cable Table 3 27 Screw Step Screw Quantity Screw Type Mainboard Assembly M2 5 x L6 1 ...

Page 147: ...tenance 3 77 Replacing the Bluetooth Module 0 1 Place the Bluetooth module on the mainboard and press down to secure in place Figure 3 120 Bluetooth Module 2 Connect the Bluetooth cable Figure 3 121 Bluetooth Cable ...

Page 148: ...chine Maintenance Replacing the USB Board 0 1 Align the I O ports of the USB board into the holes into the lower cover Figure 3 122 USB Board 2 Slide the USB board under the securing tab Figure 3 123 USB Board ...

Page 149: ... Connect and lock the USB board cable to the mainboard Figure 3 124 USB Cable 4 Make sure the USB board cable is adhered to the lower cover then connect and lock the USB board cable to the USB board Figure 3 125 USB Board Cable ...

Page 150: ... 1 Attach a double sided adhesive tape on the back side of the touchpad board then place the touchpad into the palm rest and press down to secure in place Figure 3 126 Touchpad Board 2 Attach the adhesive tape over touchpad board Figure 3 127 Touchpad Board ...

Page 151: ...Machine Maintenance 3 81 3 Connect and lock the touchpad cable to the touchpad board Figure 3 128 Touchpad Cable ...

Page 152: ... Board 0 1 Place the power button board on the upper cover Figure 3 129 Power Button Board 2 Secure the power button board with a screw Figure 3 130 Power Button Board Table 3 28 Screw Step Screw Quantity Screw Type Power Button Board Assembly M2 x L3 1 ...

Page 153: ...e 3 83 3 Place the power button cable on the upper cover and secure it with a mylar tape Figure 3 131 Power Button Cable 4 Connect and lock the power button cable to the power button board Figure 3 132 Power Button Cable ...

Page 154: ...lacing the Speakers 0 1 Position the speakers on the upper cover Figure 3 133 Speaker Cable 2 Secure the speakers with four 4 screws Figure 3 134 Speakers Table 3 29 Screw Step Screw Quantity Screw Type Speakers Assembly M2 x L3 4 ...

Page 155: ...Machine Maintenance 3 85 3 Attach the mylar tape over the speaker cable Figure 3 135 Speaker Cable 4 Secure the speaker cable under the adhesive tab Figure 3 136 Speaker Cable ...

Page 156: ...3 86 Machine Maintenance 5 Connect the speaker cable to the power button board Figure 3 137 Speaker Cable ...

Page 157: ...odule Upper Cover 0 1 Align the upper cover with the lower cover then press it down on all sides until it snaps into place Figure 3 138 Upper Cover 2 Connect and lock the power button board cable to the mainboard Figure 3 139 Power Button Board Cable ...

Page 158: ...onnect and lock the touchpad cable to the mainboard Figure 3 140 Touchpad Cable 4 Secure the upper cover with a screw Figure 3 141 Upper Cover Screw Table 3 30 Screw Step Screw Quantity Screw Type Upper Cover Assembly M2 5 x L6 1 ...

Page 159: ...CD panel and turn the computer over so that the base is facing up 6 Secure the upper cover with the twelve 12 screws Figure 3 142 Lower Cover Screws Table 3 31 Screws Step Screw Quantity Screw Type Upper Cover Assembly M2 5 x L6 9 M2 x L3 3 ...

Page 160: ...ng the keyboard make sure that you install the keyboard standoff 86 RC901 001 before installing the new keyboard Remember to peel off the paper from the keyboard standoff Figure 3 143 Metal Washers 1 Connect and lock the keyboard cable to the mainboard Figure 3 144 Keyboard ...

Page 161: ...th the corresponding slots on the upper cover then press the keyboard down until the tabs snaps into place Figure 3 145 Keyboard 3 Secure the keyboard with the two 2 screws Figure 3 146 Lower Cover Screws Table 3 32 Screws Step Screw Quantity Screw Type Keyboard Assembly M2 5 x L6 2 ...

Page 162: ...Machine Maintenance External Module Reassembly Process 0 Replacing the ODD Module 0 1 Attach the ODD bezel to the optical drive Figure 3 146 ODD Bezel 2 Attach the bracket to the ODD Figure 3 147 ODD Bracket ...

Page 163: ... Secure the bracket with a screw Figure 3 148 ODD Bracket 4 Slide the ODD into the drive bay until flush with the lower cover Figure 3 149 ODD Module Table 3 33 Screw Step Screw Quantity Screw Type ODD Bracket Assembly M2 x L3 1 ...

Page 164: ...3 94 Machine Maintenance 5 Secure the ODD with a screw Figure 3 150 ODD Module Table 3 34 Screw Step Screw Quantity Screw Type ODD Module Assembly M2 5 x L6 1 ...

Page 165: ...e into an empty memory slot Figure 3 151 DIMM Module 2 Press it down until it clicks into place The module is keyed so it can only be inserted in one direction If the module does not fit make sure that the notch in the module lines up with the tab in the memory slot Figure 3 152 DIMM Module ...

Page 166: ... Module 0 1 Insert the WLAN module at a 30 angle into the empty Mini Card slot Figure 3 153 WLAN Module 2 Secure the WLAN module with a screw Figure 3 154 WLAN Module Table 3 35 Screw Step Screw Quantity Screw Type WLAN Module Assembly M2 x L3 1 ...

Page 167: ...Machine Maintenance 3 97 3 Connect the two 2 antenna cables to the WLAN module IMPORTANT The main black connector is on the bottom and the auxiliary white connector is on top Figure 3 155 WLAN Module ...

Page 168: ...ce Replacing the HDD Module 0 1 Place the bracket over the HDD Figure 3 156 HDD Bracket 2 Secure it with the two screws Figure 3 157 HDD Module Table 3 36 Screws Step Screw Quantity Screw Type HDD Bracket Assembly M3 x L4 2 ...

Page 169: ...Machine Maintenance 3 99 3 Insert the HDD into the bay Figure 3 158 HDD Module 4 Hold the tab and slide the HDD firmly into the docking connector Figure 3 159 HDD Module ...

Page 170: ...3 100 Machine Maintenance 5 Secure the HDD to the base with a screw Figure 3 160 HDD Module Table 3 37 Screw Step Screw Quantity Screw Type HDD Module Assembly M2 x L3 1 ...

Page 171: ...rt the tabs on the base door into the slots on the lower cover Figure 3 161 Base Door 2 Lower the base door into place and secure it with the three 3 screws Figure 3 162 Base Door Table 3 38 Screws Step Screw Quantity Screw Type Base Door Assembly M2 5 x L6 3 ...

Page 172: ...3 102 Machine Maintenance Remove the Dummy Card 0 1 Insert the dummy card into the slot until it clicks into place ...

Page 173: ...Machine Maintenance 3 103 Replacing the Battery Pack 0 1 Slide the battery pack into the bay then press down until it snaps into place Figure 3 163 Battery Pack ...

Page 174: ...3 104 Machine Maintenance ...

Page 175: ...CHAPTER 4 Troubleshooting ...

Page 176: ... 8 Touchpad Failure 4 9 Internal Speaker Failure 4 10 Microphone Failure 4 12 USB Failure 4 13 WLAN Failure 4 14 Bluetooth Failure 4 15 Card Reader Failure 4 16 Thermal Unit Failure 4 17 Other Functions Failure 4 18 Intermittent Problems 4 19 Undetermined Problems 4 19 Error Codes 4 20 BIOS Beep Codes 4 21 POST Codes 4 26 ...

Page 177: ...tem responses 1 Obtain as much detailed information as possible about the problem 2 If possible verify the symptoms by re creating the failure through diagnostic tests or repeating the operation that led to the problem 3 Use Table 4 1 with the verified symptom to determine the solution 4 If the Issue is still not resolved refer to Online Support Information Table 4 1 Common Problems Symptoms Verif...

Page 178: ... extension cables between the computer and the outlet 3 Remove all surge protectors between the computer and the electrical outlet Plug the computer directly into a known serviceable electrical outlet 4 Disconnect the power and open the casing to check the Thermal Unit refer to Thermal Unit Failure and fan airways are free of obstructions 5 Remove all external and non essential hardware connected ...

Page 179: ... a time 1 Make sure that internal display is selected Switching between internal and external by pressing Fn F5 Reference Product pages for specific model procedures 2 Make sure the computer has power by checking for one of the following Fans start up Status LEDs illuminate If no power refer to Power On Issues 3 Drain stored power by removing the power cable and battery Hold the power button for 1...

Page 180: ...t running on battery alone as this may reduce display brightness 2 Adjust the brightness to its highest level Refer to the User Manual for instructions on adjusting the settings If the display is too dim at the highest brightness setting the LCD is faulty and should be replaced Refer to Disassembly Process 3 Check the display resolution is correctly configured Minimize or close all Windows If disp...

Page 181: ...Troubleshooting 4 7 LCD Failure 0 If the LCD fails perform the following one at a time Do not replace a non defective FRU Figure 4 3 LCD Failure ...

Page 182: ...4 8 Troubleshooting Keyboard Failure 0 If the Keyboard fails perform the following one at a time Do not replace a non defective FRU Figure 4 4 Keyboard Failure ...

Page 183: ...Troubleshooting 4 9 Touchpad Failure 0 If the Touchpad fails perform the following one at a time Do not replace a non defective FRU Figure 4 5 Touchpad Failure ...

Page 184: ...o Start Control Panel System and Maintenance System Device Manager Check the Device Manager to determine that The device is properly installed There are no red Xs or yellow exclamation marks There are no device conflicts No hardware is listed under Other Devices 3 If updated recently roll back the audio driver to the previous version 4 Remove and reinstall the audio driver 5 Make sure that all vol...

Page 185: ...o not show right click on the Playback tab and select Show Disabled Devices clear by default 7 Select Speakers and click Configure to start Speaker Setup Follow the on screen prompts to configure the speakers 8 Remove any recently installed hardware or software 9 Restore system and file settings from a known good date using System Restore 10 If the issue is remains repeat step 9 selecting an earli...

Page 186: ...sabled Devices clear by default The microphone appears on the Recording tab 3 Right click on the microphone and select Enable 4 Select the microphone then click Properties Select the Levels tab 5 Increase the volume to the maximum setting and click OK 6 Test the microphone hardware Select the microphone and click Configure Select Set up microphone Select the microphone type from the list and click...

Page 187: ...Troubleshooting 4 13 USB Failure 0 If the USB fails perform the following one at a time Do not replace a non defective FRU Figure 4 8 USB Failure ...

Page 188: ...4 14 Troubleshooting WLAN Failure 0 If the WLAN fails perform the following one at a time Do not replace a non defective FRU Figure 4 9 WLAN Failure ...

Page 189: ...Troubleshooting 4 15 Bluetooth Failure 0 If the Bluetooth fails perform the following one at a time Do not replace a non defective FRU Figure 4 10 Bluetooth Failure ...

Page 190: ...4 16 Troubleshooting Card Reader Failure 0 If the Card Reader fails perform the following one at a time Do not replace a non defective FRU Figure 4 11 Card Reader Failure ...

Page 191: ...Troubleshooting 4 17 Thermal Unit Failure 0 If the Thermal Unit fails perform the following one at a time Do not replace a non defective FRU Figure 4 12 Thermal Unit Failure ...

Page 192: ...4 18 Troubleshooting Other Functions Failure 0 1 Check if drives are functioning correctly 2 Check if external modules are functioning correctly 3 Change mainboard to check if current one is defective ...

Page 193: ...hort circuit is suspected or whether the system is inoperative Perform the following procedures to isolate the failing FRU do not isolate non defective FRU NOTE NOTE Verify that all attached devices are supported by the computer NOTE NOTE Verify that the power supply being used at the time of the failure is operating correctly Refer to Power On Issues 1 Remove power from the computer 2 Visually ch...

Page 194: ...uration Error 010 Memory Error at xxxx xxxx xxxxh R xxxxh W xxxxh 070 Real Time Clock Error 071 CMOS Battery Bad 072 CMOS Checksum Error 110 System is disabled An incorrect password was entered No error code Battery critically low In this situation BIOS will issue four 4 short beeps then shuts the system down No message is displayed No error code Temperature is critically high In this situation BI...

Page 195: ...d alternate registers with initial POST values 12h Restore CPU control word during warm boot 13h Initialize PCI Bus Mastering devices 14h Initialize keyboard controller 16h 1 2 2 3 BIOS ROM checksum 17h Initialize cache before memory autosize 18h 8254 timer initialization 1Ah 8237 DMA controller initialization 1Ch Reset Programmable Interrupt Controller 20h 1 3 1 1 Test DRAM refresh 22h 1 3 1 3 Te...

Page 196: ...MOS 49h Initialize PCI bus and devices 4Ah Initialize all video adapters in system 4Bh QuietBoot start optional 4Ch Shadow video BIOS ROM 4Eh Display BIOS copyright notice 50h Display CPU type and speed 51h Initialize EISA board 52h Test keyboard 54h Set key click if enabled 58h 2 2 3 1 Test for unexpected interrupts 59h Initialize POST display service 5Ah Display prompt Press F2 to enter SETUP 5B...

Page 197: ...tall external parallel ports 85h Initialize PC compatible PnP ISA devices 86h Re initialize onboard I O ports 87h Configure Motherboard Configurable Devices optional 88h Initialize BIOS Area 89h Enable Non Maskable Interrupts NMIs 8Ah Initialize Extended BIOS Data Area 8Bh Test and initialize PS 2 mouse 8Ch Initialize floppy controller 8Fh Determine number of ATA drives optional 90h Initialize har...

Page 198: ...g system B4h 1 One short beep before boot B5h Terminate QuietBoot optional B6h Check password optional B9h Prepare Boot BAh Initialize DMI parameters BBh Initialize PnP Option ROMs BCh Clear parity checkers BDh Display MultiBoot menu BEh Clear screen optional BFh Check virus and backup reminders C0h Try to boot with INT 19 C1h Initialize POST Error Manager PEM C2h Initialize error logging C3h Init...

Page 199: ...BIOS E8h Set Huge Segment E9h Initialize Multi Processor EAh Initialize OEM special code EBh Initialize PIC and DMA ECh Initialize Memory type EDh Initialize Memory size EEh Shadow Boot Block EFh System memory test F0h Initialize interrupt vectors F1h Initialize Run Time Clock F2h Initialize video F3h Initialize System Management Mode F4h 1 Output one beep before boot F5h Boot to Mini DOS F6h Clea...

Page 200: ...d by postClearBootFlagJ AEh the TrustedCore on next boot determines that the current configuration caused POST to fail and uses default values for configuration LBT Core 0x2B Enhanced CMOS LBT Core 0XE0 EFI Variable Init LBT Core 0xC1 PEM Post Error Manager Init LBT Core 0x3B Debug Service Init ROM Polit LBT Core 0xDC POST Update Error LBT Core 0x3A Autosize external cache and program cache size f...

Page 201: ...rs with the Setup defaults Rel 6 0 LBT Core 0x3D Load alternate registers with CMOS values LBT Core 0x42 Initialize interrupt vectors 0 thru 77h LBT Core 0x46 Verify the ROM copyright notice LBT Core 0x45 Initialize all motherboard devices LBT Core 0x49 1 Size the PCI bus topology and set bridge bus numbers 2 Set the system max bus number 3 Write a 0 to the command register of every PCI device 4 W...

Page 202: ...6 Initialize PC card LBT Core 0x58 Test for unexpected interrupts First do an STI for hot interrupts Secondly test the NMI for an unexpected interrupt Thirdly enable the parity checkers and read from memory checking for an unexpected interrupt LBT Core 0x3F ROMPolit memory init LBT Core 0xC4 Install the IRQ vectors Sever Hotkey LBT Core 0x7C Initialize the hardware interrupt vectors from 08 to 0F ...

Page 203: ... the Setup default table LBT Core 0x68 Enable external cache and CPU cache if present Configure non cacheable regions if necessary LBT Core 0x6A Display external cache size on the screen if it is non zero LBT Core 0x6C Display shadow message LBT Core 0xCA Post EISA init LBT Core 0x70 Check flags in CMOS and in the TrustedCore data area for errors detected during POST Display error messages on the ...

Page 204: ... appropriate diskette types in the TrustedCore data area LBT Core 0xCB Redirect Int 13h to Memory Technologies Devices such as ROM RAM PCMCIA and serial disk PICO BIOS LBT Core 0xCD Remap I O and memory address space for PCMCIA PICO BIOS LBT Core 0x90 Initialize hard disk controller If the CMOS ram is valid and intact and fixed disks are defined call the fixed disk init routine to initialize the f...

Page 205: ...tures 0xC3 Display PEM errors 0xA8 Overwrite the Press F2 for Setup prompt with spaces erasing it from the screen 0xAA Scan the key buffer to see if the F2 key was struck after keyboard interrupts were enabled If an F2 keystroke is found set a flag 0xE1 Start Periodic Timer TC Subscribe 0xAC Check if Enter SETUP is pressed 0x8F Count the number of ATA drives in the system and update the number in ...

Page 206: ...ultiBoot is installed and hotkey pressed 0xBF Check virus and backup reminders 0x97 Create pointer to MP table in Extended BDA 0x99 Check support status for Self Monitoring Analysis Reporting Technology disk failure warning 0xB1 Unload ROM Pilot 0xDD Perform remote flash if requested 0xC7 If UCR redirection is installed remove display manager and unhookINT10 0XDF Shutdown the PXE UNDI code 0xB3 St...

Page 207: ...CHAPTER 5 Jumper and Connector Locations ...

Page 208: ...2 2 Clearing Password Check and BIOS Recovery 5 5 Clearing Password Check 5 5 Performing a BIOS recovery 5 6 ...

Page 209: ...t No Code Component 1 LCD1 LCD cable connector 6 SW_R1 Right touchpad button 2 PWRCN1 Power button board cable connector 7 USBCN1 USB board cable connector 3 RTC1 Battery 8 USBCN2 USB board cable connector 4 CARD1 Memory card reader 9 TPAD1 Touchpad board cable connector 5 SW_L1 Left touchpad button 10 KB1 Keyboard cable connector ...

Page 210: ...mponent 1 BAT1 Battery connector 8 HDMI1 HDMI out port 2 ODD1 SATA ODD connector 9 CRT1 Monitor port 3 HDD1 HDD connector 10 CPU1_CP Processor socket 4 WLAN1 WLAN module slot 11 FAN1 Fan connector 5 DM1 2 DDR3 slots 1 and 2 12 DCIN1 DC power cable connector 6 USB2 USB port 2 13 RJ45 Ethernet jack 7 USB1 USB port 1 ...

Page 211: ...inboard Figure 5 3 G2 Hardware Gap To clear the BIOS password check perform the following 1 Turn off the computer and unplug all the peripherals connected to it 2 Complete the steps in Removing the Battery Pack 3 Complete the steps in Removing the Base Door 4 Complete the steps in Removing the Keyboard 5 Complete the steps in Removing the Palmrest Module Upper Cover 6 Locate the G2 hardware gap 7 ...

Page 212: ...he system with minimum BIOS initialization Users can enable this feature to restore the BIOS firmware to a successful one once the previous BIOS flashing process failed BIOS Recovery Hotkey 0 A function hotkey Fn Esc used to enable the BIOS Recovery process when system is powered On during BIOS POST To use this function it is strongly recommended to have the AC adapter and Battery present If this ...

Page 213: ...Jumper and Connector Locations 5 7 Figure 5 5 Create Crisis Disk 4 Click OK Figure 5 6 Create Crisis Disk 5 Click OK Figure 5 7 Create Crisis Disk 6 Click No to exit 7 Eject the USB storage disk ...

Page 214: ... Crisis Recovery disk files to the computer 3 Press and hold the Fn Esc keys then press the power button The BIOS recovery process begins When the process is complete the computer will automatically reboot 4 Disconnect the USB storage disk from the computer 5 Perform a BIOS flash procedure to update the BIOS firmware Refer to BIOS Flash Utilities for detailed instructions ...

Page 215: ...CHAPTER 6 FRU List ...

Page 216: ...6 2 Aspire 4743 4743G 4743Z 4743ZG Exploded Diagrams 6 4 Main Assembly 6 4 LCD Assembly 6 5 ...

Page 217: ...eb or channel Part number changes will not be noted on the printed Service Guide For ACER AUTHORIZED SERVICE PROVIDERS the Acer office may have a DIFFERENT part number code from those given in the FRU list of this printed Service Guide Users MUST use the local FRU list provided by the regional Acer office to order FRU parts for repair and service of customer machines NOTE NOTE To scrap or to retur...

Page 218: ...able 6 1 Main Assembly Exploded Diagram No Description Part Number 1 Keyboard 90 4HL07 S0L 2 Upper case black w speaker and power button board cable 60 4IQ02 021 3 Power button board 55 RC901 001 4 DC in cable 50 4IT06 031 5 DC PD 6 Mainboard 55 4NI01 091G 7 Thermal module 60 4NI03 001 8 Bluetooth module BH 21100 007 9 SD dummy card 42 RC901 002 ...

Page 219: ...B 2 0 board TBD 16 HDD bracket 60 4IQ19 021 17 HDD module KH 25008 029 18 Base door Unitload cover 42 RC901 001 19 Battery BT 0060G 001 Table 6 2 LCD Assembly Exploded Diagram No Description Part Number 1 LCD cover 60 4IQ09 021 2 LCD cable 50 4IQ01 031 3 LCD panel LK 14005 010 4 LCD hinge left 34 4IQ02 021 5 LCD bezel 60 RC901 004 6 LCD hinge right 34 4IQ01 021 Table 6 1 Main Assembly Exploded Dia...

Page 220: ...ED LF BLUE DIS AP 09001 031 ADAPTER 90W 19V 3PIN HIPRO HP A0904A3 B1LF LV5 LED LF BLUE DIS AP 09003 021 BATTERY BATTERY SANYO AS10D LI ION 3S2P SANYO 6 CELL 4400MAH MAIN COMMON ID AS10D31 BT 0060G 001 BATTERY SONY AS10D LI ION 3S2P SONY 6 CELL 4400MAH MAIN COMMON ID AS10D41 BT 00603 111 BATTERY PANASONIC AS10D LI ION 3S2P PANASONIC 6 CELL 4400MAH MAIN COMMON ID AS10D51 BT 00604 049 BATTERY SAMSUNG...

Page 221: ... 001 BLUETOOTH BOARD FOXCONN BCM2070 V2 1 T77H114 01 FOR BCM2070 BLUETOOTH CABLE 6PIN CONNECTOR BH 21100 007 BLUETOOTH BOARD FOXCONN BCM2070 V3 0 T77H114 01 FOR BCM2070 BLUETOOTH CABLE 6PIN CONNECTOR BH 21100 010 BLUETOOTH BOARD FOXCONN ATH BU12 V3 0 FOR BCM2070 BLUETOOTH CABLE 6PIN CONNECTOR BH 21100 011 DC IN CABLE 65W 50 4IT06 031 DC IN CABLE 65W 50 4IT06 001 DC IN CABLE 65W 50 4IT06 011 DC IN ...

Page 222: ... 3PIN BK DENMARK 27 01518 671 POWER CORD 10A 250V 3PIN DENMARK BK 27 01518 561 POWER CORD 10A 250V 3PIN BK SOUTH AFRICA 27 01518 681 POWER CORD 16A 250V SOUTH AFRICA BK 27 01518 571 POWER CORD 10A 250V 3PIN CHINA 27 01518 701 POWER CORD 10A 250V 3PIN CHINA BK 27 01518 591 POWER CORD 250V 3PIN EUR BK 27 01518 731 POWER CORD 16A 250V 3PIN EUR BK 27 01518 601 POWER CORD 10A 250V 3PIN ITALY 27 01518 7...

Page 223: ...D LCD CCD CABLE 50 4IQ01 011 LED LCD CCD CABLE 50 4IQ01 021 CAMERA CAMERA 1 3M LITEON 10P2TF103 56 18012 721 CAMERA 1 3M SUYIN HF1316 P80A SS03 56 18006 721 CASE COVER BRACKET ASSEMBLY SD DUMMY CARD 42 RC901 002 LOWER CASE 60 RC901 001 BASE DOOR UNITLOAD COVER 42 RC901 001 UPPER CASE BLACK W SPEAKER POWER BUTTON BOARD CABLE 60 4IQ02 021 UPPER CASE BLACK W SPEAKER POWER BUTTON BOARD CABLE 60 4IQ02 ...

Page 224: ...4IQ09 021 LED LCD COVER 14 IMR BLACK W ANTENNA 2 MICROPHONE 60 4IQ09 001 LED LCD COVER 14 IMR BLACK W ANTENNA 2 MICROPHONE 60 4IQ09 011 CPU PROCESSOR CPU INTEL CORE I3 380M PGA 2 53G 35W K 0 TJ90 KC 38K01 DMP CPU INTEL CORE I3 390M PGA 2 66G 35W K 0 TJ90 VT KC 39K01 DMP CPU INTEL CORE I5 480M PGA 2 66G 35W K 0 KC 48K01 DMP CPU INTEL CORE I5 560M PGA 2 66G 35W K 0 TURBO BOOST 3 20 2 93 KC 56K01 DMP...

Page 225: ...PM 2 5 SATA TOSHIBA MK3265GSX 8MB 68P LF F W GJ001J KH 32001 019 HDD 320GB 5400RPM 2 5 SATA HGST HTS545032B9A300 PANTHER B LF F W C60F DISK IMBALANCE CRITERIA 0 014G CM KH 32004 004 HDD MODULE 320G 5400RPM 7 0MM 2 5 SATA HDD HGST 2 5 5400RPM 320GB HTS543232A7A384 0J11523 EAGLE B7 320G P SATA LF HF F W A60W KH 32007 013 HDD MODULE 320GB5 4KS_4K 5400RPM 2 5 SATA HDD WD 2 5 5400RPM 320GB WD3200BPVT 2...

Page 226: ...575A9E384 0J15083 JET B 375G P SATA 8MB LF F W DA3872 KH 75001 011 HEATSINK CPU HEATSINK W FAN FOR UMA 60 4NI04 001 CPU HEATSINK W FAN FOR UMA 60 4NI02 001 CPU HEATSINK W FAN FOR DIS 60 4NI03 001 CPU HEATSINK W FAN FOR DIS 60 4NI01 001 KEYBOARD KEYBOARD 86KS NSK AM20L AC4T JM31 JE40 INTERNAL14 STANDARD BLACK TEXTURE GREEK 90 4HL07 S0L KEYBOARD 86KS NSK AM20L AC4T JM31 JE40 INTERNAL14 STANDARD BLAC...

Page 227: ...TURE US INTERNATIONAL 9Z N1P82 21D KEYBOARD 86KS AC4T JM31 JE40 INTERNAL14 STANDARD BLACK TEXTURE US INTERNATIONAL 90 4HL07 C1D KEYBOARD 86KS AC4T JM31 JE40 INTERNAL14 STANDARD BLACK TEXTURE RUSSIA 90 4HL07 S0R KEYBOARD 86KS AC4T JM31 JE40 INTERNAL14 STANDARD BLACK TEXTURE RUSSIA 9Z N1P82 20R KEYBOARD 86KS AC4T JM31 JE40 INTERNAL14 STANDARD BLACK TEXTURE RUSSIA 90 4HL07 C0R KEYBOARD 86KS AC4T JM31...

Page 228: ...KEYBOARD 87KS AC4T JM31 JE40 INTERNAL14 STANDARD BLACK TEXTURE BRAZIL 90 4HL07 S1B KEYBOARD 87KS AC4T JM31 JE40 INTERNAL14 STANDARD BLACK TEXTURE BRAZIL 9Z N1P82 21B KEYBOARD 87KS AC4T JM31 JE40 INTERNAL14 STANDARD BLACK TEXTURE BRAZIL 90 4HL07 C1B KEYBOARD 87KS AC4T JM31 JE40 INTERNAL14 STANDARD BLACK TEXTURE SWISS 90 4HL07 S00 KEYBOARD 87KS AC4T JM31 JE40 INTERNAL14 STANDARD BLACK TEXTURE SWISS ...

Page 229: ... JM31 JE40 INTERNAL14 STANDARD BLACK TEXTURE HUNGAR 90 4HL07 S0Q KEYBOARD 87KS AC4T JM31 JE40 INTERNAL14 STANDARD BLACK TEXTURE HUNGAR 9Z N1P82 20Q KEYBOARD 87KS AC4T JM31 JE40 INTERNAL14 STANDARD BLACK TEXTURE HUNGAR 90 4HL07 C0Q KEYBOARD 87KS AC4T JM31 JE40 INTERNAL14 STANDARD BLACK TEXTURE SPANIS 90 4HL07 S0S KEYBOARD 87KS AC4T JM31 JE40 INTERNAL14 STANDARD BLACK TEXTURE SPANIS 9Z N1P82 20S KEY...

Page 230: ...213 AC4T JM31 JE40 INTERNAL14 STANDARD BLACK TEXTURE CZ SK 9Z N1P82 213 KEYBOARD 87KS NSK AM213 AC4T JM31 JE40 INTERNAL14 STANDARD BLACK TEXTURE CZ SK 90 4HL07 C13 KEYBOARD 87KS NSK AM200 AC4T JM31 JE40 INTERNAL14 STANDARD BLACK TEXTURE BULGARIAN KB I140A 260 KEYBOARD 91KS NSK AM20J AC4T JM31 JE40 INTERNAL14 STANDARD BLACK TEXTURE JAPANE KB I140A 216 KEYBOARD STANDOFF KEYBOARD STANDOFF 86 RC901 00...

Page 231: ...I 900 1GB SUPPORT 35W CPU LF W RTC BATTERY W O CPU MEMORY NON 3G 55 4NI01 021G MAINBOARD JE43CP_N12PGS 2GB INTEL HM55 DDRIII 800 2GB SUPPORT 35W CPU LF W RTC BATTERY W O CPU MEMORY NON 3G TBD MEMORY SODIMM 1GB DDRIII 1333MHZ KINGSTON ACR128X64D3S1333C9 LF 128 8 0 065UM KN 1GB0H 017 SODIMM 1GB DDRIII 1333MHZ SAMSUNG M471B2873FHS CH9 LF 128 8 46NM KN 1GB07 004 SODIMM 1GB DDRIII 1333MHZ A DATA AD73I1...

Page 232: ...S7 KO 0040F 006 ODD HLDS BD COMBO 12 7MM TRAY DL 4X CT30N LF W O BEZEL 1 00 SATA HF WINDOWS 7 3D KO 00407 004 ODD PLDS BD COMBO 12 7MM TRAY DL 4X DS 4E1S LF W O BEZEL SATA FOR WINDOWS7 KO 0040D 005 ODD PIONEER BD COMBO 12 7MM TRAY DL 4X BDC TD03RS LF W O BEZEL 1 01 SATA WINDOWS 7 KO 0040F 003 DVD RW SUPER MULT 8X MODULE ODD TOSHIBA SUPER MULTI DRIVE 12 7MM TRAY DL 8X TS L633F LF W O BEZEL SATA HF ...

Page 233: ...R HF WINDOWS7 KU 0080D 057 ODD PLDS SUPER MULTI DRIVE 12 7MM TRAY PLDS DS 8A5SH LF W O BEZEL SATA FOR HF WINDOWS7 KU 0080E 027 SPEAKER SPEAKER 23 40911 001 SPEAKER 23 40908 001 SPEAKER 23 40909 001 SCREW SCREW M2 L3 BLACK ZN 86 FR901 001 SCREWS SCREW 86 9A524 4R0 SCREW M2 5X6 H 0 7 0 8MM 86 00E12 536 SCREW M2 5 L5 BLACK ZN NYLOK 86 TK501 001 SCREW M2 5X4L NI NYLOK 86 00H36 534 Category Description...

Page 234: ...6 20 FRU List ...

Page 235: ...CHAPTER 7 Model Definition and Configuration ...

Page 236: ...7 2 Aspire 4743 4743G 4743Z 4743ZG 7 3 ...

Page 237: ...50Mnkk AAP India LX RFH0C 011 AS4743G 382G50Mnkk LINPUSAIN2 N12PGS1GBCkk_3V3 1 2G 500_L BT 6L2 2 5R CB_bg n_1 3C_GEk_ES61 AS4743G 381 G32Mnkk AAP Singapore LX RFH0C 010 AS4743G 381G32Mnkk LINPUSASG1 N12PGS1GBCkk_3V3 1 1G 320 BT 6L2 2 5R CB_bgn_ 1 3C_GEk_EN11 AS4743G 482 G50Mnkk AAP Vietnam LX RFH0C 004 AS4743G 482G50Mnkk LINPUSAVN1 N12PGS1GBCkk_3V3 1 2G 500_L BT 6L2 2 5R CB_G N_1 3C_GEk_EN11 AS474...

Page 238: ...1 3C_GEk_SC11 AS4743G 482 G64Mnkk TWN GCTWN LX RFH02 001 AS4743G 482G64Mnkk W7HP64ASTW1 MC N12PGS1GBCkk_3V3 1 2G 640 BT 6L2 2 5R CB_GN_ 1 3C_GEk_TC41 AS4743 568G6 4Mnkk WW WW S2 RFH02 001 AS4743 568G64Mnkk W7HP64ASWW1 MC N12PGS1GBCkk_3V3 2 4G 640 6L2 2 5R CB_bgn_1 3 C_GEk_ES62 AS4743G 382 G50Mnkk AAP Singapore LX RFH02 009 AS4743G 382G50Mnkk W7HP64ASSG1 MC N12PGS1GBCkk_3V3 1 2G 500_L BT 6L2 2 5R C...

Page 239: ...2 2 5R CB_GN_ 1 3C_GEk_TC41 AS4743G 382 G50Mnkk CHINA China LX RFH01 002 AS4743G 382G50Mnkk W7HB64SCASCN1 MC N12PGS1GBCkk_3V3 1 2G 500_L 6L2 2 5R CB_GN_1 3C_GEk_SC11 AS4743G 482 G64Mnkk AAP Philippines LX RFH0C 001 AS4743G 482G64Mnkk LINPUSAPH1 N12PGS1GBCkk_3V3 1 2G 640 BT 6L2 2 5R CB_GN_ 1 3C_GEk_EN11 AS4743G 484 G64Mnkk AAP Singapore LX RFH02 004 AS4743G 484G64Mnkk W7HP64ASSG1 MC N12PGS1GBCkk_3V...

Page 240: ...GN_1 3 C_GEk_SC11 AS4743G 382 G50Mnkk CHINA Hong Kong LX RHD02 002 AS4743G 382G50Mnkk W7HP64ASHK2 MC N12PGV1GBCkk_3V3 1 2G 500_L BT 6L2 2 5R CB_bg n_1 3C_GEk_ZH31 AS4743G 482 G64Mnkk AAP Thailand LX RHD0C 009 AS4743G 482G64Mnkk LINPUSATH3 N12PGV1GBCkk_3V3 1 2G 640 BT 6L2 2 5R CB_bgn_ 1 3C_GEk_EN11 AS4743G 482 G64Mnkk AAP Thailand LX RHD0C 008 AS4743G 482G64Mnkk LINPUSATH1 N12PGV1GBCkk_3V3 1 2G 640...

Page 241: ... n_1 3C_GEk_TH51 AS4743G 382 G50Mnkk AAP Thailand LX RHD0C 001 AS4743G 382G50Mnkk LINPUSATH4 N12PGV1GBCkk_3V3 1 2G 500_L BT 6L2 2 5R CB_bg n_1 3C_GEk_ES61 AS4743G 382 G50Mnkk CHINA China LX RHD01 001 AS4743G 382G50Mnkk W7HB64SCASCN1 MC N12PGV1GBCkk_3V3 1 2G 500_L 6L2 2 5R CB_GN_1 3C_GEk_SC11 AS4743G 482 G50Mnkk CHINA China LX RHD01 002 AS4743G 482G50Mnkk W7HB64SCASCN1 MC N12PGV1GBCkk_3V3 1 2G 500_...

Page 242: ...k_TC41 AS4743ZG P63 2G50Mnkk TWN GCTWN LX RFU02 002 AS4743ZG P632G50Mnkk W7HP64ASTW1 MC N12PGS1GBCkk_3V3 1 2G 500_L BT 6L2 2 5R CB_G N_1 3C_GEk_TC41 AS4743ZG P62 3G32Mnkk WW WW S2 RFU0C 001 AS4743ZG P623G32Mnkk LINPUSAWW1 N12PGS1GBCkk_3V3 2G 1G 320 BT 6L2 2 5R CB_bg n_1 3C_GEk_EN11 AS4743ZG P63 4G75Bnkk WW WW S2 RFV02 001 AS4743ZG P634G75Bnkk W7HP64ASWW1 MC N12PGS2GBCkk_3V3 2 2G 750 BT 6L2 2 5R CB...

Page 243: ...WW WW S2 RFS02 001 AS4743Z P632G32Mnkk W7HP64ASWW1 MC UMACkk_3 2 1G 320 BT 6L2 2 5R CB_bgn_ 1 3C_GEk_ES62 AS4743 382G5 0Mnkk TWN GCTWN LX RFK02 007 AS4743 382G50Mnkk W7HP64ASTW1 MC UMACkk_3 1 2G 500_L BT 6L2 2 5R CB_bg n_1 3C_GEk_TC41 AS4743 482G5 0Mnkk AAP India LX RFK0C 002 AS4743 482G50Mnkk LinpusMGAIN2 UMACkk_3 1 2G 500_L BT 6L2 2 5R CB_bg n_1 3C_GEk_XS11 AS4743 382G5 0Mnkk AAP India LX RFK0C ...

Page 244: ... 001 AS4743 382G50Mnkk EM W7HP64EMASVN1 MC UMACkk_3 1 2G 500_L BT 6L2 2 5R CB_bg n_1 3C_GEk_ES61 AS4743 382G5 0Mnkk AAP Singapore LX RFK02 006 AS4743 382G50Mnkk W7HP64ASSG1 MC UMACkk_3 1 2G 500_L BT 6L2 2 5R CB_G N_1 3C_GEk_ZH31 AS4743 382G5 0Mnkk TWN GCTWN LX RFK02 007 AS4743 382G50Mnkk W7HP64ASTW1 MC UMACkk_3 1 2G 500_L BT 6L2 2 5R CB_bg n_1 3C_GEk_TC41 AS4743 382G5 0Mnkk AAP India LX RFK0C 001 ...

Page 245: ... AS4743G 482 G64Mnkk AAP Thailand LX RFH0C 006 AS4743G_N12PGS 1GBCkk_3V3 Ci5480M AS4743G 482 G64Mnkk AAP Thailand LX RFH0C 005 AS4743G_N12PGS 1GBCkk_3V3 Ci5480M AS4743G 482 G50Mnkk CHINA China LX RFH01 001 AS4743G_N12PGS 1GBCkk_3V3 Ci5480M AS4743G 482 G64Mnkk TWN GCTWN LX RFH02 001 AS4743G_N12PGS 1GBCkk_3V3 Ci5480M AS4743 568G6 4Mnkk WW WW S2 RFH02 001 AS4743G_N12PGS 1GBCkk_3V3 Ci5560M AS4743G 382...

Page 246: ...43G 382 G50Mnkk CHINA Hong Kong LX RHD02 002 AS4743G_N12PGV 1GBCkk_3V3 Ci3380M AS4743G 482 G64Mnkk AAP Thailand LX RHD0C 009 AS4743G_N12PGV 1GBCkk_3V3 Ci5480M AS4743G 482 G64Mnkk AAP Thailand LX RHD0C 008 AS4743G_N12PGV 1GBCkk_3V3 Ci5480M AS4743G 482 G64Mnkk AAP Thailand LX RHD0C 007 AS4743G_N12PGV 1GBCkk_3V3 Ci5480M AS4743G 482 G50Mnkk AAP Thailand LX RHD0C 006 AS4743G_N12PGV 1GBCkk_3V3 Ci5480M A...

Page 247: ...3V3 PMDP620 0 AS4743ZG P6 34G75Bnkk WW WW S2 RFV02 001 AS4743ZG_N12PG S2GBCkk_3V3 PMDP630 0 AS4743ZG P6 22G50Mnkk CHINA Hong Kong LX RHF02 001 AS4743ZG_N12PG V1GBCkk_3V3 PMDP620 0 AS4743ZG P6 32G50Mnkk AAP Thailand LX RHF0C 003 AS4743ZG_N12PG V1GBCkk_3V3 PMDP630 0 AS4743ZG P6 32G50Mnkk AAP Thailand LX RHF0C 002 AS4743ZG_N12PG V1GBCkk_3V3 PMDP630 0 AS4743ZG P6 32G50Mnkk AAP Thailand LX RHF0C 001 AS...

Page 248: ...MACkk_ 3 Ci5480M AS4743 482G5 0Mnkk AAP Vietnam LX RFK02 002 AS4743_UMACkk_ 3 Ci5480M AS4743 382G5 0Mnkk AAP Vietnam LX RFK02 001 AS4743_UMACkk_ 3 Ci3380M AS4743 382G5 0Mnkk AAP Singapore LX RFK02 006 AS4743_UMACkk_ 3 Ci3380M AS4743 382G5 0Mnkk TWN GCTWN LX RFK02 007 AS4743_UMACkk_ 3 Ci3380M AS4743 382G5 0Mnkk AAP India LX RFK0C 001 AS4743_UMACkk_ 3 Ci3380M AS4743 482G5 0Mnkk AAP India LX RFK0C 00...

Page 249: ...82 G64Mnkk AAP Thailand LX RFH0C 006 AS4743G_N12PGS 1GBCkk_3V3 NLED14 WXGAG AS4743G 482 G64Mnkk AAP Thailand LX RFH0C 005 AS4743G_N12PGS 1GBCkk_3V3 NLED14 WXGAG AS4743G 482 G50Mnkk CHINA China LX RFH01 001 AS4743G_N12PGS 1GBCkk_3V3 NLED14 WXGAG AS4743G 482 G64Mnkk TWN GCTWN LX RFH02 001 AS4743G_N12PGS 1GBCkk_3V3 NLED14 WXGAG AS4743 568G6 4Mnkk WW WW S2 RFH02 001 AS4743G_N12PGS 1GBCkk_3V3 NLED14 WX...

Page 250: ...82 G50Mnkk CHINA Hong Kong LX RHD02 002 AS4743G_N12PGV 1GBCkk_3V3 NLED14 WXGAG AS4743G 482 G64Mnkk AAP Thailand LX RHD0C 009 AS4743G_N12PGV 1GBCkk_3V3 NLED14 WXGAG AS4743G 482 G64Mnkk AAP Thailand LX RHD0C 008 AS4743G_N12PGV 1GBCkk_3V3 NLED14 WXGAG AS4743G 482 G64Mnkk AAP Thailand LX RHD0C 007 AS4743G_N12PGV 1GBCkk_3V3 NLED14 WXGAG AS4743G 482 G50Mnkk AAP Thailand LX RHD0C 006 AS4743G_N12PGV 1GBCk...

Page 251: ...NLED14 WXGAG AS4743ZG P6 34G75Bnkk WW WW S2 RFV02 001 AS4743ZG_N12PG S2GBCkk_3V3 NLED14 WXGAG AS4743ZG P6 22G50Mnkk CHINA Hong Kong LX RHF02 001 AS4743ZG_N12PG V1GBCkk_3V3 NLED14 WXGAG AS4743ZG P6 32G50Mnkk AAP Thailand LX RHF0C 003 AS4743ZG_N12PG V1GBCkk_3V3 NLED14 WXGAG AS4743ZG P6 32G50Mnkk AAP Thailand LX RHF0C 002 AS4743ZG_N12PG V1GBCkk_3V3 NLED14 WXGAG AS4743ZG P6 32G50Mnkk AAP Thailand LX R...

Page 252: ...LED14 WXGAG AS4743 482G5 0Mnkk AAP Vietnam LX RFK02 002 AS4743_UMACkk_ 3 NLED14 WXGAG AS4743 382G5 0Mnkk AAP Vietnam LX RFK02 001 AS4743_UMACkk_ 3 NLED14 WXGAG AS4743 382G5 0Mnkk AAP Singapore LX RFK02 006 AS4743_UMACkk_ 3 NLED14 WXGAG AS4743 382G5 0Mnkk TWN GCTWN LX RFK02 007 AS4743_UMACkk_ 3 NLED14 WXGAG AS4743 382G5 0Mnkk AAP India LX RFK0C 001 AS4743_UMACkk_ 3 NLED14 WXGAG AS4743 482G5 0Mnkk A...

Page 253: ... N12PGS AS4743G 482 G64Mnkk AAP Thailand LX RFH0C 006 AS4743G_N12PGS 1GBCkk_3V3 N12PGS AS4743G 482 G64Mnkk AAP Thailand LX RFH0C 005 AS4743G_N12PGS 1GBCkk_3V3 N12PGS AS4743G 482 G50Mnkk CHINA China LX RFH01 001 AS4743G_N12PGS 1GBCkk_3V3 N12PGS AS4743G 482 G64Mnkk TWN GCTWN LX RFH02 001 AS4743G_N12PGS 1GBCkk_3V3 N12PGS AS4743 568G6 4Mnkk WW WW S2 RFH02 001 AS4743G_N12PGS 1GBCkk_3V3 N12PGS AS4743G 3...

Page 254: ...382 G50Mnkk CHINA Hong Kong LX RHD02 002 AS4743G_N12PGV 1GBCkk_3V3 N12PGV AS4743G 482 G64Mnkk AAP Thailand LX RHD0C 009 AS4743G_N12PGV 1GBCkk_3V3 N12PGV AS4743G 482 G64Mnkk AAP Thailand LX RHD0C 008 AS4743G_N12PGV 1GBCkk_3V3 N12PGV AS4743G 482 G64Mnkk AAP Thailand LX RHD0C 007 AS4743G_N12PGV 1GBCkk_3V3 N12PGV AS4743G 482 G50Mnkk AAP Thailand LX RHD0C 006 AS4743G_N12PGV 1GBCkk_3V3 N12PGV AS4743G 48...

Page 255: ... S1GBCkk_3V3 N12PGS AS4743ZG P6 34G75Bnkk WW WW S2 RFV02 001 AS4743ZG_N12PG S2GBCkk_3V3 N12PGS AS4743ZG P6 22G50Mnkk CHINA Hong Kong LX RHF02 001 AS4743ZG_N12PG V1GBCkk_3V3 N12PGV AS4743ZG P6 32G50Mnkk AAP Thailand LX RHF0C 003 AS4743ZG_N12PG V1GBCkk_3V3 N12PGV AS4743ZG P6 32G50Mnkk AAP Thailand LX RHF0C 002 AS4743ZG_N12PG V1GBCkk_3V3 N12PGV AS4743ZG P6 32G50Mnkk AAP Thailand LX RHF0C 001 AS4743ZG...

Page 256: ...3_UMACkk_ 3 UMA AS4743 482G5 0Mnkk AAP Vietnam LX RFK02 002 AS4743_UMACkk_ 3 UMA AS4743 382G5 0Mnkk AAP Vietnam LX RFK02 001 AS4743_UMACkk_ 3 UMA AS4743 382G5 0Mnkk AAP Singapore LX RFK02 006 AS4743_UMACkk_ 3 UMA AS4743 382G5 0Mnkk TWN GCTWN LX RFK02 007 AS4743_UMACkk_ 3 UMA AS4743 382G5 0Mnkk AAP India LX RFK0C 001 AS4743_UMACkk_ 3 UMA AS4743 482G5 0Mnkk AAP India LX RFK0C 002 AS4743_UMACkk_ 3 UM...

Page 257: ...64Mnkk AAP Thailand LX RFH0C 006 AS4743G_N12PG S1GBCkk_3V3 1G DDR3 64 16 8 AS4743G 482 G64Mnkk AAP Thailand LX RFH0C 005 AS4743G_N12PG S1GBCkk_3V3 1G DDR3 64 16 8 AS4743G 482 G50Mnkk CHINA China LX RFH01 001 AS4743G_N12PG S1GBCkk_3V3 1G DDR3 64 16 8 AS4743G 482 G64Mnkk TWN GCTWN LX RFH02 001 AS4743G_N12PG S1GBCkk_3V3 1G DDR3 64 16 8 AS4743 568G6 4Mnkk WW WW S2 RFH02 001 AS4743G_N12PG S1GBCkk_3V3 1...

Page 258: ...nkk CHINA Hong Kong LX RHD02 002 AS4743G_N12PG V1GBCkk_3V3 1G DDR3 128 16 4 AS4743G 482 G64Mnkk AAP Thailand LX RHD0C 009 AS4743G_N12PG V1GBCkk_3V3 1G DDR3 128 16 4 AS4743G 482 G64Mnkk AAP Thailand LX RHD0C 008 AS4743G_N12PG V1GBCkk_3V3 1G DDR3 128 16 4 AS4743G 482 G64Mnkk AAP Thailand LX RHD0C 007 AS4743G_N12PG V1GBCkk_3V3 1G DDR3 128 16 4 AS4743G 482 G50Mnkk AAP Thailand LX RHD0C 006 AS4743G_N12...

Page 259: ... DDR3 64 16 8 AS4743ZG P6 23G32Mnkk WW WW S2 RFU0C 001 AS4743ZG_N12PG S1GBCkk_3V3 1G DDR3 64 16 8 AS4743ZG P6 34G75Bnkk WW WW S2 RFV02 001 AS4743ZG_N12PG S2GBCkk_3V3 2G DDR3 128 16 8 AS4743ZG P6 22G50Mnkk CHINA Hong Kong LX RHF02 001 AS4743ZG_N12PG V1GBCkk_3V3 1G DDR3 128 16 4 AS4743ZG P6 32G50Mnkk AAP Thailand LX RHF0C 003 AS4743ZG_N12PG V1GBCkk_3V3 1G DDR3 128 16 4 AS4743ZG P6 32G50Mnkk AAP Thai...

Page 260: ...4743_UMACkk_ 3 N AS4743 482G5 0Mnkk AAP Singapore LX RFK02 003 AS4743_UMACkk_ 3 N AS4743 482G5 0Mnkk AAP Vietnam LX RFK02 002 AS4743_UMACkk_ 3 N AS4743 382G5 0Mnkk AAP Vietnam LX RFK02 001 AS4743_UMACkk_ 3 N AS4743 382G5 0Mnkk AAP Singapore LX RFK02 006 AS4743_UMACkk_ 3 N AS4743 382G5 0Mnkk TWN GCTWN LX RFK02 007 AS4743_UMACkk_ 3 N AS4743 382G5 0Mnkk AAP India LX RFK0C 001 AS4743_UMACkk_ 3 N AS474...

Page 261: ... AS4743G 382 G50Mnkk AAP Vietnam LX RFH0C 00 2 AS4743G_N12 PGS1GBCkk_3 V3 SO2GB III10 N AS4743G 482 G64Mnkk AAP Vietnam LX RFH0C 00 8 AS4743G_N12 PGS1GBCkk_3 V3 SO2GB III10 N AS4743G 482 G64Mnkk AAP Thailand LX RFH0C 00 7 AS4743G_N12 PGS1GBCkk_3 V3 SO2GB III10 N AS4743G 482 G64Mnkk AAP Thailand LX RFH0C 00 6 AS4743G_N12 PGS1GBCkk_3 V3 SO2GB III10 N AS4743G 482 G64Mnkk AAP Thailand LX RFH0C 00 5 AS...

Page 262: ...ina LX RFH01 002 AS4743G_N12 PGS1GBCkk_3 V3 SO2GB III10 N AS4743G 482 G64Mnkk AAP Philippine s LX RFH0C 00 1 AS4743G_N12 PGS1GBCkk_3 V3 SO2GB III10 N AS4743G 484 G64Mnkk AAP Singapore LX RFH02 004 AS4743G_N12 PGS1GBCkk_3 V3 SO2GB III10 SO2GB III10 AS4743G 484 G75Bnkk WW WW S2 RFL02 002 AS4743G_N12 PGS2GBCkk_3 V3 SO2GB III10 SO2GB III10 AS4743 464G 75Bnkk WW WW S2 RFL02 001 AS4743G_N12 PGS2GBCkk_3 ...

Page 263: ...nkk AAP Thailand LX RHD0C 00 5 AS4743G_N12 PGV1GBCkk_3 V3 SO2GB III10 N AS4743G 482 G50Mnkk AAP Thailand LX RHD0C 00 4 AS4743G_N12 PGV1GBCkk_3 V3 SO2GB III10 N AS4743G 382 G50Mnkk AAP Thailand LX RHD0C 00 3 AS4743G_N12 PGV1GBCkk_3 V3 SO2GB III10 N AS4743G 382 G50Mnkk AAP Thailand LX RHD0C 00 2 AS4743G_N12 PGV1GBCkk_3 V3 SO2GB III10 N AS4743G 382 G50Mnkk AAP Thailand LX RHD0C 00 1 AS4743G_N12 PGV1G...

Page 264: ... S2 RFU0C 00 1 AS4743ZG_N1 2PGS1GBCkk_ 3V3 SO2GB III10 SO1GB III10 AS4743ZG P6 34G75Bnkk WW WW S2 RFV02 001 AS4743ZG_N1 2PGS2GBCkk_ 3V3 SO2GB III10 SO2GB III10 AS4743ZG P6 22G50Mnkk CHIN A Hong Kong LX RHF02 001 AS4743ZG_N1 2PGV1GBCkk_ 3V3 SO2GB III10 N AS4743ZG P6 32G50Mnkk AAP Thailand LX RHF0C 00 3 AS4743ZG_N1 2PGV1GBCkk_ 3V3 SO2GB III10 N AS4743ZG P6 32G50Mnkk AAP Thailand LX RHF0C 00 2 AS4743...

Page 265: ... AS4743 382G 50Mnkk AAP Singapore LX RFK02 005 AS4743_UMAC kk_3 SO2GB III10 N AS4743 482G 50Mnkk AAP Singapore LX RFK02 003 AS4743_UMAC kk_3 SO2GB III10 N AS4743 482G 50Mnkk AAP Vietnam LX RFK02 002 AS4743_UMAC kk_3 SO2GB III10 N AS4743 382G 50Mnkk AAP Vietnam LX RFK02 001 AS4743_UMAC kk_3 SO2GB III10 N AS4743 382G 50Mnkk AAP Singapore LX RFK02 006 AS4743_UMAC kk_3 SO2GB III10 N AS4743 382G 50Mnkk...

Page 266: ... 482 G64Mnkk AAP Thailand LX RFH0C 006 AS4743G_N12PGS 1GBCkk_3V3 N640GB5 4KS AS4743G 482 G64Mnkk AAP Thailand LX RFH0C 005 AS4743G_N12PGS 1GBCkk_3V3 N640GB5 4KS AS4743G 482 G50Mnkk CHINA China LX RFH01 001 AS4743G_N12PGS 1GBCkk_3V3 N500GB5 4KS AS4743G 482 G64Mnkk TWN GCTWN LX RFH02 001 AS4743G_N12PGS 1GBCkk_3V3 N640GB5 4KS_4K AS4743 568G 64Mnkk WW WW S2 RFH02 001 AS4743G_N12PGS 1GBCkk_3V3 N640GB5 ...

Page 267: ...2 G50Mnkk CHINA Hong Kong LX RHD02 002 AS4743G_N12PGV 1GBCkk_3V3 N500GB5 4KS_4K AS4743G 482 G64Mnkk AAP Thailand LX RHD0C 009 AS4743G_N12PGV 1GBCkk_3V3 N640GB5 4KS AS4743G 482 G64Mnkk AAP Thailand LX RHD0C 008 AS4743G_N12PGV 1GBCkk_3V3 N640GB5 4KS AS4743G 482 G64Mnkk AAP Thailand LX RHD0C 007 AS4743G_N12PGV 1GBCkk_3V3 N640GB5 4KS AS4743G 482 G50Mnkk AAP Thailand LX RHD0C 006 AS4743G_N12PGV 1GBCkk_...

Page 268: ...0GB5 4KS AS4743ZG P6 34G75Bnkk WW WW S2 RFV02 001 AS4743ZG_N12PG S2GBCkk_3V3 N750GB5 4KS AS4743ZG P6 22G50Mnkk CHINA Hong Kong LX RHF02 001 AS4743ZG_N12PG V1GBCkk_3V3 N500GB5 4KS_4K AS4743ZG P6 32G50Mnkk AAP Thailand LX RHF0C 003 AS4743ZG_N12PG V1GBCkk_3V3 N500GB5 4KS AS4743ZG P6 32G50Mnkk AAP Thailand LX RHF0C 002 AS4743ZG_N12PG V1GBCkk_3V3 N500GB5 4KS AS4743ZG P6 32G50Mnkk AAP Thailand LX RHF0C ...

Page 269: ...00GB5 4KS AS4743 482G 50Mnkk AAP Vietnam LX RFK02 002 AS4743_UMACkk_ 3 N500GB5 4KS AS4743 382G 50Mnkk AAP Vietnam LX RFK02 001 AS4743_UMACkk_ 3 N500GB5 4KS AS4743 382G 50Mnkk AAP Singapore LX RFK02 006 AS4743_UMACkk_ 3 N500GB5 4KS AS4743 382G 50Mnkk TWN GCTWN LX RFK02 007 AS4743_UMACkk_ 3 N500GB5 4KS AS4743 382G 50Mnkk AAP India LX RFK0C 001 AS4743_UMACkk_ 3 N500GB5 4KS AS4743 482G 50Mnkk AAP Indi...

Page 270: ...7 36 Model Definition and Configuration ...

Page 271: ...XS AS4743G 482 G64Mnkk AAP Thailand LX RFH0C 006 AS4743G_N12PGS 1GBCkk_3V3 NSM8XS AS4743G 482 G64Mnkk AAP Thailand LX RFH0C 005 AS4743G_N12PGS 1GBCkk_3V3 NSM8XS AS4743G 482 G50Mnkk CHINA China LX RFH01 001 AS4743G_N12PGS 1GBCkk_3V3 NSM8XS AS4743G 482 G64Mnkk TWN GCTWN LX RFH02 001 AS4743G_N12PGS 1GBCkk_3V3 NSM8XS AS4743 568G 64Mnkk WW WW S2 RFH02 001 AS4743G_N12PGS 1GBCkk_3V3 NSM8XS AS4743G 382 G5...

Page 272: ...S AS4743G 382 G50Mnkk CHINA Hong Kong LX RHD02 002 AS4743G_N12PGV 1GBCkk_3V3 NSM8XS AS4743G 482 G64Mnkk AAP Thailand LX RHD0C 009 AS4743G_N12PGV 1GBCkk_3V3 NSM8XS AS4743G 482 G64Mnkk AAP Thailand LX RHD0C 008 AS4743G_N12PGV 1GBCkk_3V3 NSM8XS AS4743G 482 G64Mnkk AAP Thailand LX RHD0C 007 AS4743G_N12PGV 1GBCkk_3V3 NSM8XS AS4743G 482 G50Mnkk AAP Thailand LX RHD0C 006 AS4743G_N12PGV 1GBCkk_3V3 NSM8XS ...

Page 273: ...BCkk_3V3 NSM8XS AS4743ZG P6 34G75Bnkk WW WW S2 RFV02 001 AS4743ZG_N12PG S2GBCkk_3V3 NBDCB4X S AS4743ZG P6 22G50Mnkk CHINA Hong Kong LX RHF02 001 AS4743ZG_N12PG V1GBCkk_3V3 NSM8XS AS4743ZG P6 32G50Mnkk AAP Thailand LX RHF0C 003 AS4743ZG_N12PG V1GBCkk_3V3 NSM8XS AS4743ZG P6 32G50Mnkk AAP Thailand LX RHF0C 002 AS4743ZG_N12PG V1GBCkk_3V3 NSM8XS AS4743ZG P6 32G50Mnkk AAP Thailand LX RHF0C 001 AS4743ZG_...

Page 274: ..._UMACkk_ 3 NSM8XS AS4743 482G 50Mnkk AAP Vietnam LX RFK02 002 AS4743_UMACkk_ 3 NSM8XS AS4743 382G 50Mnkk AAP Vietnam LX RFK02 001 AS4743_UMACkk_ 3 NSM8XS AS4743 382G 50Mnkk AAP Singapore LX RFK02 006 AS4743_UMACkk_ 3 NSM8XS AS4743 382G 50Mnkk TWN GCTWN LX RFK02 007 AS4743_UMACkk_ 3 NSM8XS AS4743 382G 50Mnkk AAP India LX RFK0C 001 AS4743_UMACkk_ 3 NSM8XS AS4743 482G 50Mnkk AAP India LX RFK0C 002 AS...

Page 275: ..._N12PG S1GBCkk_3V3 3rd WiFi 2x2 BGN AS4743G 482 G64Mnkk AAP Thailand LX RFH0C 006 AS4743G_N12PG S1GBCkk_3V3 3rd WiFi 2x2 BGN AS4743G 482 G64Mnkk AAP Thailand LX RFH0C 005 AS4743G_N12PG S1GBCkk_3V3 3rd WiFi 2x2 BGN AS4743G 482 G50Mnkk CHINA China LX RFH01 001 AS4743G_N12PG S1GBCkk_3V3 3rd WiFi 2x2 BGN AS4743G 482 G64Mnkk TWN GCTWN LX RFH02 001 AS4743G_N12PG S1GBCkk_3V3 3rd WiFi 2x2 BGN AS4743 568G ...

Page 276: ...3V3 3rd WiFi 2x2 BGN AS4743G 382 G32Mnkk CHINA China LX RHD01 003 AS4743G_N12PG V1GBCkk_3V3 3rd WiFi 2x2 BGN AS4743G 382 G50Mnkk CHINA Hong Kong LX RHD02 002 AS4743G_N12PG V1GBCkk_3V3 3rd WiFi 2x2 BGN AS4743G 482 G64Mnkk AAP Thailand LX RHD0C 009 AS4743G_N12PG V1GBCkk_3V3 3rd WiFi 2x2 BGN AS4743G 482 G64Mnkk AAP Thailand LX RHD0C 008 AS4743G_N12PG V1GBCkk_3V3 3rd WiFi 2x2 BGN AS4743G 482 G64Mnkk A...

Page 277: ...1GBCkk_3V3 3rd WiFi 2x2 BGN AS4743ZG P6 32G50Mnkk TWN GCTWN LX RFU02 002 AS4743ZG_N12PG S1GBCkk_3V3 3rd WiFi 2x2 BGN AS4743ZG P6 23G32Mnkk WW WW S2 RFU0C 001 AS4743ZG_N12PG S1GBCkk_3V3 3rd WiFi 2x2 BGN AS4743ZG P6 34G75Bnkk WW WW S2 RFV02 001 AS4743ZG_N12PG S2GBCkk_3V3 3rd WiFi 2x2 BGN AS4743ZG P6 22G50Mnkk CHINA Hong Kong LX RHF02 001 AS4743ZG_N12PG V1GBCkk_3V3 3rd WiFi 2x2 BGN AS4743ZG P6 32G50M...

Page 278: ...4743_UMACkk_ 3 3rd WiFi 2x2 BGN AS4743 482G 50Mnkk AAP Singapore LX RFK02 003 AS4743_UMACkk_ 3 3rd WiFi 2x2 BGN AS4743 482G 50Mnkk AAP Vietnam LX RFK02 002 AS4743_UMACkk_ 3 3rd WiFi 2x2 BGN AS4743 382G 50Mnkk AAP Vietnam LX RFK02 001 AS4743_UMACkk_ 3 3rd WiFi 2x2 BGN AS4743 382G 50Mnkk AAP Singapore LX RFK02 006 AS4743_UMACkk_ 3 3rd WiFi 2x2 BGN AS4743 382G 50Mnkk TWN GCTWN LX RFK02 007 AS4743_UMA...

Page 279: ...kk_3V3 BT 2 1 AS4743G 482 G64Mnkk AAP Thailand LX RFH0C 006 AS4743G_N12PG S1GBCkk_3V3 BT 2 1 AS4743G 482 G64Mnkk AAP Thailand LX RFH0C 005 AS4743G_N12PG S1GBCkk_3V3 BT 2 1 AS4743G 482 G50Mnkk CHINA China LX RFH01 001 AS4743G_N12PG S1GBCkk_3V3 N AS4743G 482 G64Mnkk TWN GCTWN LX RFH02 001 AS4743G_N12PG S1GBCkk_3V3 BT 3 0 AS4743 568G 64Mnkk WW WW S2 RFH02 001 AS4743G_N12PG S1GBCkk_3V3 N AS4743G 382 G...

Page 280: ...G50Mnkk CHINA Hong Kong LX RHD02 002 AS4743G_N12PG V1GBCkk_3V3 BT 3 0 AS4743G 482 G64Mnkk AAP Thailand LX RHD0C 009 AS4743G_N12PG V1GBCkk_3V3 BT 2 1 AS4743G 482 G64Mnkk AAP Thailand LX RHD0C 008 AS4743G_N12PG V1GBCkk_3V3 BT 2 1 AS4743G 482 G64Mnkk AAP Thailand LX RHD0C 007 AS4743G_N12PG V1GBCkk_3V3 BT 2 1 AS4743G 482 G50Mnkk AAP Thailand LX RHD0C 006 AS4743G_N12PG V1GBCkk_3V3 BT 2 1 AS4743G 482 G5...

Page 281: ...V3 BT 2 1 AS4743ZG P6 34G75Bnkk WW WW S2 RFV02 001 AS4743ZG_N12P GS2GBCkk_3V3 BT 3 0 AS4743ZG P6 22G50Mnkk CHINA Hong Kong LX RHF02 001 AS4743ZG_N12P GV1GBCkk_3V3 BT 3 0 AS4743ZG P6 32G50Mnkk AAP Thailand LX RHF0C 003 AS4743ZG_N12P GV1GBCkk_3V3 BT 2 1 AS4743ZG P6 32G50Mnkk AAP Thailand LX RHF0C 002 AS4743ZG_N12P GV1GBCkk_3V3 BT 2 1 AS4743ZG P6 32G50Mnkk AAP Thailand LX RHF0C 001 AS4743ZG_N12P GV1G...

Page 282: ...k_ 3 BT 3 0 AS4743 482G 50Mnkk AAP Vietnam LX RFK02 002 AS4743_UMACkk_ 3 BT 3 0 AS4743 382G 50Mnkk AAP Vietnam LX RFK02 001 AS4743_UMACkk_ 3 BT 3 0 AS4743 382G 50Mnkk AAP Singapore LX RFK02 006 AS4743_UMACkk_ 3 BT 3 0 AS4743 382G 50Mnkk TWN GCTWN LX RFK02 007 AS4743_UMACkk_ 3 BT 3 0 AS4743 382G 50Mnkk AAP India LX RFK0C 001 AS4743_UMACkk_ 3 BT 2 1 AS4743 482G 50Mnkk AAP India LX RFK0C 002 AS4743_U...

Page 283: ...BCkk_3V3 HM55 AS4743G 482 G64Mnkk AAP Thailand LX RFH0C 006 AS4743G_N12PG S1GBCkk_3V3 HM55 AS4743G 482 G64Mnkk AAP Thailand LX RFH0C 005 AS4743G_N12PG S1GBCkk_3V3 HM55 AS4743G 482 G50Mnkk CHINA China LX RFH01 001 AS4743G_N12PG S1GBCkk_3V3 HM55 AS4743G 482 G64Mnkk TWN GCTWN LX RFH02 001 AS4743G_N12PG S1GBCkk_3V3 HM55 AS4743 568G 64Mnkk WW WW S2 RFH02 001 AS4743G_N12PG S1GBCkk_3V3 HM55 AS4743G 382 G...

Page 284: ...382 G50Mnkk CHINA Hong Kong LX RHD02 002 AS4743G_N12PG V1GBCkk_3V3 HM55 AS4743G 482 G64Mnkk AAP Thailand LX RHD0C 009 AS4743G_N12PG V1GBCkk_3V3 HM55 AS4743G 482 G64Mnkk AAP Thailand LX RHD0C 008 AS4743G_N12PG V1GBCkk_3V3 HM55 AS4743G 482 G64Mnkk AAP Thailand LX RHD0C 007 AS4743G_N12PG V1GBCkk_3V3 HM55 AS4743G 482 G50Mnkk AAP Thailand LX RHD0C 006 AS4743G_N12PG V1GBCkk_3V3 HM55 AS4743G 482 G50Mnkk ...

Page 285: ...BCkk_3V3 HM55 AS4743ZG P6 34G75Bnkk WW WW S2 RFV02 001 AS4743ZG_N12P GS2GBCkk_3V3 HM55 AS4743ZG P6 22G50Mnkk CHINA Hong Kong LX RHF02 001 AS4743ZG_N12P GV1GBCkk_3V3 HM55 AS4743ZG P6 32G50Mnkk AAP Thailand LX RHF0C 003 AS4743ZG_N12P GV1GBCkk_3V3 HM55 AS4743ZG P6 32G50Mnkk AAP Thailand LX RHF0C 002 AS4743ZG_N12P GV1GBCkk_3V3 HM55 AS4743ZG P6 32G50Mnkk AAP Thailand LX RHF0C 001 AS4743ZG_N12P GV1GBCkk...

Page 286: ...ACkk_ 3 HM55 AS4743 482G 50Mnkk AAP Vietnam LX RFK02 002 AS4743_UMACkk_ 3 HM55 AS4743 382G 50Mnkk AAP Vietnam LX RFK02 001 AS4743_UMACkk_ 3 HM55 AS4743 382G 50Mnkk AAP Singapore LX RFK02 006 AS4743_UMACkk_ 3 HM55 AS4743 382G 50Mnkk TWN GCTWN LX RFK02 007 AS4743_UMACkk_ 3 HM55 AS4743 382G 50Mnkk AAP India LX RFK0C 001 AS4743_UMACkk_ 3 HM55 AS4743 482G 50Mnkk AAP India LX RFK0C 002 AS4743_UMACkk_ 3 ...

Page 287: ... 2 AS4743G 482 G64Mnkk AAP Thailand LX RFH0C 006 AS4743G_N12PG S1GBCkk_3V3 6CELL2 2 AS4743G 482 G64Mnkk AAP Thailand LX RFH0C 005 AS4743G_N12PG S1GBCkk_3V3 6CELL2 2 AS4743G 482 G50Mnkk CHINA China LX RFH01 001 AS4743G_N12PG S1GBCkk_3V3 6CELL2 2 AS4743G 482 G64Mnkk TWN GCTWN LX RFH02 001 AS4743G_N12PG S1GBCkk_3V3 6CELL2 2 AS4743 568G 64Mnkk WW WW S2 RFH02 001 AS4743G_N12PG S1GBCkk_3V3 6CELL2 2 AS47...

Page 288: ...82 G50Mnkk CHINA Hong Kong LX RHD02 002 AS4743G_N12PG V1GBCkk_3V3 6CELL2 2 AS4743G 482 G64Mnkk AAP Thailand LX RHD0C 009 AS4743G_N12PG V1GBCkk_3V3 6CELL2 2 AS4743G 482 G64Mnkk AAP Thailand LX RHD0C 008 AS4743G_N12PG V1GBCkk_3V3 6CELL2 2 AS4743G 482 G64Mnkk AAP Thailand LX RHD0C 007 AS4743G_N12PG V1GBCkk_3V3 6CELL2 2 AS4743G 482 G50Mnkk AAP Thailand LX RHD0C 006 AS4743G_N12PG V1GBCkk_3V3 6CELL2 2 A...

Page 289: ...3V3 6CELL2 2 AS4743ZG P6 34G75Bnkk WW WW S2 RFV02 001 AS4743ZG_N12P GS2GBCkk_3V3 6CELL2 2 AS4743ZG P6 22G50Mnkk CHINA Hong Kong LX RHF02 001 AS4743ZG_N12P GV1GBCkk_3V3 6CELL2 2 AS4743ZG P6 32G50Mnkk AAP Thailand LX RHF0C 003 AS4743ZG_N12P GV1GBCkk_3V3 6CELL2 2 AS4743ZG P6 32G50Mnkk AAP Thailand LX RHF0C 002 AS4743ZG_N12P GV1GBCkk_3V3 6CELL2 2 AS4743ZG P6 32G50Mnkk AAP Thailand LX RHF0C 001 AS4743Z...

Page 290: ... 3 6CELL2 2 AS4743 482G 50Mnkk AAP Vietnam LX RFK02 002 AS4743_UMACkk_ 3 6CELL2 2 AS4743 382G 50Mnkk AAP Vietnam LX RFK02 001 AS4743_UMACkk_ 3 6CELL2 2 AS4743 382G 50Mnkk AAP Singapore LX RFK02 006 AS4743_UMACkk_ 3 6CELL2 2 AS4743 382G 50Mnkk TWN GCTWN LX RFK02 007 AS4743_UMACkk_ 3 6CELL2 2 AS4743 382G 50Mnkk AAP India LX RFK0C 001 AS4743_UMACkk_ 3 6CELL2 2 AS4743 482G 50Mnkk AAP India LX RFK0C 00...

Page 291: ...BCkk_3V3 90W AS4743G 482 G64Mnkk AAP Thailand LX RFH0C 006 AS4743G_N12PG S1GBCkk_3V3 90W AS4743G 482 G64Mnkk AAP Thailand LX RFH0C 005 AS4743G_N12PG S1GBCkk_3V3 90W AS4743G 482 G50Mnkk CHINA China LX RFH01 001 AS4743G_N12PG S1GBCkk_3V3 90W AS4743G 482 G64Mnkk TWN GCTWN LX RFH02 001 AS4743G_N12PG S1GBCkk_3V3 90W AS4743 568G 64Mnkk WW WW S2 RFH02 001 AS4743G_N12PG S1GBCkk_3V3 90W AS4743G 382 G50Mnkk...

Page 292: ...43G 382 G50Mnkk CHINA Hong Kong LX RHD02 002 AS4743G_N12PG V1GBCkk_3V3 65W AS4743G 482 G64Mnkk AAP Thailand LX RHD0C 009 AS4743G_N12PG V1GBCkk_3V3 65W AS4743G 482 G64Mnkk AAP Thailand LX RHD0C 008 AS4743G_N12PG V1GBCkk_3V3 65W AS4743G 482 G64Mnkk AAP Thailand LX RHD0C 007 AS4743G_N12PG V1GBCkk_3V3 65W AS4743G 482 G50Mnkk AAP Thailand LX RHD0C 006 AS4743G_N12PG V1GBCkk_3V3 65W AS4743G 482 G50Mnkk A...

Page 293: ... GS1GBCkk_3V3 90W AS4743ZG P6 34G75Bnkk WW WW S2 RFV02 001 AS4743ZG_N12P GS2GBCkk_3V3 90W AS4743ZG P6 22G50Mnkk CHINA Hong Kong LX RHF02 001 AS4743ZG_N12P GV1GBCkk_3V3 65W AS4743ZG P6 32G50Mnkk AAP Thailand LX RHF0C 003 AS4743ZG_N12P GV1GBCkk_3V3 65W AS4743ZG P6 32G50Mnkk AAP Thailand LX RHF0C 002 AS4743ZG_N12P GV1GBCkk_3V3 65W AS4743ZG P6 32G50Mnkk AAP Thailand LX RHF0C 001 AS4743ZG_N12P GV1GBCkk...

Page 294: ...43_UMACkk _3 65W AS4743 482G 50Mnkk AAP Vietnam LX RFK02 002 AS4743_UMACkk _3 65W AS4743 382G 50Mnkk AAP Vietnam LX RFK02 001 AS4743_UMACkk _3 65W AS4743 382G 50Mnkk AAP Singapore LX RFK02 006 AS4743_UMACkk _3 65W AS4743 382G 50Mnkk TWN GCTWN LX RFK02 007 AS4743_UMACkk _3 65W AS4743 382G 50Mnkk AAP India LX RFK0C 001 AS4743_UMACkk _3 65W AS4743 482G 50Mnkk AAP India LX RFK0C 002 AS4743_UMACkk _3 6...

Page 295: ..._3V3 1 3M AS4743G 482 G64Mnkk AAP Thailand LX RFH0C 006 AS4743G_N12PG S1GBCkk_3V3 1 3M AS4743G 482 G64Mnkk AAP Thailand LX RFH0C 005 AS4743G_N12PG S1GBCkk_3V3 1 3M AS4743G 482 G50Mnkk CHINA China LX RFH01 001 AS4743G_N12PG S1GBCkk_3V3 1 3M AS4743G 482 G64Mnkk TWN GCTWN LX RFH02 001 AS4743G_N12PG S1GBCkk_3V3 1 3M AS4743 568G 64Mnkk WW WW S2 RFH02 001 AS4743G_N12PG S1GBCkk_3V3 1 3M AS4743G 382 G50Mn...

Page 296: ...743G 382 G50Mnkk CHINA Hong Kong LX RHD02 002 AS4743G_N12PG V1GBCkk_3V3 1 3M AS4743G 482 G64Mnkk AAP Thailand LX RHD0C 009 AS4743G_N12PG V1GBCkk_3V3 1 3M AS4743G 482 G64Mnkk AAP Thailand LX RHD0C 008 AS4743G_N12PG V1GBCkk_3V3 1 3M AS4743G 482 G64Mnkk AAP Thailand LX RHD0C 007 AS4743G_N12PG V1GBCkk_3V3 1 3M AS4743G 482 G50Mnkk AAP Thailand LX RHD0C 006 AS4743G_N12PG V1GBCkk_3V3 1 3M AS4743G 482 G50...

Page 297: ...GS1GBCkk_3V3 1 3M AS4743ZG P6 34G75Bnkk WW WW S2 RFV02 001 AS4743ZG_N12P GS2GBCkk_3V3 1 3M AS4743ZG P6 22G50Mnkk CHINA Hong Kong LX RHF02 001 AS4743ZG_N12P GV1GBCkk_3V3 1 3M AS4743ZG P6 32G50Mnkk AAP Thailand LX RHF0C 003 AS4743ZG_N12P GV1GBCkk_3V3 1 3M AS4743ZG P6 32G50Mnkk AAP Thailand LX RHF0C 002 AS4743ZG_N12P GV1GBCkk_3V3 1 3M AS4743ZG P6 32G50Mnkk AAP Thailand LX RHF0C 001 AS4743ZG_N12P GV1G...

Page 298: ...3_UMACkk _3 1 3M AS4743 482G 50Mnkk AAP Vietnam LX RFK02 002 AS4743_UMACkk _3 1 3M AS4743 382G 50Mnkk AAP Vietnam LX RFK02 001 AS4743_UMACkk _3 1 3M AS4743 382G 50Mnkk AAP Singapore LX RFK02 006 AS4743_UMACkk _3 1 3M AS4743 382G 50Mnkk TWN GCTWN LX RFK02 007 AS4743_UMACkk _3 1 3M AS4743 382G 50Mnkk AAP India LX RFK0C 001 AS4743_UMACkk _3 1 3M AS4743 482G 50Mnkk AAP India LX RFK0C 002 AS4743_UMACkk...

Page 299: ...0C 007 AS4743G_N12PG S1GBCkk_3V3 Resource CD AS4743G 482 G64Mnkk AAP Thailand LX RFH0C 006 AS4743G_N12PG S1GBCkk_3V3 Resource CD AS4743G 482 G64Mnkk AAP Thailand LX RFH0C 005 AS4743G_N12PG S1GBCkk_3V3 Resource CD AS4743G 482 G50Mnkk CHINA China LX RFH01 001 AS4743G_N12PG S1GBCkk_3V3 AS4743G 482 G64Mnkk TWN GCTWN LX RFH02 001 AS4743G_N12PG S1GBCkk_3V3 AS4743 568G 64Mnkk WW WW S2 RFH02 001 AS4743G_N...

Page 300: ...D02 002 AS4743G_N12PG V1GBCkk_3V3 AS4743G 482 G64Mnkk AAP Thailand LX RHD0C 009 AS4743G_N12PG V1GBCkk_3V3 Resource CD AS4743G 482 G64Mnkk AAP Thailand LX RHD0C 008 AS4743G_N12PG V1GBCkk_3V3 Resource CD AS4743G 482 G64Mnkk AAP Thailand LX RHD0C 007 AS4743G_N12PG V1GBCkk_3V3 Resource CD AS4743G 482 G50Mnkk AAP Thailand LX RHD0C 006 AS4743G_N12PG V1GBCkk_3V3 Resource CD AS4743G 482 G50Mnkk AAP Thaila...

Page 301: ... P6 34G75Bnkk WW WW S2 RFV02 001 AS4743ZG_N12P GS2GBCkk_3V3 AS4743ZG P6 22G50Mnkk CHINA Hong Kong LX RHF02 001 AS4743ZG_N12P GV1GBCkk_3V3 AS4743ZG P6 32G50Mnkk AAP Thailand LX RHF0C 003 AS4743ZG_N12P GV1GBCkk_3V3 Resource CD AS4743ZG P6 32G50Mnkk AAP Thailand LX RHF0C 002 AS4743ZG_N12P GV1GBCkk_3V3 Resource CD AS4743ZG P6 32G50Mnkk AAP Thailand LX RHF0C 001 AS4743ZG_N12P GV1GBCkk_3V3 Resource CD A...

Page 302: ...MACkk _3 AS4743 482G 50Mnkk AAP Vietnam LX RFK02 002 AS4743_UMACkk _3 AS4743 382G 50Mnkk AAP Vietnam LX RFK02 001 AS4743_UMACkk _3 AS4743 382G 50Mnkk AAP Singapore LX RFK02 006 AS4743_UMACkk _3 AS4743 382G 50Mnkk TWN GCTWN LX RFK02 007 AS4743_UMACkk _3 AS4743 382G 50Mnkk AAP India LX RFK0C 001 AS4743_UMACkk _3 Resource CD AS4743 482G 50Mnkk AAP India LX RFK0C 002 AS4743_UMACkk _3 Resource CD Table...

Page 303: ...hailand LX RFH0C 006 AS4743G_N12PG S1GBCkk_3V3 N AS4743G 482 G64Mnkk AAP Thailand LX RFH0C 005 AS4743G_N12PG S1GBCkk_3V3 N AS4743G 482 G50Mnkk CHINA China LX RFH01 001 AS4743G_N12PG S1GBCkk_3V3 W7 Standard AS4743G 482 G64Mnkk TWN GCTWN LX RFH02 001 AS4743G_N12PG S1GBCkk_3V3 W7 Standard AS4743 568G 64Mnkk WW WW S2 RFH02 001 AS4743G_N12PG S1GBCkk_3V3 W7 Standard AS4743G 382 G50Mnkk AAP Singapore LX ...

Page 304: ...G V1GBCkk_3V3 W7 Standard AS4743G 382 G50Mnkk CHINA Hong Kong LX RHD02 002 AS4743G_N12PG V1GBCkk_3V3 W7 Standard AS4743G 482 G64Mnkk AAP Thailand LX RHD0C 009 AS4743G_N12PG V1GBCkk_3V3 N AS4743G 482 G64Mnkk AAP Thailand LX RHD0C 008 AS4743G_N12PG V1GBCkk_3V3 N AS4743G 482 G64Mnkk AAP Thailand LX RHD0C 007 AS4743G_N12PG V1GBCkk_3V3 N AS4743G 482 G50Mnkk AAP Thailand LX RHD0C 006 AS4743G_N12PG V1GBC...

Page 305: ...01 AS4743ZG_N12P GS1GBCkk_3V3 N AS4743ZG P6 34G75Bnkk WW WW S2 RFV02 001 AS4743ZG_N12P GS2GBCkk_3V3 W7 Standard AS4743ZG P6 22G50Mnkk CHINA Hong Kong LX RHF02 001 AS4743ZG_N12P GV1GBCkk_3V3 W7 Standard AS4743ZG P6 32G50Mnkk AAP Thailand LX RHF0C 003 AS4743ZG_N12P GV1GBCkk_3V3 N AS4743ZG P6 32G50Mnkk AAP Thailand LX RHF0C 002 AS4743ZG_N12P GV1GBCkk_3V3 N AS4743ZG P6 32G50Mnkk AAP Thailand LX RHF0C ...

Page 306: ... _3 W7 Standard AS4743 482G 50Mnkk AAP Vietnam LX RFK02 002 AS4743_UMACkk _3 W7 Standard AS4743 382G 50Mnkk AAP Vietnam LX RFK02 001 AS4743_UMACkk _3 W7 Standard AS4743 382G 50Mnkk AAP Singapore LX RFK02 006 AS4743_UMACkk _3 W7 Standard AS4743 382G 50Mnkk TWN GCTWN LX RFK02 007 AS4743_UMACkk _3 W7 Standard AS4743 382G 50Mnkk AAP India LX RFK0C 001 AS4743_UMACkk _3 N AS4743 482G 50Mnkk AAP India LX...

Page 307: ...Thailand LX RFH0C 007 AS4743G_N12P GS1GBCkk_3V3 ATH AS4743G 482 G64Mnkk AAP Thailand LX RFH0C 006 AS4743G_N12P GS1GBCkk_3V3 ATH AS4743G 482 G64Mnkk AAP Thailand LX RFH0C 005 AS4743G_N12P GS1GBCkk_3V3 ATH AS4743G 482 G50Mnkk CHINA China LX RFH01 001 AS4743G_N12P GS1GBCkk_3V3 ACCN AS4743G 482 G64Mnkk TWN GCTWN LX RFH02 001 AS4743G_N12P GS1GBCkk_3V3 GCTWN AS4743 568G 64Mnkk WW WW S2 RFH02 001 AS4743G...

Page 308: ...S4743G_N12P GV1GBCkk_3V3 AFE AS4743G 382 G32Mnkk CHINA China LX RHD01 003 AS4743G_N12P GV1GBCkk_3V3 ACCN AS4743G 382 G50Mnkk CHINA Hong Kong LX RHD02 002 AS4743G_N12P GV1GBCkk_3V3 AFE AS4743G 482 G64Mnkk AAP Thailand LX RHD0C 009 AS4743G_N12P GV1GBCkk_3V3 ATH AS4743G 482 G64Mnkk AAP Thailand LX RHD0C 008 AS4743G_N12P GV1GBCkk_3V3 ATH AS4743G 482 G64Mnkk AAP Thailand LX RHD0C 007 AS4743G_N12P GV1GB...

Page 309: ... 003 AS4743ZG_N12P GS1GBCkk_3V3 GCTWN AS4743ZG P 632G50Mnkk TWN GCTWN LX RFU02 002 AS4743ZG_N12P GS1GBCkk_3V3 GCTWN AS4743ZG P 623G32Mnkk WW WW S2 RFU0C 001 AS4743ZG_N12P GS1GBCkk_3V3 WW AS4743ZG P 634G75Bnkk WW WW S2 RFV02 001 AS4743ZG_N12P GS2GBCkk_3V3 WW AS4743ZG P 622G50Mnkk CHINA Hong Kong LX RHF02 001 AS4743ZG_N12P GV1GBCkk_3V3 AFE AS4743ZG P 632G50Mnkk AAP Thailand LX RHF0C 003 AS4743ZG_N12...

Page 310: ...pore LX RFK02 005 AS4743_UMACkk _3 ACS AS4743 482G 50Mnkk AAP Singapore LX RFK02 003 AS4743_UMACkk _3 ACS AS4743 482G 50Mnkk AAP Vietnam LX RFK02 002 AS4743_UMACkk _3 AVN AS4743 382G 50Mnkk AAP Vietnam LX RFK02 001 AS4743_UMACkk _3 AVN AS4743 382G 50Mnkk AAP Singapore LX RFK02 006 AS4743_UMACkk _3 ACS AS4743 382G 50Mnkk TWN GCTWN LX RFK02 007 AS4743_UMACkk _3 GCTWN AS4743 382G 50Mnkk AAP India LX ...

Page 311: ...S4743G 482 G64Mnkk AAP Thailand LX RFH0C 006 AS4743G_N12P GS1GBCkk_3V3 LINPUS AS4743G 482 G64Mnkk AAP Thailand LX RFH0C 005 AS4743G_N12P GS1GBCkk_3V3 LINPUS AS4743G 482 G50Mnkk CHINA China LX RFH01 001 AS4743G_N12P GS1GBCkk_3V3 W7HB64SC AS4743G 482 G64Mnkk TWN GCTWN LX RFH02 001 AS4743G_N12P GS1GBCkk_3V3 W7HP64 AS4743 568G 64Mnkk WW WW S2 RFH02 001 AS4743G_N12P GS1GBCkk_3V3 W7HP64 AS4743G 382 G50M...

Page 312: ...AS4743G 382 G50Mnkk CHINA Hong Kong LX RHD02 002 AS4743G_N12P GV1GBCkk_3V3 W7HP64 AS4743G 482 G64Mnkk AAP Thailand LX RHD0C 009 AS4743G_N12P GV1GBCkk_3V3 LINPUS AS4743G 482 G64Mnkk AAP Thailand LX RHD0C 008 AS4743G_N12P GV1GBCkk_3V3 LINPUS AS4743G 482 G64Mnkk AAP Thailand LX RHD0C 007 AS4743G_N12P GV1GBCkk_3V3 LINPUS AS4743G 482 G50Mnkk AAP Thailand LX RHD0C 006 AS4743G_N12P GV1GBCkk_3V3 LINPUS AS...

Page 313: ...S1GBCkk_3V3 LINPUS AS4743ZG P 634G75Bnkk WW WW S2 RFV02 001 AS4743ZG_N12P GS2GBCkk_3V3 W7HP64 AS4743ZG P 622G50Mnkk CHINA Hong Kong LX RHF02 001 AS4743ZG_N12P GV1GBCkk_3V3 W7HP64 AS4743ZG P 632G50Mnkk AAP Thailand LX RHF0C 003 AS4743ZG_N12P GV1GBCkk_3V3 LINPUS AS4743ZG P 632G50Mnkk AAP Thailand LX RHF0C 002 AS4743ZG_N12P GV1GBCkk_3V3 LINPUS AS4743ZG P 632G50Mnkk AAP Thailand LX RHF0C 001 AS4743ZG_...

Page 314: ...UMACkk _3 W7HP64 AS4743 482G 50Mnkk AAP Vietnam LX RFK02 002 AS4743_UMACkk _3 W7HP64EM AS4743 382G 50Mnkk AAP Vietnam LX RFK02 001 AS4743_UMACkk _3 W7HP64EM AS4743 382G 50Mnkk AAP Singapor e LX RFK02 006 AS4743_UMACkk _3 W7HP64 AS4743 382G 50Mnkk TWN GCTWN LX RFK02 007 AS4743_UMACkk _3 W7HP64 AS4743 382G 50Mnkk AAP India LX RFK0C 001 AS4743_UMACkk _3 LinpusMG AS4743 482G 50Mnkk AAP India LX RFK0C ...

Page 315: ...TH3EN11 AS4743G 48 2G64Mnkk AAP Thailand LX RFH0C 006 AS4743G_N12P GS1GBCkk_3V3 TH1TH51 AS4743G 48 2G64Mnkk AAP Thailand LX RFH0C 005 AS4743G_N12P GS1GBCkk_3V3 TH4ES61 AS4743G 48 2G50Mnkk CHINA China LX RFH01 001 AS4743G_N12P GS1GBCkk_3V3 CN1SC11 AS4743G 48 2G64Mnkk TWN GCTWN LX RFH02 001 AS4743G_N12P GS1GBCkk_3V3 TW1TC41 AS4743 568 G64Mnkk WW WW S2 RFH02 001 AS4743G_N12P GS1GBCkk_3V3 WW1ES62 AS47...

Page 316: ...2G50Mnkk CHINA Hong Kong LX RHD02 002 AS4743G_N12P GV1GBCkk_3V3 HK2ZH31 AS4743G 48 2G64Mnkk AAP Thailand LX RHD0C 009 AS4743G_N12P GV1GBCkk_3V3 TH3EN11 AS4743G 48 2G64Mnkk AAP Thailand LX RHD0C 008 AS4743G_N12P GV1GBCkk_3V3 TH1TH51 AS4743G 48 2G64Mnkk AAP Thailand LX RHD0C 007 AS4743G_N12P GV1GBCkk_3V3 TH4ES61 AS4743G 48 2G50Mnkk AAP Thailand LX RHD0C 006 AS4743G_N12P GV1GBCkk_3V3 TH3EN11 AS4743G ...

Page 317: ...3 WW1EN11 AS4743ZG P 634G75Bnkk WW WW S2 RFV02 001 AS4743ZG_N12P GS2GBCkk_3V3 WW1ES62 AS4743ZG P 622G50Mnkk CHINA Hong Kong LX RHF02 001 AS4743ZG_N12P GV1GBCkk_3V3 HK2ZH31 AS4743ZG P 632G50Mnkk AAP Thailand LX RHF0C 003 AS4743ZG_N12P GV1GBCkk_3V3 TH3EN11 AS4743ZG P 632G50Mnkk AAP Thailand LX RHF0C 002 AS4743ZG_N12P GV1GBCkk_3V3 TH1TH51 AS4743ZG P 632G50Mnkk AAP Thailand LX RHF0C 001 AS4743ZG_N12P ...

Page 318: ...3 SG1ES61 AS4743 482 G50Mnkk AAP Vietnam LX RFK02 002 AS4743_UMACkk _3 VN1ES61 AS4743 382 G50Mnkk AAP Vietnam LX RFK02 001 AS4743_UMACkk _3 VN1ES61 AS4743 382 G50Mnkk AAP Singapor e LX RFK02 006 AS4743_UMACkk _3 SG1ZH31 AS4743 382 G50Mnkk TWN GCTWN LX RFK02 007 AS4743_UMACkk _3 TW1TC41 AS4743 382 G50Mnkk AAP India LX RFK0C 001 AS4743_UMACkk _3 IN2XS11 AS4743 482 G50Mnkk AAP India LX RFK0C 002 AS47...

Page 319: ...2P GS1GBCkk_3V3 LINPUSATH 3EN11 AS4743G 48 2G64Mnkk AAP Thailand LX RFH0C 006 AS4743G_N12P GS1GBCkk_3V3 LINPUSATH 1TH51 AS4743G 48 2G64Mnkk AAP Thailand LX RFH0C 005 AS4743G_N12P GS1GBCkk_3V3 LINPUSATH 4ES61 AS4743G 48 2G50Mnkk CHINA China LX RFH01 001 AS4743G_N12P GS1GBCkk_3V3 W7HB64SC ASCN1SC11 AS4743G 48 2G64Mnkk TWN GCTWN LX RFH02 001 AS4743G_N12P GS1GBCkk_3V3 W7HP64AST W1TC41 AS4743 568 G64Mn...

Page 320: ...kk_3V3 W7HP64AS HK2ZH31 AS4743G 38 2G32Mnkk CHINA China LX RHD01 003 AS4743G_N12P GV1GBCkk_3V3 W7HB64SC ASCN1SC11 AS4743G 38 2G50Mnkk CHINA Hong Kong LX RHD02 002 AS4743G_N12P GV1GBCkk_3V3 W7HP64AS HK2ZH31 AS4743G 48 2G64Mnkk AAP Thailand LX RHD0C 009 AS4743G_N12P GV1GBCkk_3V3 LINPUSATH 3EN11 AS4743G 48 2G64Mnkk AAP Thailand LX RHD0C 008 AS4743G_N12P GV1GBCkk_3V3 LINPUSATH 1TH51 AS4743G 48 2G64Mnk...

Page 321: ...GS1GBCkk_3V3 W7HP64AST W1TC41 AS4743ZG P 632G50Mnkk TWN GCTWN LX RFU02 002 AS4743ZG_N12P GS1GBCkk_3V3 W7HP64AST W1TC41 AS4743ZG P 623G32Mnkk WW WW S2 RFU0C 001 AS4743ZG_N12P GS1GBCkk_3V3 LINPUSAW W1EN11 AS4743ZG P 634G75Bnkk WW WW S2 RFV02 001 AS4743ZG_N12P GS2GBCkk_3V3 W7HP64AS WW1ES62 AS4743ZG P 622G50Mnkk CHINA Hong Kong LX RHF02 001 AS4743ZG_N12P GV1GBCkk_3V3 W7HP64AS HK2ZH31 AS4743ZG P 632G50...

Page 322: ...3_UMACk k_3 W7HP64AS SG1ES61 AS4743 482 G50Mnkk AAP Singapor e LX RFK02 003 AS4743_UMACk k_3 W7HP64AS SG1ES61 AS4743 482 G50Mnkk AAP Vietnam LX RFK02 002 AS4743_UMACk k_3 W7HP64EM ASVN1ES61 AS4743 382 G50Mnkk AAP Vietnam LX RFK02 001 AS4743_UMACk k_3 W7HP64EM ASVN1ES61 AS4743 382 G50Mnkk AAP Singapor e LX RFK02 006 AS4743_UMACk k_3 W7HP64AS SG1ZH31 AS4743 382 G50Mnkk TWN GCTWN LX RFK02 007 AS4743_...

Page 323: ..._3V3 EN AS4743G 48 2G64Mnkk AAP Thailand LX RFH0C 006 AS4743G_N12P GS1GBCkk_3V3 EN AS4743G 48 2G64Mnkk AAP Thailand LX RFH0C 005 AS4743G_N12P GS1GBCkk_3V3 EN AS4743G 48 2G50Mnkk CHINA China LX RFH01 001 AS4743G_N12P GS1GBCkk_3V3 SC AS4743G 48 2G64Mnkk TWN GCTWN LX RFH02 001 AS4743G_N12P GS1GBCkk_3V3 EN TC AS4743 568 G64Mnkk WW WW S2 RFH02 001 AS4743G_N12P GS1GBCkk_3V3 EN AS4743G 38 2G50Mnkk AAP Si...

Page 324: ...743G 38 2G50Mnkk CHINA Hong Kong LX RHD02 002 AS4743G_N12P GV1GBCkk_3V3 ENHK ZH S C AS4743G 48 2G64Mnkk AAP Thailand LX RHD0C 009 AS4743G_N12P GV1GBCkk_3V3 EN AS4743G 48 2G64Mnkk AAP Thailand LX RHD0C 008 AS4743G_N12P GV1GBCkk_3V3 EN AS4743G 48 2G64Mnkk AAP Thailand LX RHD0C 007 AS4743G_N12P GV1GBCkk_3V3 EN AS4743G 48 2G50Mnkk AAP Thailand LX RHD0C 006 AS4743G_N12P GV1GBCkk_3V3 EN AS4743G 48 2G50M...

Page 325: ...ZG P 632G50Mnkk TWN GCTWN LX RFU02 002 AS4743ZG_N12 PGS1GBCkk_3V 3 EN TC AS4743ZG P 623G32Mnkk WW WW S2 RFU0C 001 AS4743ZG_N12 PGS1GBCkk_3V 3 EN AS4743ZG P 634G75Bnkk WW WW S2 RFV02 001 AS4743ZG_N12 PGS2GBCkk_3V 3 EN AS4743ZG P 622G50Mnkk CHINA Hong Kong LX RHF02 001 AS4743ZG_N12 PGV1GBCkk_3V 3 ENHK ZH S C AS4743ZG P 632G50Mnkk AAP Thailand LX RHF0C 003 AS4743ZG_N12 PGV1GBCkk_3V 3 EN AS4743ZG P 63...

Page 326: ...ZH S C AS4743 382 G50Mnkk AAP Singapor e LX RFK02 005 AS4743_UMACk k_3 EN AS4743 482 G50Mnkk AAP Singapor e LX RFK02 003 AS4743_UMACk k_3 EN AS4743 482 G50Mnkk AAP Vietnam LX RFK02 002 AS4743_UMACk k_3 EN AS4743 382 G50Mnkk AAP Vietnam LX RFK02 001 AS4743_UMACk k_3 EN AS4743 382 G50Mnkk AAP Singapor e LX RFK02 006 AS4743_UMACk k_3 ENHK ZH S C AS4743 382 G50Mnkk TWN GCTWN LX RFK02 007 AS4743_UMACk ...

Page 327: ...I140A 22 9 AS4743G 48 2G50Mnkk AAP Vietnam LX RFH0C 004 AS4743G_N12P GS1GBCkk_3V3 US International KB I140A 22 9 AS4743G 38 2G50Mnkk AAP Vietnam LX RFH0C 002 AS4743G_N12P GS1GBCkk_3V3 US International KB I140A 22 9 AS4743G 48 2G64Mnkk AAP Vietnam LX RFH0C 008 AS4743G_N12P GS1GBCkk_3V3 US International KB I140A 22 9 AS4743G 48 2G64Mnkk AAP Thailand LX RFH0C 007 AS4743G_N12P GS1GBCkk_3V3 US Internat...

Page 328: ...nternational KB I140A 22 9 AS4743G 39 2G50Mnkk AAP Singapor e LX RFH02 006 AS4743G_N12P GS1GBCkk_3V3 US International KB I140A 22 9 AS4743G 39 2G64Mnkk AAP Philippin es LX RFH0C 003 AS4743G_N12P GS1GBCkk_3V3 US International KB I140A 22 9 AS4743G 48 2G50Mnkk AAP Malaysia LX RFH02 003 AS4743G_N12P GS1GBCkk_3V3 US International KB I140A 22 9 AS4743G 38 2G64Mnkk TWN GCTWN LX RFH02 002 AS4743G_N12P GS...

Page 329: ...ternational KB I140A 22 9 AS4743G 48 2G50Mnkk CHINA Hong Kong LX RHD02 001 AS4743G_N12P GV1GBCkk_3V3 US International KB I140A 22 9 AS4743G 38 2G32Mnkk CHINA China LX RHD01 003 AS4743G_N12P GV1GBCkk_3V3 US International KB I140A 22 9 AS4743G 38 2G50Mnkk CHINA Hong Kong LX RHD02 002 AS4743G_N12P GV1GBCkk_3V3 US International KB I140A 22 9 AS4743G 48 2G64Mnkk AAP Thailand LX RHD0C 009 AS4743G_N12P G...

Page 330: ...V1GBCkk_3V3 Thailand KB I140A 22 6 AS4743G 38 2G50Mnkk AAP Thailand LX RHD0C 001 AS4743G_N12P GV1GBCkk_3V3 US International KB I140A 22 9 AS4743G 38 2G50Mnkk CHINA China LX RHD01 001 AS4743G_N12P GV1GBCkk_3V3 US International KB I140A 22 9 AS4743G 48 2G50Mnkk CHINA China LX RHD01 002 AS4743G_N12P GV1GBCkk_3V3 US International KB I140A 22 9 AS4743G 39 4G64Mnkk WW WW S2 RHD02 001 AS4743G_N12P GV1GBC...

Page 331: ...001 AS4743ZG_N12 PGS2GBCkk_3V 3 US International KB I140A 22 9 AS4743ZG P 622G50Mnkk CHINA Hong Kong LX RHF02 001 AS4743ZG_N12 PGV1GBCkk_3V 3 US International KB I140A 22 9 AS4743ZG P 632G50Mnkk AAP Thailand LX RHF0C 003 AS4743ZG_N12 PGV1GBCkk_3V 3 US International KB I140A 22 9 AS4743ZG P 632G50Mnkk AAP Thailand LX RHF0C 002 AS4743ZG_N12 PGV1GBCkk_3V 3 Thailand KB I140A 22 6 AS4743ZG P 632G50Mnkk...

Page 332: ...ional KB I140A 22 9 AS4743 482 G50Mnkk AAP Singapor e LX RFK02 004 AS4743_UMACk k_3 US International KB I140A 22 9 AS4743 382 G50Mnkk AAP Singapor e LX RFK02 005 AS4743_UMACk k_3 US International KB I140A 22 9 AS4743 482 G50Mnkk AAP Singapor e LX RFK02 003 AS4743_UMACk k_3 US International KB I140A 22 9 AS4743 482 G50Mnkk AAP Vietnam LX RFK02 002 AS4743_UMACk k_3 US International KB I140A 22 9 AS4...

Page 333: ...43_UMACk k_3 Chinese KB I140A 20 8 AS4743 382 G50Mnkk AAP India LX RFK0C 001 AS4743_UMACk k_3 US International KB I140A 22 9 AS4743 482 G50Mnkk AAP India LX RFK0C 002 AS4743_UMACk k_3 US International KB I140A 22 9 Table 7 22 Model Definition KB Model RO Country Acer Part No BOM Name K B ...

Page 334: ...4743G 48 2G64Mnkk AAP Thailand LX RFH0C 006 AS4743G_N12P GS1GBCkk_3V3 US 110V AS4743G 48 2G64Mnkk AAP Thailand LX RFH0C 005 AS4743G_N12P GS1GBCkk_3V3 Continental AS4743G 48 2G50Mnkk CHINA China LX RFH01 001 AS4743G_N12P GS1GBCkk_3V3 PRC AS4743G 48 2G64Mnkk TWN GCTWN LX RFH02 001 AS4743G_N12P GS1GBCkk_3V3 US 110V BSMI AS4743 568 G64Mnkk WW WW S2 RFH02 001 AS4743G_N12P GS1GBCkk_3V3 US and Continenta...

Page 335: ...4743G 38 2G50Mnkk CHINA Hong Kong LX RHD02 002 AS4743G_N12P GV1GBCkk_3V3 UK AS4743G 48 2G64Mnkk AAP Thailand LX RHD0C 009 AS4743G_N12P GV1GBCkk_3V3 Europe AS4743G 48 2G64Mnkk AAP Thailand LX RHD0C 008 AS4743G_N12P GV1GBCkk_3V3 US 110V AS4743G 48 2G64Mnkk AAP Thailand LX RHD0C 007 AS4743G_N12P GV1GBCkk_3V3 Continental AS4743G 48 2G50Mnkk AAP Thailand LX RHD0C 006 AS4743G_N12P GV1GBCkk_3V3 Europe AS...

Page 336: ...GBCkk_3V 3 US 110V BSMI AS4743ZG P 632G50Mnkk TWN GCTWN LX RFU02 002 AS4743ZG_N12 PGS1GBCkk_3V 3 US 110V BSMI AS4743ZG P 623G32Mnkk WW WW S2 RFU0C 001 AS4743ZG_N12 PGS1GBCkk_3V 3 US and Continental AS4743ZG P 634G75Bnkk WW WW S2 RFV02 001 AS4743ZG_N12 PGS2GBCkk_3V 3 US and Continental AS4743ZG P 622G50Mnkk CHINA Hong Kong LX RHF02 001 AS4743ZG_N12 PGV1GBCkk_3V 3 UK AS4743ZG P 632G50Mnkk AAP Thaila...

Page 337: ...3 482 G50Mnkk AAP Singapor e LX RFK02 004 AS4743_UMACk k_3 UK AS4743 382 G50Mnkk AAP Singapor e LX RFK02 005 AS4743_UMACk k_3 UK AS4743 482 G50Mnkk AAP Singapor e LX RFK02 003 AS4743_UMACk k_3 UK AS4743 482 G50Mnkk AAP Vietnam LX RFK02 002 AS4743_UMACk k_3 Europe AS4743 382 G50Mnkk AAP Vietnam LX RFK02 001 AS4743_UMACk k_3 Europe AS4743 382 G50Mnkk AAP Singapor e LX RFK02 006 AS4743_UMACk k_3 UK A...

Page 338: ...7 104 Model Definition and Configuration ...

Page 339: ...CHAPTER 8 Test Compatible Components ...

Page 340: ...8 2 Microsoft Windows 7 Environment Test 8 4 ...

Page 341: ... department All of its system functions are tested under Windows 7 environment Refer to the following lists for components adapter cards and peripherals which have passed these tests Regarding configuration combination and test procedures please refer to the Compatibility Test Report released by the Acer Mobile System Testing Department ...

Page 342: ...53 CHICONY POWER 65W Adapter Chicony Power 65W 19V 1 7x5 5x11 Yellow CPA09 A065N1 LV5 low profile LF AP 0650A 017 10001081 DELTA 90W Adapter DELTA 90W 19V 1 7x5 5x11 Blue ADP 90CD DBH LV5 LED LF AP 09001 031 10001023 LITE ON 90W Adapter LITE ON 90W 19V 1 7x5 5x11 Blue PA 1900 34AR LV5 LED LF AP 09003 021 60002015 HIPRO 90W Adapter HIPRO 90W 19V 1 7x5 5x11 Blue HP A0904A3 B1LF LV5 LED LF AP 0900A 0...

Page 343: ...tooth 23707801 FOXCONN TW BT 2 1 Foxconn Bluetooth BRM 2070 T77H114 01 BH 21100 007 10001018 HON HAI BT 2 1 Foxconn Bluetooth ATH BU_12 BH 21100 012 10001018 HON HAI BT 3 0 Foxconn Bluetooth BRM 2046 BT3 0 T60H928 33 f w 861 BH 21100 008 10001018 HON HAI BT 3 0 Foxconn Bluetooth ATH AR3011 BT3 0 BH 21100 009 10001018 HON HAI BT 3 0 Foxconn Bluetooth BRM 2070 T77H114 01 BT 3 0 BH 21100 010 10001018...

Page 344: ...5400rpm 250GB ST9250315AS 9HH132 189 Wyatt with new pcb SATA 8MB LF F W 0001SDM1 KH 25001 019 60001922 TOSHIBA DIGI N250GB5 4KS HDD TOSHIBA 2 5 5400rpm 250GB MK2565GSX Capricorn BS 320G P SATA 8MB LF F W GJ002J KH 25004 005 60002005 HGST SG N250GB5 4KS HDD HGST 2 5 5400rpm 250GB HTS545025B9A300 Panther B SATA LF F W C60F Disk imbalance criteria 0 014g cm KH 25007 016 60001994 WD N250GB5 4KS HDD WD...

Page 345: ...5 4KS HDD WD 2 5 5400rpm 500GB WD5000BPVT 22HXZT1 ML375_AF 4K drive SATA 8MB LF HF F W 01 01A01 KH 50008 021 60001922 TOSHIBA DIGI N640GB5 4KS HDD TOSHIBA 2 5 5400rpm 640GB MK6465GSX Capricorn BS 320G P SATA 8MB LF F W GJ002J KH 64004 001 60001994 WD N640GB5 4KS HDD WD 2 5 5400rpm 640GB WD6400BPVT 22HXZT1 ML375M SATA 8MB LF F W 01 01A01 KH 64008 005 60002036 SEAGATE N750GB5 4KS HDD SEAGATE 2 5 540...

Page 346: ...2 LF 220nit 8ms 500 1 LK 14008 004 60003089 LG NLED14WXGA G LED LCD LPL 14 WXGA Glare LP140WH4 TLC1 LF 220nit 16ms LK 14008 009 10001022 CMI NLED14WXGA G LED LCD CMI 14 WXGA Glare BT140GW01 V6 LF 220nit 8ms 600 1 LK 1400D 008 Memory 60002041 QIMONDA SO1GBIII10 Memory NONE REG ECC DDRIII 1066 1GB phantom p n LF KN 1GB00 003 60024207 KINGSTON SO1GBIII13 Memory KINGSTON SO DIMM DDRIII 1333 1GB ACR128...

Page 347: ... 065um KN 2GB0C 00 6 60002045 HYNIX SO2GBIII13 Memory HYNIX SO DIMM DDRIII 1333 2GB HMT325S6BFR8C H9 LF 256 8 46nm KN 2GB0G 01 8 60004668 ELPIDA SO4GBIII10 Memory NONE SO DIMM DDRIII 1066 4GB dummy P N LF KN 4GB00 001 60002215 SAMSUNG SO4GBIII10 Memory SAMSUNG SO DIMM DDRIII 1066 4GB M471B5273BH1 CF8 LF 256 8 0 055um KN 4GB0B 00 7 60004668 ELPIDA SO4GBIII13 Memory ELPIDA SO DIMM DDRIII 1333 4GB EB...

Page 348: ...8X TS L633F LF W O bezel SATA HF Windows 7 KU 00801 040 60001939 PIONEER NSM8XS ODD PIONEER Super Multi DRIVE 12 7mm Tray DL 8X DVR TD10RS LF W O bezel 1 00 SATA KU 00805 049 60001535 PANASONIC NSM8XS ODD PANASONIC Super Multi DRIVE 12 7mm Tray DL 8X UJ890A LF W O bezel SATA HF Windows 7 KU 00807 070 60001535 PANASONIC NSM8XS ODD PANASONIC Super Multi DRIVE 12 7mm Tray DL 8X UJ8A0 LF W O bezel SAT...

Page 349: ...idia N12 N12P GV OP B A1 40nm 29mm 29mm GB1 128 package KG PGV0V 002 10001067 INTEL UMA UMA Intel KI 23200 038 VRAM 10000981 MISC 1G DDR3 64 16 8 1G DDR3 64 16 8 KI 23300 018 10000981 MISC 2G DDR3 128 16 8 2G DDR3 128 16 8 KI 23300 028 10000981 MISC 512M DDR3 64 16 4 512M DDR3 64 16 4 KI 23300 019 9999995 ONE TIME VENDER N N no VRAM KI 23300 014 60002045 HYNIX VR1GbIII8 VRAM HYNIX Graphic DDRIII 8...

Page 350: ...os HB97 2x2 BGN HM NI 23600 072 10001023 LITE ON 3rd WiFi 2x2 BGN Liteon Wireless LAN Atheris HB97 2x2 BGN HM WN6603AH NI 23600 073 PLM00010 QMI 3rd WiFi 2x2 BGN QMI Wireless LAN Atheros HB97 2x2 BGN HM NI 23600 074 23707801 FOXCONN TW 3rd WiFi BG Foxconn Wirelss LAN Atheros HB95BG HM T77H121 10 NI 23600 077 10001067 INTEL INT6250H WiMax Intel WLAN 622ANXHMWG Kilmer Peak 2x2 AGN KI KPH01 001 10001...

Page 351: ...CHAPTER 9 Online Support Information ...

Page 352: ...9 2 Introduction 9 3 ...

Page 353: ...ormation section users can download information on all of Acer s Notebook Desktop and Server models including Service guides for all models Bios updates Software utilities Spare parts lists TABs Technical Announcement Bulletin For these purposes we have included an Acrobat File to facilitate the problem free downloading of our technical material Also contained on this website are Detailed informat...

Page 354: ...9 4 Online Support Information ...

Reviews: