

SETTING UP YOUR PEDOMETER
To record your distance and calories accurately, you will need
to set your stride length and body weight.
CHOOSING A MEASUREMENT SYSTEM
This unit is initially set to use English measurement units
(Miles and Pounds). To change the unit back and forth
between English and Metric units (Kilometers and
Kilograms), press the green RESET button for 5 seconds.
Finding Your Stride Length:
Your stride length is the length of
one of your steps, measured from “toe to toe.” To measure,
walk 10 steps with your normal stride and measure the
TOTAL DISTANCE from the toe of your starting step to the
toe of your 10
th
step (see diagram below). Divide the TOTAL
DISTANCE by 10. This is your stride length. Example: If you
walk 22 feet, your stride length is 2.2 feet.
Setting Your Stride Length:
Press the yellow MODE button
until arrow on bottom of display points to “DIST.” Press the
dark blue SET button once to enter setting mode. Display will
shift to show stride (for example, “F 1.95” means stride is set
to 1.95 feet). Press the dark blue SET button to increase stride
length. Press the green RESET button to reduce stride length.
Press the yellow MODE button to exit setting mode.
Setting Your Weight:
Press the yellow MODE button until
arrow on bottom of display points to “CAL.” Press the dark
blue SET button once to enter setting mode. Display will
shift to show weight in pounds. For example, “L 165” means
weight is set to 165 lbs. Press the dark blue SET button to
increase weight setting. Press the green RESET button to
reduce weight setting. Press the yellow MODE button to exit
setting mode.
Setting the Clock:
Press the yellow MODE button until the
arrow on the bottom of the display points to the clock icon .
Press the dark blue SET button to enter clock setting mode
(clock readout will flash). Press the green RESET button to
advance Hours. Press the dark blue SET button to advance
Minutes. Press the aqua DAY/CUM button to shift between
12 and 24 hour mode. (“H” will show in display for 24 hour
mode.) Press the cream MEMORY button to change the day
of the week setting. Press the yellow MODE button to exit
clock setting mode, or wait a few seconds for pedometer to
automatically exit clock setting mode.
WEARING YOUR PEDOMETER
While gently holding the belt clip open, slide the pedometer
onto your belt or the top edge of your pants or skirt. It should fit
snugly and level, above one knee.
Note:
The pedometer should be as vertical as possible. Walkers
with larger stomachs may find it helpful to wear the pedometer
farther back on the body, toward one hip.
The cover must be closed for the pedometer to work.
To avoid
losing or dropping your pedometer, use the included leash and
clip to fasten the pedometer securely to your clothing.
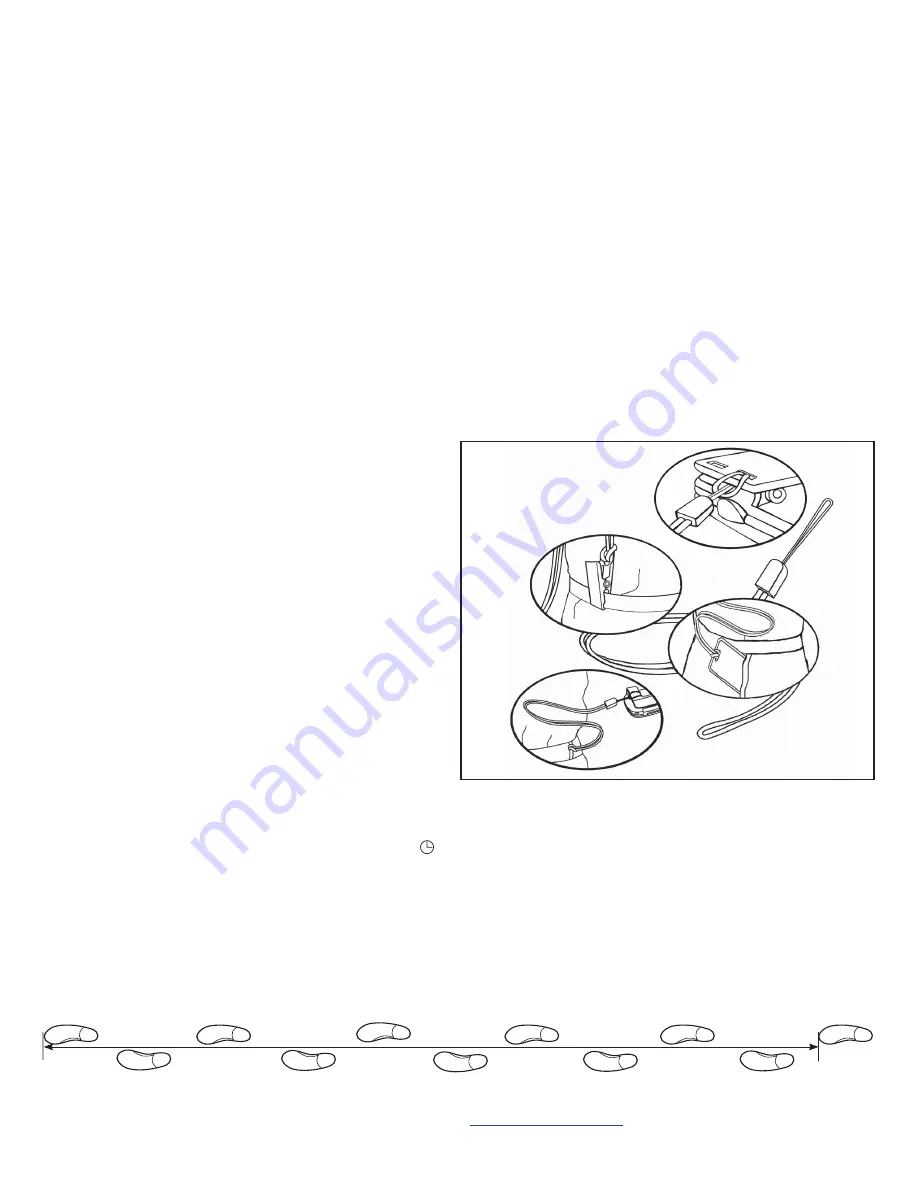
Attaching the Leash:
Attach the pedometer to the leash by
looping the leash around the pedometer belt clip. Next, clasp
the waistband of your clothing with the attached metal clip. You
can also use a safety pin to fasten the leash to your clothing, or
loop the leash through your belt or belt loop.
ACCUSPLIT, Inc. • 2290M Ringwood Ave. • San Jose, CA 95131
800-965-2008 • 925-226-0888 • FAX 925-463-0147 • www.ACCUSPLIT.com • [email protected]
10 steps
Congratulations on taking the first step to wellness
with your purchase of an ACCUSPLIT pedometer.
It’s easy to set up your new pedometer.
Just follow the steps below, and start walking!
MEMORY PEDOMETER
OPERATING INSTRUCTIONS
ACCUSPLIT®
EAGLE
™
1691M17
970-047
VIEWING YOUR RESULTS
Once you put on your pedometer with the cover closed, it will
automatically begin to record your steps, distance, calories
burned, and activity time. Repeatedly press the yellow MODE
button to cycle through the pedometer modes:
SCAN
→
STEPS
→
DISTANCE
→
CALORIES
→
ACTIVITY
TIMER
→
TIME OF DAY
→
RATE
→
SCAN
First, loop the
pedometer clip
Next, loop the metal
clip, then clasp clothing
Or, loop a
badge holder, then
put into pocket
(Badge holder
not included)
Or, loop a belt
or belt loop
Eat Right! Walk More! Live Well!
The ACCUSPLIT Lifestyle


