background image

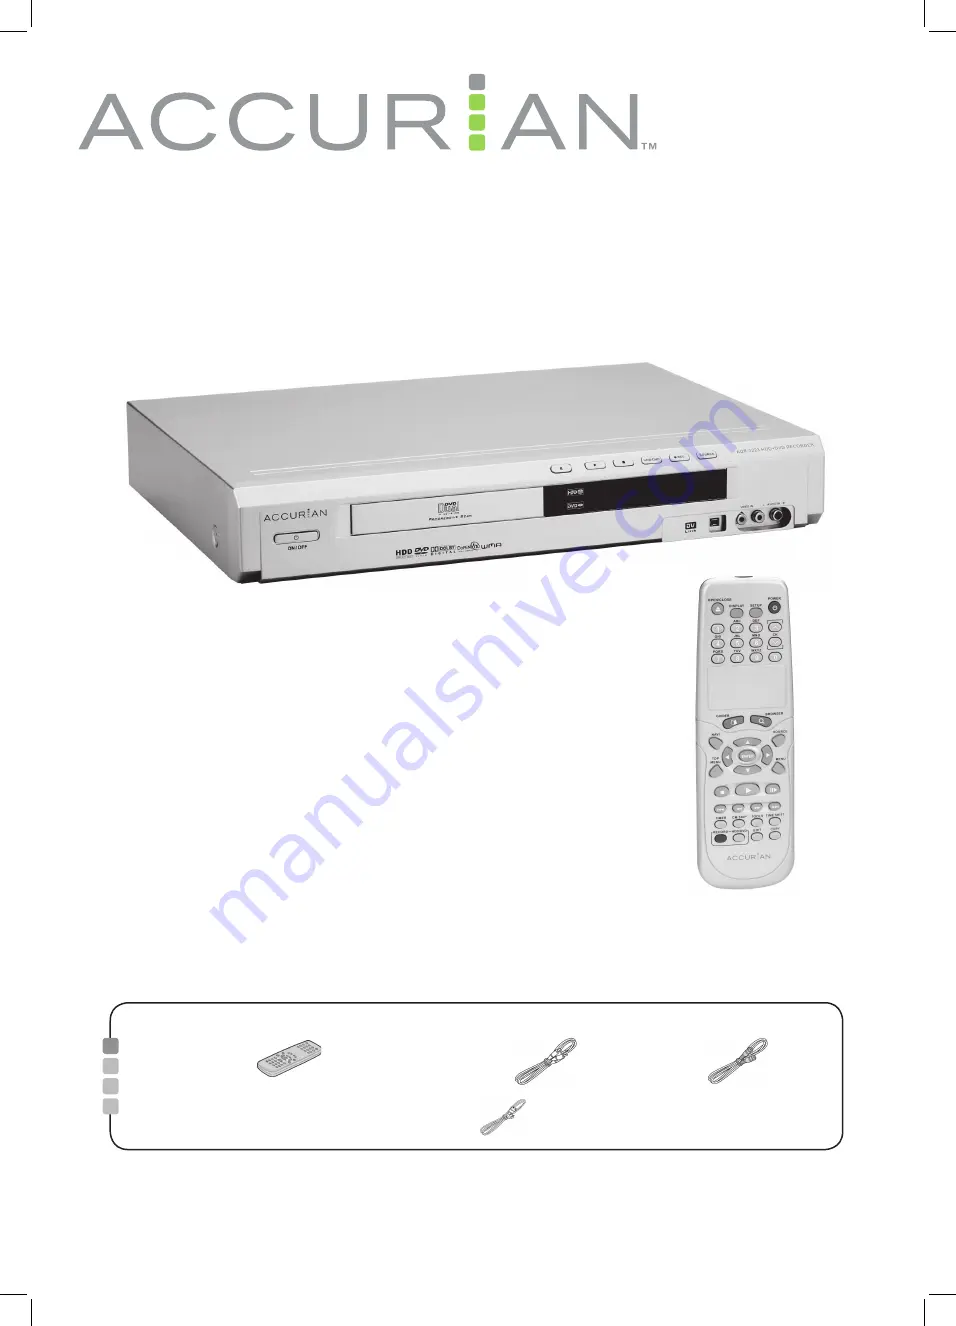
Thank you for purchasing this Accuran ALL Write DVD 
Recorder with Progressive Scan.  Your recorder contains 
an 80GB hard drive for recording. You can record and 
store up to an average of 50 movies on the HDD. Plus, 
this recorder works with the leading media formats.

Accurian ALL Write DVD Recorder

with 80GB HDD
ADR-3223

WHAT’S INCLUDED

Please read this user’s guide before installing, setting up, or using your new product

Please check and identify the supplied accessories.

  1x Remote control 

   1x Audio/Video cable 

  

  1x RF cable

  User’s Guide 

   1x Power Cord

(In some models, the power 

cord is attached to the unit)

Summary of Contents for ADR-3223

Page 1: ...HDD Plus this recorder works with the leading media formats Accurian ALL Write DVD Recorder with 80GB HDD ADR 3223 WHAT S INCLUDED Please read this user s guide before installing setting up or using...

Page 2: ...ograms 22 Adding new recordings 23 Changing chapter intervals 23 Playing back the last recorded title 23 Recording from a VCR or Camcorder 24 One touch recording 25 DV recording One Touch Recording 26...

Page 3: ...gs convenience receptacles and the point where they exit from the product 16 Outdoor Antenna Grounding If an outside antenna or cable system is connected to the product be sure the antenna or cable sy...

Page 4: ...rous voltage within the product s enclosure that may be of su cient magnitude to constitute a risk of electric shock to humans The exclamation point within an equilateral tri angle is intended to aler...

Page 5: ...the disc tray the DVD recorder will display Unknown Disc on the display panel after attempts to load the disc fail Region code of DVD Video This unit can play back DVD VIDEO discs compatible with the...

Page 6: ...PEN CLOSE 3 Number buttons 1 9 0 4 Easy Guider Menu button GUIDER 5 Navigation button NAVI 6 Cursor Enter buttons ENTER 7 Top menu button TOP MENU 8 Stop button STOP 9 Skip buttons PREVIOUS NEXT 10 Ti...

Page 7: ...en HDD and DVD 9 RECORD Button Starts recording 10 DV LINK IEEE 1394 Jack Connects digital video camcorders to this DVD Recorder 11 DISPLAY Window Operation indicators are displayed here 12 AV1 FRONT...

Page 8: ...3 AV2 REAR VIDEO AUDIO L R Jacks Composite signal input 4 COMPONENT VIDEO OUTPUT Y Pb Pr Jacks Component signal output 5 LINE OUT VIDEO AUDIO L R Jacks Composite signal output 6 LINE OUT S VIDEO Jack...

Page 9: ...re using the unit follow the steps below to connect the unit to the antenna cable and TV Connecting to a TV with COMPOSITE jacks Use an RF cable supplied to connect the RF IN on the unit to the antenn...

Page 10: ...etup menu 2 When using an S Video connection please remove all other video output connections 3 In this con guration the Red and White audio connections are required 2 Connecting to a TV via COMPONENT...

Page 11: ...ampli er with Dolby Digital and DTS decoders to enjoy surround sound Digital out optical Use a ber optic cable not supplied to connect the DIGITAL OUT OPTICAL digital optical output on the unit to the...

Page 12: ...N on the cable box satellite receiver to the antenna outlet Use an RF cable same as supplied to connect the RF OUT on the cable box satellite receiver to the RF input on the DVD Recorder Use an RF cab...

Page 13: ...sive scan compatible TV you may lose the video signal on your TV instantly To get the picture back press Cursor Right and the numbered buttons 5 0 2 and 0 on the remote control and then ENTER In about...

Page 14: ...and press 3 Press to select Edit Channel and press ENTER The Channel Editor menu will be displayed For detailed operation instructions on the Channel Editor menu refer to the Channel Editor section TV...

Page 15: ...UP select TV Tuner Utilities Edit Channel and press ENTER Or press SOURCE to set TV as the input signal source and press EDIT Either way the Channel Editor menu will be displayed Swapping TV channels...

Page 16: ...o turn o a channel found manually 1 Press to select a TV Channel not found during channel scanning and press 2 Press to select Turn On and press ENTER The TV channel selected will be turned on To turn...

Page 17: ...PLAY to resume normal playback Press STOP to stop playback at a marked stop Press STOP twice to bring the playback to a full stop Playback picture les 1 Press GUIDER to display the Easy Guider Menu 2...

Page 18: ...n HDD only 1 Press GUIDER to display the Easy Guider menu 2 Press to select Playback and then press ENTER 3 Press to select HDD and press ENTER 4 Press to select Last Record and press ENTER Play back...

Page 19: ...a recording mode and then press ENTER 6 Press ENTER to start recording Press STOP to stop recording Press PAUSE to pause recording Notes 1 If a new recordable CD R or a newly erased CD RW is used for...

Page 20: ...re six recording modes HQ SP LP EP SLP and Just Fit When the recording mode is set as Just Fit the recording mode will be automatically adjusted depending on how much recording space is available on t...

Page 21: ...EG or BMP formats audio les in MP3 WAV or WMA format and recorded video titles Reference the Copy section for the right disc to use Copy From DVD to HDD Press OPEN CLOSE to open the disc tray and inse...

Page 22: ...VD RW discs after the discs are nalized 5 In some cases you may not be able to add new recording s to a recordable DVD disc that contains contents written on other DVD recorders 6 A disc records 49 vi...

Page 23: ...ase ensure that the DVD disc or hard disc has enough available space for the recording session 4 You cannot change the channel or recording mode during recording RECORDING Change Chapter Intervals Add...

Page 24: ...OSE to open the disc tray and insert a recordable DVD disc with the label side facing up If a new recordable DVD RW disc is used for recording you need to rst select either Quick Preparation or Full P...

Page 25: ...on the built in HDD the length of recording is 6 hours maximum DV recording Before you start to record DV contents This DVD recorder allows basic DV control functions with the remote control The DVD...

Page 26: ...en The on screen functions are accessed using the DVD recorder remote control 1 Power on your TV and this DVD recorder 2 Press the HDD DVD button to set the target device for the recording If DVD is s...

Page 27: ...and press ENTER Notes 1 You can t perform any record before you formatted the CD R CD RW disc 2 Only single format is allowed on a single disc 3 You can t change the format of CD R disc after formatti...

Page 28: ...the date time picture quality and channel of the program or input source manually You can set up 16 individual sessions in the Timer Recording function TIMER RECORD 8 Press to select Repeat once dail...

Page 29: ...o set up for more Timer Record programs If not move to the Exit icon and press ENTER or press TIMER to exit the Timer Record List 13 Press POWER to turn o the unit and activate the Timer Record functi...

Page 30: ...he TV and ready to resume viewing press PLAY and the TV program will start playing from the interrupted scene 6 Press F F or REW to perform fast forward or fast rewind scanning to the point where TIME...

Page 31: ...browse the contents of a DVD disc or the HDD Press HDD DVD to select HDD or ODD to playback the contents saved DVD VCD SVCD video disc playback Before you begin to enjoy the digital world of audio an...

Page 32: ...3 3 Press to correct a mistake Press repeatedly to move back to the digit where you entered a wrong number and reenter the correct one Press ENTER to start playback from the speci ed time Note Moving...

Page 33: ...icon depending on what the source is set as and press ENTER to change the setting 4 Press to move the highlight to the Video icon and press ENTER to view the le menu with thumbnails To view the text m...

Page 34: ...D or DVD 3 Press the BROWSER button to bring up the Browser menu with thumbnails If you want to change the playback device press to move the highlighted cursor to the HDD icon or DVD icon depending wh...

Page 35: ...Menu 3 Press to go to the Playback icon and press ENTER 4 Press to select HDD or DVD to play the les from and press ENTER Note Music and picture les can be played concurrently when these les are saved...

Page 36: ...not be in exact the same positions as the original when recording on a disc in Video mode 3 You can t use the One Touch Copy function to copy a title if any part of the title is copy once protected 4...

Page 37: ...he remote control to select desired characters 5 When you nish entering the title press to select Finish and press ENTER Note You only can enter up to 30 characters for a name You can not leave the ti...

Page 38: ...t and then press ENTER to exit the setting Erasing a title HDD and DVD only Use this function to erase a title Note that once erased the title s cannot be retrieved 1 Press BROWSER to display the Brow...

Page 39: ...marks in more titles repeat steps 2 to 5 or press to select Exit and then press ENTER to exit the setting Notes 1 You cannot add chapter marks to recorded title s on a DVD R DVD R or DVD RW disc once...

Page 40: ...ter 6 To show un hide the hidden chapter press to go to Show Chapter and press ENTER during the playback of the hidden chapter Press NEXT or PREVIOUS to advance to the next chapter or the previous cha...

Page 41: ...to select DVD or HDD and press ENTER 4 Press ENTER to start erasing The erasing process will take place 5 When complete go to Exit and press ENTER Finalize make compatible CAUTIONS For DVD R DVD R DV...

Page 42: ...will permanently delete the les selected Defragment HDD only The Defragment process reorganizes the contents of the HDD creating continuous blocks of available space 1 Press TOOLS to display the Disc...

Page 43: ...Disable play back control for VCD and SVCD ON Default OFF System Video Output Switch video output signal Component Default Progressive TV Type Select type of the TV output NTSC Default PAL Please mak...

Page 44: ...rd Quality Set the default recording quality HQ SP Default LP EP SLP Chapter Mark Set the interval for auto insertion of chapters during recording O 5 10 15 20 25 30 mins Default 5mins 1 Press SETUP t...

Page 45: ...ode allow the contents to be programmed or edited DVD R DVD R is a recordable disc that is the same size as a DVD Video Contents can be recorded only once to a DVD R and will have the same format as a...

Page 46: ...b 0 7 Vpp 75 Ohm Cr 0 7 Vpp 75 Ohm AUDIO FORMAT SUPPORTED Playback Analog output 2channel Digital output coaxial optical Format supported LPCM Dolby Digital DTS only digital out MPEG AUDIO PERFORMANCE...

Page 47: ...scs recorded with copy once material cannot be played on non CPRM compatible players The recorder starts playing the disc automatically The DVD VIDEO features an auto playback function Timer Recording...

Page 48: ...in a particular installation If this equipment does cause harmful interference to radio or television reception which can be determined by turning the equipment off and on the user is encouraged to tr...

Reviews: