background image

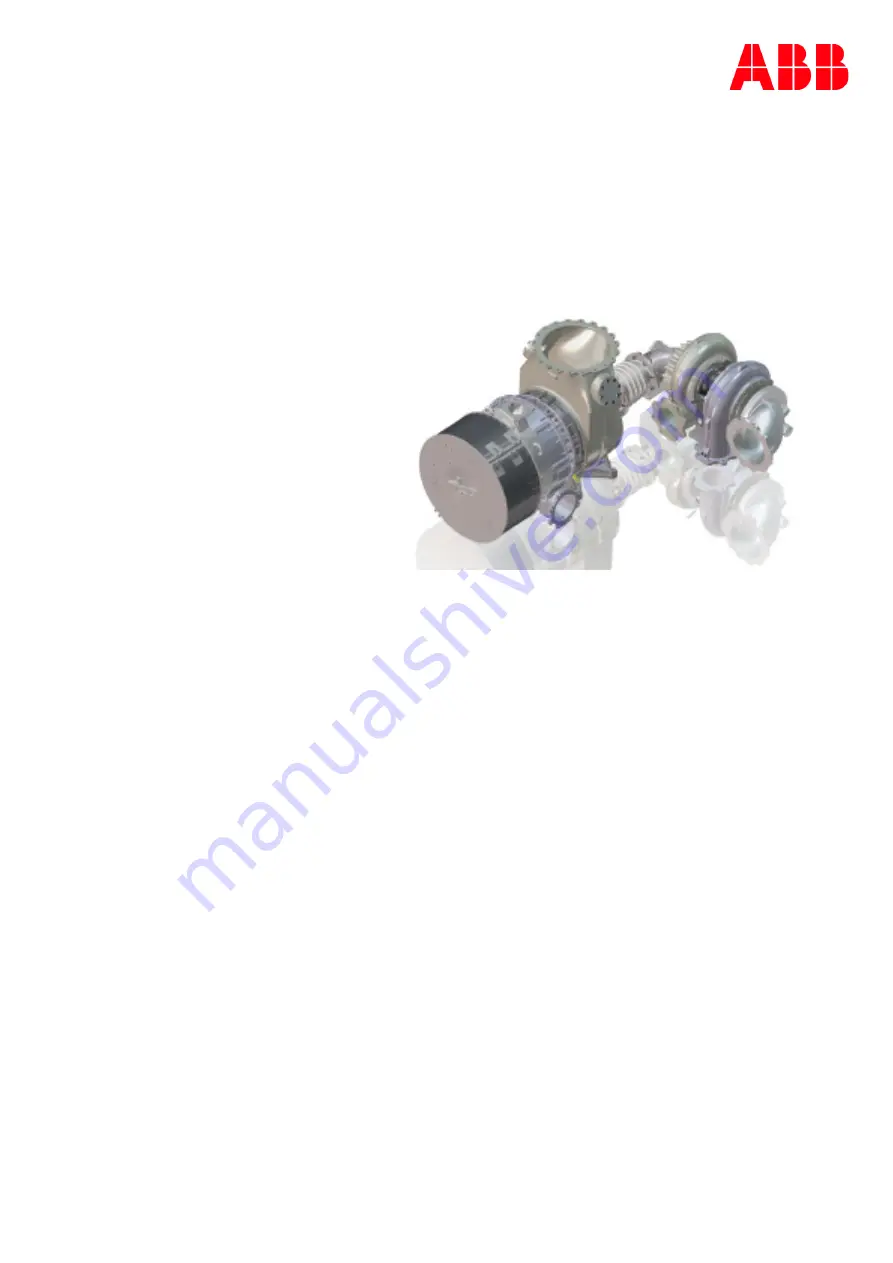
Turbocharger / A100-M radial

Original assembly instructions – English

This document is valid for the 
Power2 series:

Power2 550-M

Purpose

The assembly instructions explain how the low- 
and high-pressure stage of ABB Turbo

charging


is fitted to the engine correctly and without any 
health and safety risks.

Target group

The assembly instructions are intended for 
engineers and mechanics responsible for fitting 
the low- and high-pressure stage on the engine.

Power2 performance package

Two-stage turbocharging solution for highest 
turbocharging efficiency

ASSEMBLY INSTRUCTIONS

Turbocharger / Power2 500-M

Original assembly instructions – English

Summary of Contents for Power2 Series

Page 1: ...orrectly and without any health and safety risks Target group The assembly instructions are intended for engineers and mechanics responsible for fitting the low and high pressure stage on the engine P...

Page 2: ......

Page 3: ...oads 6 2 3 Occupational safety 7 3 Weight and transportation of the low pressure and the high pressure stages 10 4 Installing the low pressure stage 11 4 1 Placing the low pressure stage on the bracke...

Page 4: ...evention and environmental protection 1 2 Definition of target group The assembly instructions are intended for engineers and mechanics responsible for fitting the low and high pressure stage on the e...

Page 5: ...BB Turbocharging in this document Official service stations of ABB Turbocharging Official service stations are identified in this document as ABB Turbocharging Service Sta tions They are regularly aud...

Page 6: ...tructions indicated by this symbol and the word CAUTION can lead to seri ous damage to engine or property with grave consequences u Caution signs must always be observed NOTICE Note The note provides...

Page 7: ...must be observed for safe and trouble free opera tion of the Power2 and during all work on the Power2 components All further safety instructions contained and specifically identified in every chapter...

Page 8: ...n to the correct attachment of loads on the crane hook u People must not stand beneath suspended loads Wear safety gloves to protect against mechanical hazards Wear safety helmet Fig 1 Attachment of l...

Page 9: ...hich you have received instruction or train ing Wear safety footwear to protect against mechanical hazard and risk of fall ing Wear protective clothing WARNING Risk of falling When work is performed o...

Page 10: ...G Physical hazards due to rotating parts The rotor can rotate due to the stack draught alone Contact with rotating parts can cause severe injury u Secure rotor against turning WARNING Mechanical hazar...

Page 11: ...o health Flammable and combustible oper ating materials and supplies can catch fire or resulting vapours can lead to an explosion u Do not breathe in these substances and avoid contact with the skin u...

Page 12: ...pos sible Depending on the specification the weight specified on the rating plate may be lower than the standard values specified here Fig 3 Suspending the low pressure and high pressure stages A High...

Page 13: ...quirements Material of fixing elements for securing low pressure stage on bracket ISO strength class 10 9 and 12 9 according to DIN ISO 898 Washers under the screw head or nut Use hardened washers thi...

Page 14: ...essure stage u Attach one lifting gear each to the two fins of the bearing casing provided for this pur pose and depending on the design loop one lifting gear around the gas inlet casing u Check to ma...

Page 15: ...of the surface of the screw contact points must be in contact with the bracket If the surface contact is not sufficient the screw must be re tightened until 25 of the surface rests on the bracket u P...

Page 16: ...rque must be applied with a torque spanner in a Z wise fashion Power2 Thread size mm Maximum tightening torque Nm Pre tightening torque Nm Checking torque Nm 550 LP M20 560 455 350 Table 8 Tightening...

Page 17: ...crews can be fitted in each case see Table 9 Pre tightening torque sequence 16 and see Table 11 Pre tightening torque sequence 17 If the maximum allowable forces and torques on the casing of the low p...

Page 18: ...Take into account the thickness of the washers at least 15 of the nominal thread dia meter Step 3 Fig 7 Fixing screws of a two piece foot u Tighten the CE foot screws 3 4 5 6 with the pre tightening t...

Page 19: ...EN Rev A July 2020 Step 4 Fig 8 Pre tightening torque sequence 2 u Tighten the TE foot screws 1 2 7 8 with the pre tightening torque Power2 Gas outlet branch position Sequence 550 LP NB000 045 315 1 2...

Page 20: ...tening torque in sequence 1 2 3 4 5 6 7 8 Power2 Gas outlet branch position Sequence 550 LP NB000 045 315 1 2 3 4 5 6 7 8 NB090 1 6 3 5 8 7 NB270 2 5 4 6 7 8 Table 13 Tightening sequence Power2 Thread...

Page 21: ...Inserting the gaskets Gaskets that are forgotten damaged or improperly inserted will lead to oil leaks u Always use new gaskets and insert them carefully into the slot Fig 10 Gaskets in the slots of t...

Page 22: ...he fastening elements of the high pressure stage 1 Insert expansion bush 42190 into bearing casing 2 Screw the clamping nut 42201 flush onto the threaded rod 42191 The hexagon of the thread screw is a...

Page 23: ...d in the bracket 4 Check value x If value x is not reached the high pressure stage must be lifted up from the bracket and realigned 5 Screw threaded rod into bracket up to value L using hexagon If val...

Page 24: ...e stage 1 Tighten the clamping nuts 42201 see section Tightening the clamping nut 2 Connect the cable connector 86515 to the speed sensor WARNING Support 61300 In radial gas outlet casings the gas for...

Page 25: ...2020 Fig 14 Steps for fastening the high pressure stage Part number Thread size and tightening torque 01 M16 260 Nm 61003 M20 365 Nm Table 16 Tightening torque 01 61003 3 Fit the support 61300 using t...

Page 26: ...cessary tension force is reached u Do not clean pressure screws u Do not lubricate pressure screws In order to correctly fit the clamping nuts the pressure screws 04 must not protrude from the clampin...

Page 27: ...the stop 2 Tighten pressure screws crosswise to 50 of the tightening torque specified in the table 3 Tighten pressure screws crosswise to 100 of the tightening torque specified in the table 4 Work in...

Page 28: ...for more than 6 months VCI WARNING Health protection when handling VCI VCI products are not hazardous in terms of the Ordinance on Hazardous Substances Nevertheless the following points must be obser...

Page 29: ...t the 70 level the maximum permissible humidity has been exceeded In this case the low pressure or high pressure stage or the cartridge group must be checked and repack aged by an ABB Turbocharging Se...

Page 30: ...the low pressure and high pressure stage with the relevant serial number is available online on our website www abb com turbocharging Fig 19 Serial number of the low pressure and high pressure stage...

Page 31: ...Assembly Instructions Power2 500 M 7 Further information Copyright 2020 ABB All rights reserved HZTL455311P0009_EN Rev A July 2020 Fig 20 Finding the Operation Manual online Page 29 29...

Page 32: ...roduct on our website see Operation Manuals Copyright 2020 ABB All rights reserved Operation Manual Contact information ABB Switzerland Ltd Turbocharging Bruggerstrasse 71 a CH 5401 Baden Switzerland...

Reviews: