4Deep HoloSea S7, User Manual
Discover the innovative features of the 4Deep HoloSea S7 with our comprehensive User Manual. This manual provides essential guidance for maximizing your device's capabilities. Download the free manual exclusively from manualshive.com to unlock all the potential of your HoloSea S7, ensuring you get the most out of these advanced features.
Share
Download


Reviews:
No comments
Related manuals for HoloSea S7

B-810 Series
Brand: Optika Pages: 48

130
Brand: National Pages: 8

SO-161-R
Brand: Scan Optics Pages: 18

SO-111-R
Brand: Scan Optics Pages: 22

STMPRO
Brand: BEL Pages: 7

Lx POL
Brand: Labomed Pages: 32

BH2-5RE
Brand: Olympus Pages: 18

BX-FLA
Brand: Olympus Pages: 46

CH10
Brand: Olympus Pages: 31

200 1013143
Brand: 3B SCIENTIFIC PHYSICS Pages: 12
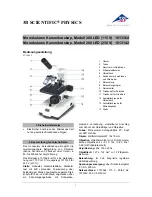
200 1013142
Brand: 3B SCIENTIFIC PHYSICS Pages: 12

200 1003268
Brand: 3B SCIENTIFIC PHYSICS Pages: 12
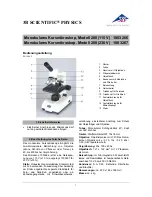
200 1003266
Brand: 3B SCIENTIFIC PHYSICS Pages: 12

ME5
Brand: 3B SCIENTIFIC Pages: 4

CK2
Brand: Olympus Pages: 15

PUK 3s
Brand: Mezzo Pages: 11


