background image

Figure 4 Standalone

®

 Setup

Please see the Figure 4 Standalone User Guide, found on the support.3dsystems.com/figure4standalone, for safe

-

ty information and comprehensive operating instructions.

Save all foam and packing material for future use. Shipping without the original packing material may 

cause damage to the printer.

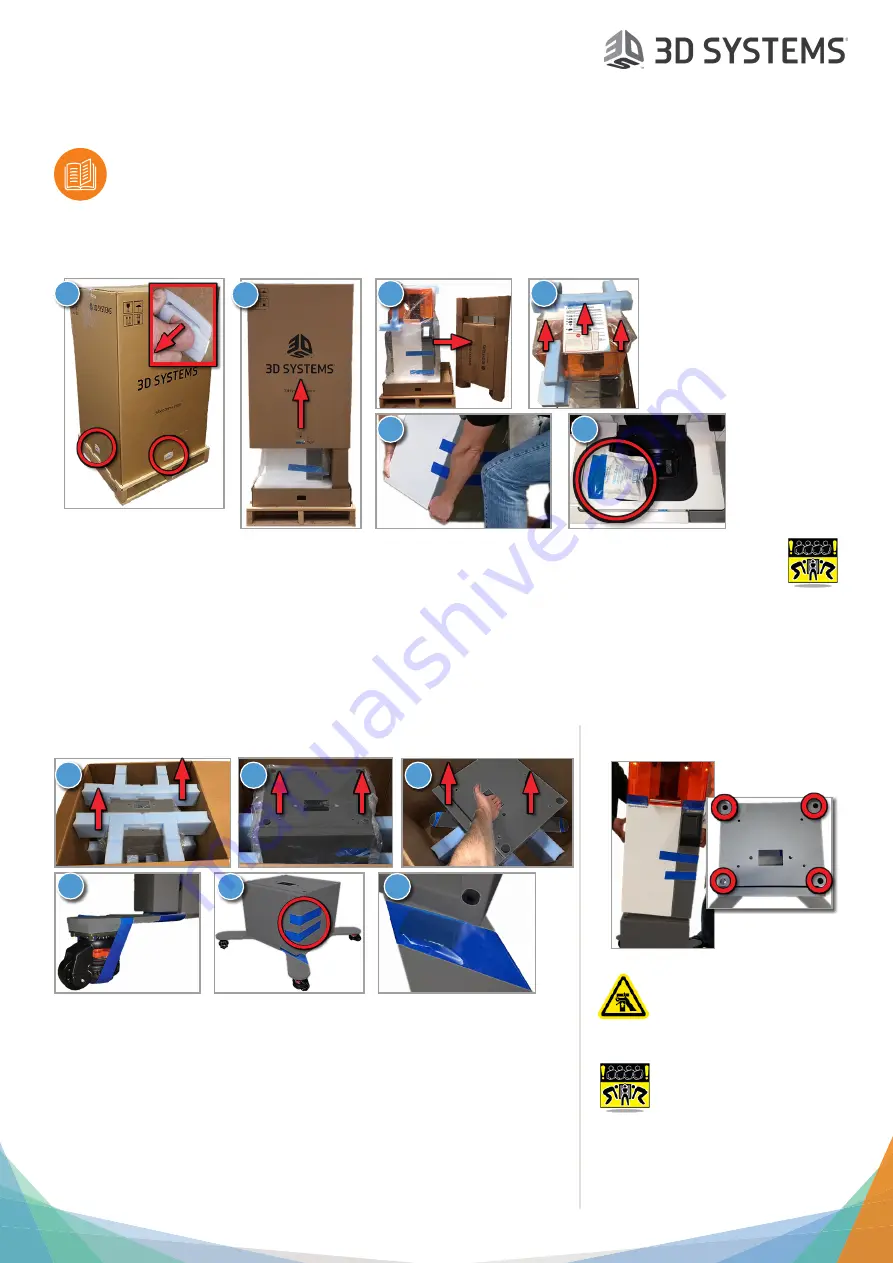
1. Unbox and Stage Printer

1.  Remove 4 packing clips around the bottom of the printer.

2.  Lift outer box to remove. Ensure your ceiling clearance is at 

least 2.6m (8.5 ft) to lift this box off.

3.  Remove accessories box. Compare contents of box to list in 

the 

Welcome Letter

 to ensure everything is included.

4.  Remove documentation. Remove foam pieces and plastic 

sleeve simultaneously (they are taped together).

5.  If you are using the pedestal, proceed to 

Section 2. If not, team-lift printer onto a 
level surface and skip to Section 6.

6.  Remove desiccant pack.

1

2. Unbox Pedestal

1.  Cut box top open. Remove two pieces of packing foam from top of pedestal.

2.  Remove plastic sleeve from the pedestal.

3.  Grab pedestal with one hand by rectangular hole in middle and lift out of box.

4.  Remove tape from all four casters.

5. 

Stage pedestal on a level floor and remove the blue tape from the door.

6.  Open door and remove tape and cardboard spacer.

3. Place Printer on Pedestal

PINCH HAZARD: Keep 

fingers/hands clear of 

gap between printer and 

pedestal.

Team-lift printer onto 

pedestal, fitting four rubber 

printer feet into four holes 

in top of pedestal. Ensure you install 
printer in orientation shown, with 
front of printer lining up with front of 
pedestal.

3

4

5

2

6

1

2

3

4

5

6

Summary of Contents for Figure 4 Standalone

Page 1: ...multaneously they are taped together 5 If you are using the pedestal proceed to Section 2 If not team lift printer onto a level surface and skip to Section 6 6 Remove desiccant pack 1 2 Unbox Pedestal 1 Cut box top open Remove two pieces of packing foam from top of pedestal 2 Remove plastic sleeve from the pedestal 3 Grab pedestal with one hand by rectangular hole in middle and lift out of box 4 R...

Page 2: ...he right to lower it b Turn the orange thumb wheel to the left to raise it 3 You will now adjust the leveling feet a Keep back left leveling foot off the ground b Lower front right leveling foot until it touches the ground c Lower front left leveling foot until it touches the ground Adjust foot up or down until bubble in level is roughly centered in the circle left to right 4 Lower the back right ...

Page 3: ...k 2 Follow the instructions to down load install 3D Sprint 10 Add Printer 1 Open 3D Sprint Click the Printer icon if the Printer window is not already open 2 Click Find Printer button to find printer on your network If this fails enter the printer s IP address and press Enter The IP address can be found on the printer s touch screen on the Settings tab above right 3 Click the Figure 4 Standalone i...

Page 4: ...print Help menu for more information on Build Styles 13 Select Build Style 1 Select Draft for this test build 2 Click the Set button 1 2 14 Initial Print Guide Continue to the Initial Print Guide which is packed in with your printer This guide will show you how to print a verification build Please visit support 3dsystems com figure4stand alone for up to date versions of the following docu ments Fi...

Reviews: