background image

AKJ780C

OWNER’S MANUAL

ACC 780C-01

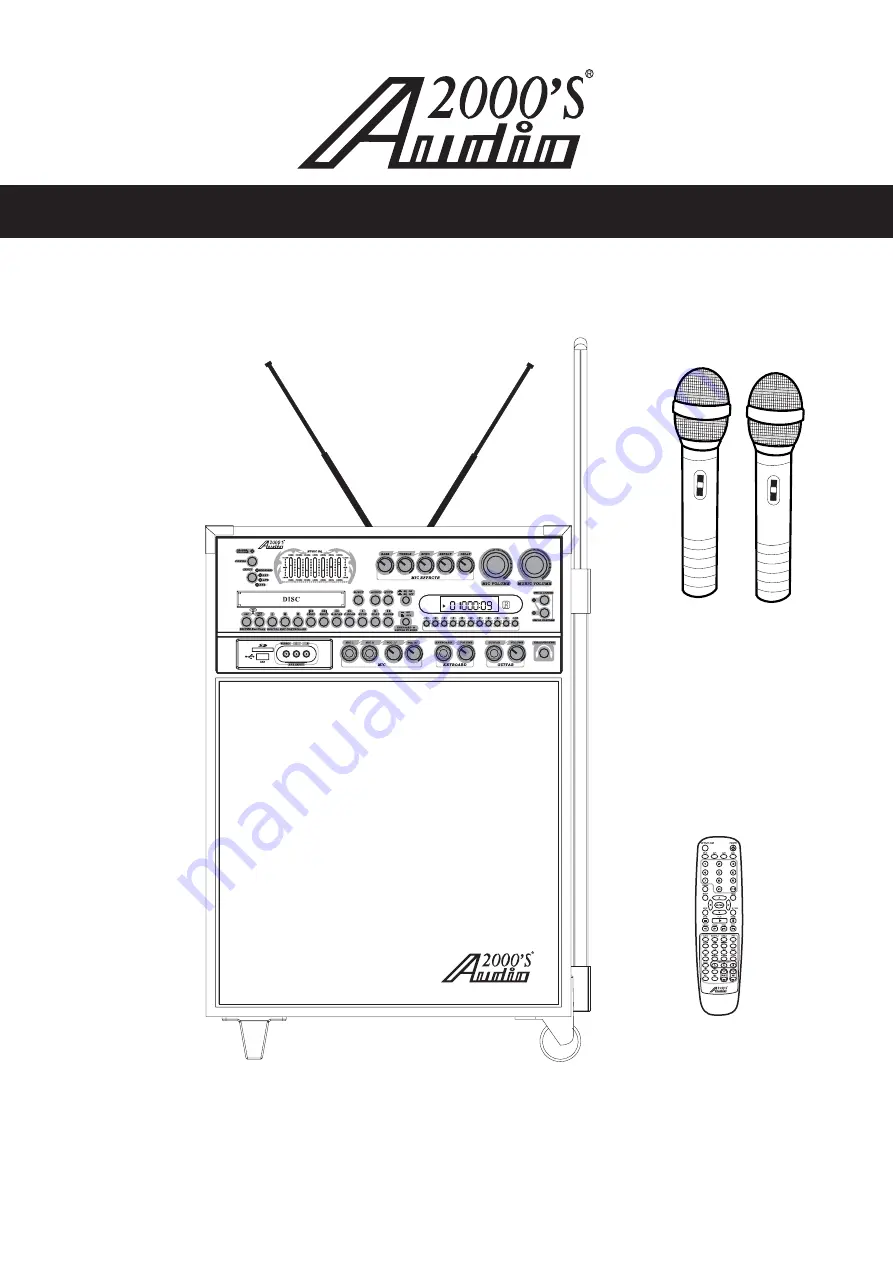
Thank you for purchasing the

AKJ780C recordable all-in-one karaoke/PA

system with dual-channel wireless microphones! For the best results and the utmost
satisfaction from your new unit, please read this manual thoroughly, and retain it for
future reference.

Audio2000'S

For more information, please visit our website (www.audio2000s.com).

®

VCD

L R

AKJ780C

Recordable & Wireless All-in-one Karaoke/ PA System

AKJ780C

Recordable & Wireless All-in-one Karaoke/ PA System

A

B

RECORDABLE ALL-IN- ONE KARAOKE/PA SYSTEM WITH DUAL-CHANNEL WIRELESS MICROPHONES

Summary of Contents for AKJ780C

Page 1: ...st satisfaction from your new unit please read this manual thoroughly and retain it for future reference Audio2000 S For more information please visit our website www audio2000s com VCD L R AKJ780C Recordable Wireless All in one Karaoke PA System AKJ780C Recordable Wireless All in one Karaoke PA System A B RECORDABLE ALL IN ONE KARAOKE PA SYSTEM WITH DUAL CHANNEL WIRELESS MICROPHONES ...

Page 2: ......

Page 3: ...Preference Page ...

Page 4: ...fety purpose of the polarized or grounding type plug A polarized plug has two blades with one wider than the other A grounding type plug has two blades and a third grounding prong The wide blade or the third prong are provided for your safety If the provided plug does not fit into your outlet consult an electrician for replacement of the obsolete outlet 10 Protect the power cord from being walked ...

Page 5: ...ade wider than the other This plug will fit into the power outlet only one way This is a safety feature If you are unable to insert the plug fully into the outlet try reversing the plug If the plug should still fail to fit contact your electrician to replace your obsolete outlet Do not defeat the safety purpose of the polarized plug 16 Ventilation Slots and openings in the cabinet are provided for...

Page 6: ......

Page 7: ...AA 4 AA 4 ...

Page 8: ...ck 16 and press 10 10 and 3 to go directly to track 23 AKJ780C AKJ780C AKJ780C Note This feature does not work with a standard or non multiplex format disc This feature is designed to work with multiplex discs only Note Like the VOCAL CANCEL this feature does not work with a standard or non multiplex format disc This feature is designed to work with multiplex discs only KEYBOARD GUITAR TO ECHO ON ...

Page 9: ...backwards through the current track and F Scan scans forwards through the current track button Stops disc playback in standby mode when pressed once and completely stops disc playback when pressed twice Cycles through caption languages on a disc with multiple caption languages available Mutes the sound from Disc USB SD AV1 AV2and AV3 input channels switch This switch is used to turn the 7 band gra...

Page 10: ...nterval the more DELAY that is applied the longer each ECHO interval will take to complete Turn control clockwise to INCREASE and counter clockwise to DECREASE level This input is used to connect a KEYBOARD device via a inch instrument cable This control is used to set the VOLUME level for a KEYBOARD connected to the KEYBOARD INPUT JACK This input is used to connect a GUITAR via a inch instrument ...

Page 11: ...monitor via COMPONENT VIDEO cables COMPONENT VIDEO outputs the different color signals U Pb and V Pr and luminance signal Y separately for high fidelity in reproducing colors The description of the component video output connectors may differ depending on the TV set or monitor i e Pr Pb Y or Cr Cb Y or R Y B Y Y Component video cables only transmit the video signal separate cables are needed for a...

Page 12: ...DEO INPUT jacks on the connecting TV or display devices jacks These jacks are for connecting the AUDIO OUTPUT to an amplifier recording or mixing devices Connect paired RCA type patch cables from these jacks to the appropriate INPUT jacks on external audio devices jacks 6 AC POWER PRE OUT outlet This outlet provides AC POWER to an external device jacks Connect one end of inch cables to the left an...

Page 13: ...is highlighted button Accesses the title screen on a DVD button Accesses the main menu on a DVD and other discs with main menus button Accesses the main menu on a VCD 2 0 disc button Stops disc playback in standby mode when pressed once and completely stops disc playback when pressed twice button Plays a disc that is stopped or paused See the operations section page 18 in this manual for detailed ...

Page 14: ... been stopped in standby mode This button toggles between the different variants of component video YUV US and S Video button Clears any numbers typed into a menu before a selection has been made 21 Angle 22 PBC 23 Slow 24 Step 25 Repeat 26 A B loop 27 L R 28 P N 29 Time 30 Zoom 31 OSD 32 Resume 33 V MODE 34 Clear Note Not all DVDs will have multiple viewing angles available 35 Mute 36 DIGITAL KEY...

Page 15: ... when the optional rechargeable batteries have been installed a the AKJ780C unit will remain OFF if the b the will be recharged till they are fully charged The CHARGE VOLTAGE LED light will be red when the optional rechargeable batteries are being c optional rechargeable batteries have not been installed optional rechargeable batteries after they have been installed harged The CHARGE VOLTAGE LED l...

Page 16: ...TV TV Connecting to a TV video monitor with a RCA input 1 2 3 What you will need 1 RCA style video cable included TV video monitor with a RCA video input Connect one end of the RCA video cable to the yellow Video Out on the rear panel of the The has two RCA type VIDEO OUTPUT jacks for connecting to TVs or monitor devices Both VIDEO OUTPUTS can be connected simultaneously Connect the other end of t...

Page 17: ...to the left and right AUDIO LINE AUX INPUT jacks on the external device 4 CONNECTING EFFECTS USING THE EFFECT INSERT 1 2 3 By using the built in EFFECT INSERT you can add external effects to vocals and or guitar or keyboard or microphone without compromising the quality of the original signal Connect one end of the inch stereo audio cables to the GUITAR EFFECT KEYBOARD EFFECT or MIC EFFECT inserts...

Page 18: ...x RCA patch cables Connect the plug from one side of each cable to the ML CEN SL MR SW and SR outputs on the Connect the plug from the other side of each cable to the corresponding ML CEN SL MR SW and SR inputs on your 5 1 amplifier A 7 1 Pro Logic configuration requires 2 additional RCA cables to be connected from the FL and FR outputs of the to your 7 1 Amplifier AKJ780C AKJ780C AKJ780C 3 Connec...

Page 19: ...at the base of your handheld MICROPHONE until it locks into place Then connect the XLR male jack at the other end of the cable into either of the BALANCED MIC 1 or 2 inputs on the rear panel It should be obvious which sides of your XLR cable are male and AKJ780C female as there is only one possible connection 3 To connect a GUITAR connect a instrument cable from the GUITAR s output to the inch inc...

Page 20: ...lume and the MIC button to lower the volume Turning the A On Off and to Standby KJ780C Input Channels The has 4 available input channels Disc USB SD Turns on the s disc player for playing DVD CD CDG and other discs AV1 AV2 AV3 For playing a device that is connected to the AV1 AV2 AV3 RCA audio video inputs on the front and rear panels Press the power button on the AKJ780C to turn the unit on or of...

Page 21: ......

Page 22: ......

Page 23: ...button on the remote control to scroll down to Last Memory If Last Memory is set to off press enter when Last Memory is highlighted and press up so that On is highlighted Press ENTER on the remote control to confirm the selection Press SETUP again on the remote control to close the Setup menu 20 PHOTO L PHOTO J Insert a CD CD G or VCD in the disc tray and press the PROG button to enter the program...

Page 24: ...ram mode The TV monitor display will show the program menu as in Photo L In the program menu enter the title number under the column T and enter the chapter number under the column C Up to 20 songs on a DVD can be entered to the program menu in a desired order The same song on a DVD can be entered multiple times Use the directional buttons to go to the song location in the program menu to make any...

Page 25: ...jacks then begin to load the media sources from USB or SD CARD Plug a USB thumb drive into the USB Input Use the directional buttons to select videos music or images Press the Enter button to play a selected video music or image Plug an SD card into the SD memory card slot Use the directional buttons to select videos music or images Press the Enter button to play a selected video music or image AK...

Page 26: ......

Page 27: ...25 ...

Page 28: ......

Page 29: ...26 ...

Page 30: ...justing the individual Microphone volume controls 1 2 Each microphone channel has its own volume control located on the front panel of the Each one can be adjusted separately providing a great sounding vocal mix Turn the VOL 1 A control knob to adjust the volume of the MIC 1 input and the wireless microphone A Turn the VOL 2 B control knob to adjust the volume of the MIC 2 input and the wireless m...

Page 31: ......

Page 32: ...en to replace the batteries The maximum operational distance between the remote control and the sensor is approximately 25 feet If the remote only operates at shorter distances it is time to replace the batteries Installing the batteries To install the batteries first remove the battery compartment lid from the back of the remote control Insert two AAA batteries ensuring that the polarities are al...

Page 33: ...can choose between INTERLACE YUV P SCAN YPBPR or S VIDEO This menu actually refers to TV display mode Choose between 4 3PS for Panoramic Screen 4 3LB for Letterbox or 16 9 based on your viewing preference 5 PASSWORD When the PASSWORD menu is selected the displayed lock icon is closed locked as shown in Fig 1 The preset password to lock or unlock RATING settings is 0000 If you are a parent and want...

Page 34: ...wer the vertical fader bars to set up the following video preference settings Adjust the brightness of the display Adjust the contrast of the display Adjust the hue of the display Adjust the saturation of the display 1 BRIGHTNESS 2 CONTRAST 3 HUE 4 SATURATION VIDEO SETUP 7 NEXT PAGE SYSTEM SETUP DEFAULT RESUME PREV PAGE 7 1 DEFAULT 7 2 RESUME 7 3 PREV PAGE Select this mode if you choose to return ...

Page 35: ...1 OP MODE LINE OUT RF REMOD 2 DYNAMIC RANGE 3 DUAL MONO STEREO MONO L This setting compresses the output signal and lowers the volume for use in a quieter environment such as at night time This setting increases volume for regular usage When the OP CODE is set to LINE OUT use this setting to select the ratio of signal compression Select FULL for the lowest maximum signal and OFF for the highest ma...

Page 36: ...e there are no defective cables Make sure all of your components are turned on Make sure the C is set to the right input Make sure the TV or monitor is working correctly Make sure the disc is inserted correctly label side up Make sure the disc is clean and not scratched If using a CD DVD R RW try using a different brand as some brands might not be compatible Clean the CD lens using a CD lens clean...

Reviews: