manualshive.com logo in svg
background image

Copyright 1010music LLC 2020

Page 1 of 72

Bitbox 3.0.1 User Manual

Bitbox 3.0 User Manual

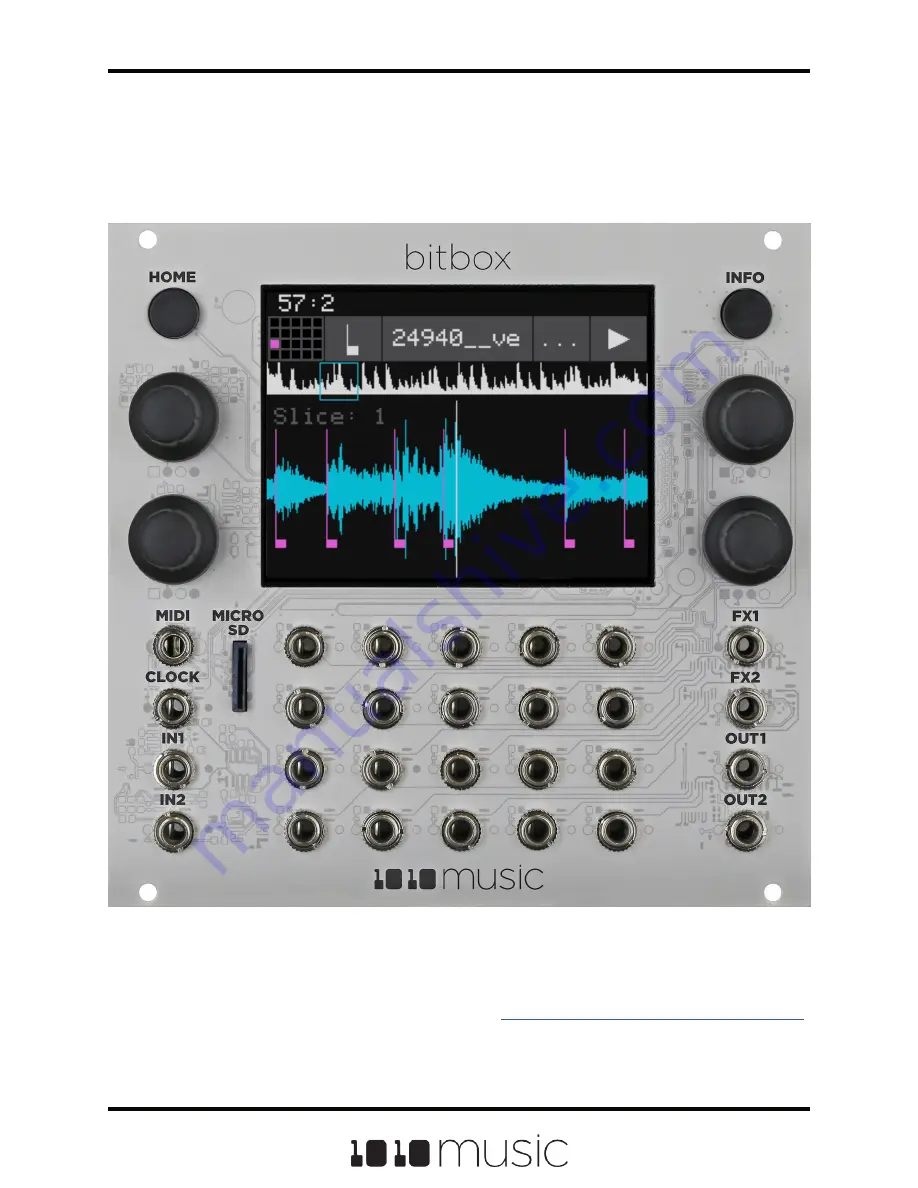
Welcome to bitbox. Bitbox is a very useful tool for capturing and playing back samples.
This manual will walk you through all of the features of bitbox. If you want to start
playing right away, please consult the Quick Start Guide found in the box. The Quick
Start Guide and this manual are also available at

1010music.com/bitbox-documentation

.

Содержание Bitbox 3.0

Страница 1: ...x is a very useful tool for capturing and playing back samples This manual will walk you through all of the features of bitbox If you want to start playing right away please consult the Quick Start Guide found in the box The Quick Start Guide and this manual are also available at 1010music com bitbox documentation ...

Страница 2: ...Trigger a Cell via Control Voltage Signal 17 Trigger a Cell via MIDI Input 17 CREATE AND CONFIGURE A NEW PRESET 18 Create and Name a Preset 18 Select WAV Files and Control Playback Options 18 To Configure Basic Cell Parameters 21 To Assign a Cell to an Exclusive Playback Group 23 Set up a Sample Cell 24 Multi Sample Cells 26 Work with a Clip Cell 28 Tips for Synchronizing Clips 29 Table of Content...

Страница 3: ... To Record a Multi sample Pack onto Bitbox 37 Save and Load Parameters in WAV Files 38 To save the values you have configured for a pad back to the WAV file 39 Trim WAV Files 40 Use Clipboard Functions with Cells 40 Manage WAV Files 41 Working with WAV Files on the microSD Card 41 To Delete Save As or Rename a WAV File 42 Save WAV files with a Preset 43 To Pack a Preset 43 PLAY NOTES USING THE KEY...

Страница 4: ...ot folder 51 USE MIDI AND CV WITH BITBOX 52 Pitch Shift Samples to Play Different Notes 52 Using MIDI to Play Samples Chromatically 52 To Use MIDI to Play the Currently Selected Pad Chromatically 52 To Use MIDI to Always Play a Specific Pad Chromatically 53 To Use CV to Play Samples Chromatically 54 Modulate Pad Parameters 55 To Apply CV or MIDI Modulation 55 To Use MIDI CC in Learn mode to Modula...

Страница 5: ... 65 To Configure a Pad without a WAV file 65 To Add a WAV file to a Template Pad 65 EXPORT A SET TO ABLETON LIVE 66 PROCESSOR MANAGEMENT TIPS 67 UPDATE AND SWAP FIRMWARE 68 Switch to a New MicroSD Card While Operating Bitbox 68 Backup Your Presets and WAV Files 68 Install New Firmware 68 TECHNICAL SPECS 70 Module Specs 70 Pin Mapping for Mini TRS Jack to MIDI 5 Pin DIN Connectors 70 On Board Memor...

Страница 6: ...STAY UP TO DATE 72 Demonstration Videos and Latest Docs 72 Connect with Other Bitbox Users 72 Contact Us 72 Copyright 1010music LLC 2020 Page 6 of 72 Bitbox 3 0 1 User Manual ...

Страница 7: ...scribe how to create a preset and configure pads This will include a discussion of the different pad modes and how to record a new WAV file Next we will go into more depth about preset management tasks That will be followed by a discussion of how to use modulators tracks and clock signals to synchronize playback across pads and with external devices After that we will cover how to backup your pres...

Страница 8: ...files directly from the module You can save your changes over the original file or save as a different file You can rename and delete files as well Bitbox shows you a visual representation of your WAV files and helps you cut the samples into slices that can be triggered independently Touch screen pinch and stretch gestures allow you to zoom into the display of the wave file to get more precise con...

Страница 9: ...creens Press INFO to view the information screen for the current selection In some cases you can press INFO more than once to get to deeper information The HOME button takes you back a screen If you get lost you can push HOME until you get back to the Main screen The control knobs are used to cycle through options on the screen When there are several parameters on the screen use the control knob c...

Страница 10: ...nts the playback state of the pad The four pads along the right side of the screen labeled EXT1 through EXT4 are mapped to Main Screen external inputs The column to the left of the EXT pads can also be used as additional external inputs EXT5 through EXT8 in addition to simultaneously being used to trigger samples mapped to those pads You can touch a pad on the screen to select it The selected pad ...

Страница 11: ...make sure you have a compatible Eurorack Bitbox requires a 12V connection and uses the standard 16 pin ribbon cable to connect to the rack You should always power down the Eurorack when connecting new modules Remove bitbox from the packing material and attach the ribbon cable to the back of the module The cable is the same on both ends so it does not matter which end is inserted into the module Ho...

Страница 12: ...he right Main Screen Connect an Output In order to hear the sounds that are playing on your bitbox you will need to connect the outputs to some speakers Start by inserting two mini TS cables to the OUT1 and OUT2 jacks and then connecting the other ends to your mixer or speakers Connect an Input Bitbox accepts several different forms of input For now we will set up some basic inputs to get you star...

Страница 13: ...arameter to adjust its value Touch the tabs at the bottom of the screen to access additional settings Tools Main Page Tools Rec Page Tools MIDI In Page Menu Screen Here are the available settings Page Parameter Description Main Brightness Controls the brightness of the display screen with 100 being the brightest and 0 being totally dark MasterVol Controls the output level to Out 1 and Out 2 Flip U...

Страница 14: ... MIDI channel See the section Use MIDI and CV with Bitbox below for more information When this parameter is set to Omni pad hits and can be triggered by all MIDI channels However any MIDI channel that is assigned as the MIDI In for a pad or as the MIDI Keys parameter will be excluded from the list of channels that will trigger pad hits when MIDI Pads is set to OMNI MIDI Program Change messages rec...

Страница 15: ...o the Main screen Working in Flipped Mode When the value for Flip UI is set to ON the user interface on the touch screen will be inverted Use this setting when the module is installed in a rack with the touchscreen on the bottom When flipped the firmware adjusts how the buttons control knobs and CV Trigger jacks are mapped to the user interface One noteworthy change is that the HOME and INFO butto...

Страница 16: ... in alphabetical order when you start it up If you are using the original bitbox content the 808 Kit preset will be loaded Trigger playback of a WAV file by touching a pad in the grid that has a name displayed for example TOML2 in the 808 Kit preset You will see a blue progress bar appear at the bottom of the pad during playback You will hear the WAV file played back through the audio output selec...

Страница 17: ...or EXT1 through EXT4 are assigned notes 55 to 52 for use as Scene Triggers and Recording triggers However these MIDI mappings for notes 52 to 55 do not work with modulation 48 49 50 51 D 3 55 44 45 46 47 54 40 41 42 43 53 36 C2 37 38 39 52 Default Mapping of MIDI Notes to Bitbox Cells and EXTs Note The MIDI input uses a Type B mini TRS connection Be sure to use a TRS cable and not a TS cable Read ...

Страница 18: ...ge the name 3 Touch the back arrow to backspace through the preset name to clear it Then use the on screen keyboard to type in a new name Turn the knob to change where you are typing Use the carat button to toggle between upper and lower case letters Touch the 123 button to display the numeric keyboard if needed 4 When the name is complete touch Enter to save the name and go to the Presets screen ...

Страница 19: ...y 2 notes Granular Generate new sounds from your samples The sample is played back in small portions about 10 to 200ms in length called grains mono New Rec Use to start recording a new WAV file or clear a WAV from a pad Each pad can have a different Cell Mode You can use the same WAV file in different pads in different pad modes To load a WAV file into a pad 1 Select a pad by touching it or using ...

Страница 20: ... are directories Load a directory to see its contents The file path is displayed above the list of files e g Piano in the example above Touch the caret to navigate back up the directory tree Touch the back arrow to go back to the previous screen You will now be on the Waveform screen There are a number of important features on the Waveform screen The grid icon in the top left of the screen provide...

Страница 21: ...he left most control is the pad selector grid Touch this grid and then touch a pad in the grid to select a different pad to edit 4 The second menu item is the output selection button Out1 2 in the example figure Touch this menu item to display the Output Options 5 Touch the desired Output Option to select it Cell Parameters Screen Output Option Description Out1 Out 2 FX1 FX2 The output of this pad...

Страница 22: ...h or the MIDI note is released Toggle Begin the WAV file playback in the same manner as Trigger mode When another trigger event happens the playback will stop No Attack The time it takes for the sound to reach its loudest level 0 0 to 100 0 The attack percentage is a logarithmic scale between 0 and 9 seconds No Decay How long it takes for the sound to go from the initial peak to the sustain level ...

Страница 23: ... MIDI Note Number 0 No Several of the pad parameters have three black boxes below them These pads are potential modulation targets and these boxes are used to control the modulation parameters We will discuss modulation later To Assign a Cell to an Exclusive Playback Group At the top of the ADSR parameters page the menu option to the right of the grid icon allows you to control exclusive grouping ...

Страница 24: ...aunch Mode set to Trigger looping will happen for the duration of the Release phase of the note If you have the Launch Mode set to Gate looping plays through the gate pulse and the release time If you have the Launch Mode set to Toggle looping starts to play when the initial pulse is received and continues until the terminating toggle pulse is received If Loop Mode is Bidirect and Rev is ON playba...

Страница 25: ... used for this WAV on this pad in this preset When None is specified the sample is assumed to have a root note of middle C If you save the WAV file from this pad the Root Note value will be saved with it None C 1 through G9 No Start Point where playback will begin when playing forward or ends when playing in reverse Expressed as a sample number 0 to number of samples in the file Yes Len When Loop ...

Страница 26: ...this in the Symplesound folder available for download from the forum To load one of these sample banks into a pad 1 Push Home to go to the Main screen 2 Select a pad by touching it or using the control knobs to cycle through the pads The top control knobs move the selection horizontally The bottom control knobs move the selection vertically The selected pad is highlighted pink 3 Press the INFO but...

Страница 27: ...t Note on the Misc tab of the Parameters screen Save the WAV file with the root note information After you have done this for all of the files in the folder use File Load All to load them all into a pad and you will hear that the notes are mapped accordingly Because a multi sample pad uses multiple samples it is not possible to set start length loop start or loop end points for these pads Therefor...

Страница 28: ...grid with intervals specified by the Quant Size parameter When quantization is used the note trigger will cause playback to start and end on the next quant size boundary For example if the Quant Size is set to 1 bar and you press the pad the playback will begin at the start of the next bar None always start and stop immediately 1 16 1 8 1 4 1 2 1 bar 2 bars 4 bars 8 bars No Sync Sync is only enabl...

Страница 29: ...laying the sync will cause the playback of the WAV file to jump to the next selected sync increment in the file when the corresponding clock time has passed So if the WAV was a little faster than your clock the playback position will jump backwards to move the playback of the WAV to the selected clock increment If the WAV is slower than your clock the playback position will jump ahead to the selec...

Страница 30: ...rget Loop Mode Controls whether the slice playback is looped This does not work with Launch Mode of Trigger Use Launch Mode of Gate or Toggle if you want to loop slices ON OFF No Quant Size Use Quant Size to quantize when the playback starts and stops Quantization will cause playback to snap to a musical grid with intervals specified by the Quant Size parameter When quantization is used the note t...

Страница 31: ...slice ON playback will continue past the end of the slice to the end of the file OFF playback will stop at the end of the triggered slice No Slice Seq When Slice Seq is set to a value other than None each new note will advance the selection of the next slice to play The value of this parameter controls the order in which slice selection is advanced None This parameter will not be used to control t...

Страница 32: ...tal lines with a small pink square near the bottom You can adjust the results of the slice to grid or auto scan by manually adding or removing slices to get the slices that match your creative vision scan or slice to grid When you use auto scan bitbox uses an internal algorithm to decide where to place the splits You can control the sensitivity of the algorithm When you use slice to grid you defin...

Страница 33: ...ters as sample pads along with the following additional parameters Parameter Description Range of Values Mod Target Grain Size The size of the small segments of the WAV file that will be played measured in number of samples 1024 to 16384 which is about 10ms to about 200ms No Grain Count How many different grains are layered together during playback 2 to 8 Keep in mind that more grains require more...

Страница 34: ...y the Waveform screen If you are on the Waveform screen press the Pad Mode icon to the left of the WAV file name at the top of the screen and then touch New Rec You will now see the Load and Record screen 4 In the top menu touch the menu item to the right of the grid icon In 1 2 in the example screenshot This will display the list of input choices Touch one of the options to choose whether to reco...

Страница 35: ...ding to start and stop at the designated musical time interval This is not available when Threshold recording is enabled None always start and stop immediately 1 16 quantize to the next sixteenth note time 1 8 eighth note 1 4 quarter note 1 2 half note 1 bar a whole note assuming 4 4 time 2 bars 4 bars 8 bars Gain The VU meters represent the level of the signal to be recorded You can adjust the ga...

Страница 36: ...e the file is stored on the microSD card in the folder associated with the preset This folder is located under Presets and has the same name as the preset For example if your preset name is KickinGroove then your recordings will be in the folder Presets KickinGroove How you will work with these files depends on whether you are recording samples to build a library to use in presets in the future or...

Страница 37: ...der and to Pack your presets often To Record a Multi sample Pack onto Bitbox 1 Create a preset for the multi sample pack Let s call it MyBank 2 Record the files into the new MyBank preset Delete any extra files that are not needed 3 Assign root notes to each of the files if you want to ensure bitbox maps the files to the correct note For example if you recorded a sample for C3 and you want that sa...

Страница 38: ...loaded and saved to the WAV file when the WAV is saved Stored in the WAV smpl tag Sample Single LpEnd Point where the looping will end when playing forwards or looping will begin when playing in reverse Expressed in samples Must be after or equal to LpStr LpEnd is read form the WAV file when a sample is loaded and saved to the WAV file when the WAV is saved Stored in the WAV smpl tag Sample Single...

Страница 39: ...t the pad mode based on the parameters that are available in the WAV file If there are slices in the WAV then it sets the pad mode to slicer If there are loop points in the WAV then it sets the pad mode to sample To save the values you have configured for a pad back to the WAV file 1 Open the WAV screen for the pad 2 Touch the name of the WAV file at the top of the screen to display the WAV select...

Страница 40: ...k bracket trimmed off Touch anywhere else on the screen to cancel 6 Save your preset to save the change to the pad Otherwise the length parameter for the pad will be wrong when you reload the preset Note You may want to use File Save As before you trim the file to give yourself a backup copy of the file Use Clipboard Functions with Cells Bitbox has a slightly hidden set of clipboard buttons on the...

Страница 41: ...rd Bitbox 3 0 changes where new recordings are stored When you create a new recording it will be stored in the folder for that preset For example the first new recording for the My Kickin Grooves preset will be saved as Presets My Kickin Grooves RC000001 wav When you load an existing WAV file into a pad the preset will have a pointer to that WAV file in its source folder If you want to gather copi...

Страница 42: ...ch File to display the WAV File menu 5 Touch Delete to delete the selected WAV file from the microSD card Touch Save As to save a copy of the WAV file with a different name Touch Rename to change the name of the file on the microSD card 6 If you select Delete bitbox will display a confirmation prompt Touch OK to confirm or touch anywhere else to cancel 7 If you select Rename or Save As bitbox disp...

Страница 43: ...nize your sample library You may also want to gather up all of the files used in a preset so you can move it to another microSD card or archive it on your computer The Pack feature was created to address these needs To Pack a Preset 1 Load the preset you want to pack 2 Push the HOME button until you see the Menu screen and then touch Presets 3 Touch File then Pack Bitbox will find all of the WAV f...

Страница 44: ... on the keyboard to hear the selected pad play pitch shifted by key You can adjust which octave is playing by touching the arrow buttons above the keyboard or by turning a knob The C keys are numbered so you can quickly identify which octave will be playing 7 Push INFO to access the Grid Based keyboard Use the two buttons in the top right of the screen to select the Key and Scale that will be used...

Страница 45: ...muted To Adjust the Sound Level and Pan of a Pad 1 Push HOME until you see the Menu screen then touch Mix to display the mixer screen 2 Touch the pad you want to adjust 3 Turn one of the top two knobs to adjust the level of the currently selected pad 4 Turn one of the bottom two knobs to adjust the pan if available Mixer Screen To Mute and Unmute Pads The mixer screen also allows you to mute indiv...

Страница 46: ...x now stores all of the preset xml files in sub folders under the Presets folder Each preset has its own sub folder with the name of the preset and a preset xml file within that sub folder E g the preset My Kickin Grooves will be stored as a file named preset xml in the Presets My Kickin Grooves folder When you first start working with the preset it will point to the WAV files in their source fold...

Страница 47: ...s you work If you change to a different preset or unplug bitbox you will lose your work To save the preset 1 Push HOME until you see the Menu screen then touch Presets to display the Preset Management screen 2 Touch Save to store your changes to the currently loaded preset or touch Save As to save changes to a new preset To Load a Preset 1 Press the HOME button repeatedly until you see the Menu sc...

Страница 48: ... screen 3 Touch File then Pack Bitbox will copy all of the WAV files used by this preset into the preset s folder Any multi sample banks will be copied with their folder The preset xml file will be updated to point to these copies of the WAV files and will be saved To Delete a Preset When you delete a preset you remove the preset from the list of presets on the Preset Management Screen and you del...

Страница 49: ... and return to the Presets screen with the preset selected Keyboard Screen Note Renaming a preset does not load that preset Note If you enter a name that is already in use you will replace the old file with the current preset To Save Current Changes as a New Preset Sometimes while working on a preset you decide to save your changes to a different preset in order to save your work while still prese...

Страница 50: ...rs under the Presets folder Bitbox will not find them if you move the XML files outside of these folders or move these folders outside of the Presets folder Legacy Presets Bitbox Firmware version 3 0 changed the way presets and new sample recordings are managed It moves the preset files out of the root and into individual folders under the presets folder New WAV file recordings are now stored in t...

Страница 51: ...pack up all of your presets one by one which will copy all of the files used by the presets into their respective folders When that is done you may choose to delete the files that are stored at the root or safely move them to a sub folder for future use Page 51 of 72 Copyright 1010music LLC 2020 Bitbox 3 0 1 User Manual ...

Страница 52: ...wo ways to set up bitbox to trigger pads chromatically You can use the MIDI Keys setting on the Tools screen to configure a MIDI channel that will be used to play whichever pad is currently selected You can also use the MIDI In setting on the pad parameters screen to configure a pad to always respond to a specific MIDI channel even when the pad is not selected To Use MIDI to Play the Currently Sel...

Страница 53: ...eturn to the Main screen 2 Select a loaded pad and push INFO twice to go to the Pad Parameters screen 3 Touch the MIDI tab at the bottom of the screen to go the page with MIDI parameters 4 Turn the knob to set the value for the MIDI In parameter to the channel that you want to use to play this pad chromatically 5 Connect a MIDI controller to the MIDI jack and set up the controller to use the MIDI ...

Страница 54: ...odulation Parameters screen 3 Use the knobs to select the EXT port you want to use for input 4 Use the knobs to set the 1V Octave parameter to ON This will configure bitbox to map the voltage on the CV so that one volt spans one octave You can set 1V Octave to off and use the Amount parameter to control how bitbox maps the voltage 5 Push HOME to go back to the Pad Parameters screen 6 Set the Launc...

Страница 55: ...three different signal sources to modulate each parameter The same signal can be used to modulate multiple parameters To Apply CV or MIDI Modulation 1 From the Main screen touch the pad you want to modulate 2 Press INFO twice to display the Parameters screen then touch the page tab for the parameter you want to modulate 3 Touch one of the three black boxes below the parameter to display the Modula...

Страница 56: ...ve difference in pitch playback In this case 1 12th of a volt maps to one semitone Each semitone of voltage level changes the pitch or slice selection by 1 EXT Ports Modulation Source Description none No modulation source will be used EXT1 to EXT8 External Control Voltage connected to one of the numbered EXT ports as shown in the image on the right Trig Any input that is used to trigger a pad such...

Страница 57: ...Navigate to the parameter page for the pad parameter you want to modulate 3 Touch one of the three black boxes below the parameter you want to modulate This brings up the Modulation Source screen 4 Touch Learn in the top right corner to enable MIDI CC learning mode 5 Move the MIDI control such as a knob or slider that you want to use with this parameter When bitbox has learned the mapping the Lear...

Страница 58: ...e 4 will be played MIDI Notes 36 and up are now mapped to Slices 1 and up for playback Parameter Value Explanation Launch Mode Trigger This will cause the WAV slice to play from beginning to end when a trigger is received Other values will work but let s use this for the example Loop Mode Off We will turn off looping for this example Slice 3 This doesn t impact how the MIDI device or Keys screen p...

Страница 59: ... off looping for this example Slice 3 This parameter does not impact which slice is triggered in this example because the modulation for this parameter will override it MIDI Default We want the default behavior where the MIDI channel selected for MIDI Pads on the Tools screen will be used to trigger this pad Slice Seq None We will not use the Slice Sequencer in this example PlayThru OFF For this e...

Страница 60: ... Slicer Cells above One example of a WAV file to use with this feature is SFX Metal METL_shake and squeal wav 2 Set the following values for the pad parameters Parameter Value Explanation Launch Mode Trigger This will cause the WAV slice to play from beginning to end when a trigger is received Other values will work but let s use this for the example Loop Mode Off We will turn off looping for this...

Страница 61: ... the current slice position will advance to the next slice Press Play or use any of the other ways to trigger a pad repeatedly and you should hear the slices advance with each CV pulse If you are using a CV input as the Slice Seq modulation source EXT 1 through 8 the position of the slice selector cursor may change several times before the note is triggered again or it might not change at all It d...

Страница 62: ...put is available the highest priority clock signal lowest priority number will be used Bitbox can delay the timing of the playback of a Clip pad to synchronize it with a specified unit of musical clock time To synchronize the playback of Clip pads with the clock configure a pad in Clip mode and set the value for Quant to something other than None Bitbox only synchronizes pads with a pad mode of Cl...

Страница 63: ...or data loss bitbox has a global parameter that allows you to control whether or not the device responds to program change signals By default this is set to off To Enable or Disable MIDI Program Changes 1 Push Home until you see the Menu screen 2 Touch Tools to open the Tools Parameters screen 3 Touch the MIDI In tab at the bottom of the screen to change the page 4 Turn the knob to set the value o...

Страница 64: ...signed as the MIDI Pads channel on the TOOLS screen If the MIDI Keys parameter is set to Omni and the incoming notes are on a MIDI channel that has not been specifically assigned to anything else a pad s MIDI In or the MIDI Pads parameter then the currently selected pad will respond to notes on this channel If the MIDI Pads parameter is set to Omni and the incoming notes are on a MIDI channel that...

Страница 65: ...ou will now see the Load and Record screen 3 Push INFO again to see the Parameters screen for this pad 4 Choose the Pad Mode on the Main page of the Parameters screen 5 Use the buttons across the bottom of the screen to choose the desired page and update the parameters as you normally would 6 Push HOME until you see the Menu screen then touch Presets to display the Preset Management screen Touch S...

Страница 66: ...r using a microSD to SD card adapter or a microSD to USB adapter 3 Double click or open the als file with the same name as the preset in order to open your set in Ableton Live 4 For best results use the Save As option as well as the Collect and Save menu item in Ableton to migrate the relevant WAV files onto your machine and into the customary Ableton directory structure Copyright 1010music LLC 20...

Страница 67: ...reative choices That being said here are some tips you can use to reduce your processor load and the corresponding chance of encountering sound artifacts Configure your pads to run monophonic whenever possible On most percussion sounds you won t hear the difference and this is an easy win Use mono samples instead of stereo where appropriate Stereo samples are twice the work to load and play Use 48...

Страница 68: ...puter Install New Firmware Here are the steps required 1 Backup your microSD card as described above 2 Download the desired firmware onto your computer You can choose to download either synthbox fxbox or bitbox firmware but only one set of firmware can run at a time You can find the latest firmware images on the forum at https forum 1010music com You must be a registered user of the forum to acces...

Страница 69: ...l restart with the new software Note The microSD card used for updating firmware must be formatted with FAT32 The exFAT format will not work Even though new firmware versions can support exFat for storing presets and WAV files you must use a card formatted with FAT32 to upgrade firmware After the upgrade is successfully completed you can use your exFAT formatted card to load and store presets Page...

Страница 70: ... a mini TRS jack 1010music bitbox is compatible with cables that use the following mapping of MIDI signals between female MIDI connectors and mini TRS jacks 1 4 2 5 3 Current Source Shield Current Sink SLEEVE TIP RING SLEEVE TIP RING 5 Pin DIN and Mini TRS Jack Connectors MIDI Signal MIDI Connector Mini TRS Current Source Pin 4 Tip Current Sink Pin 5 Ring Shield Pin 2 Sleeve MIDI Connector to Mini...

Страница 71: ...ed double quotes forward slash back slash question mark asterisk less than and greater than symbols the colon and the pipe symbol File names must be less than 256 characters including the path name Files that do not conform to these naming constraints will not be recognized by bitbox Maximum Number of Voices Supported Bitbox can support playback of up to 16 total voices across all pads at one time...

Страница 72: ...f 1010music modules at https forum 1010music com If you have a question about the module that isn t answered in this manual this is your best source for help We actively monitor the wish list sub forums for ideas for future versions of our products Forum registration is free We hope to see you out there Contact Us Are you loving bitbox Have questions You can contact us through our website at http ...

Отзывы: