


Chapter 11 Bandwidth Management
SBG5500 Series User’s Guide
197
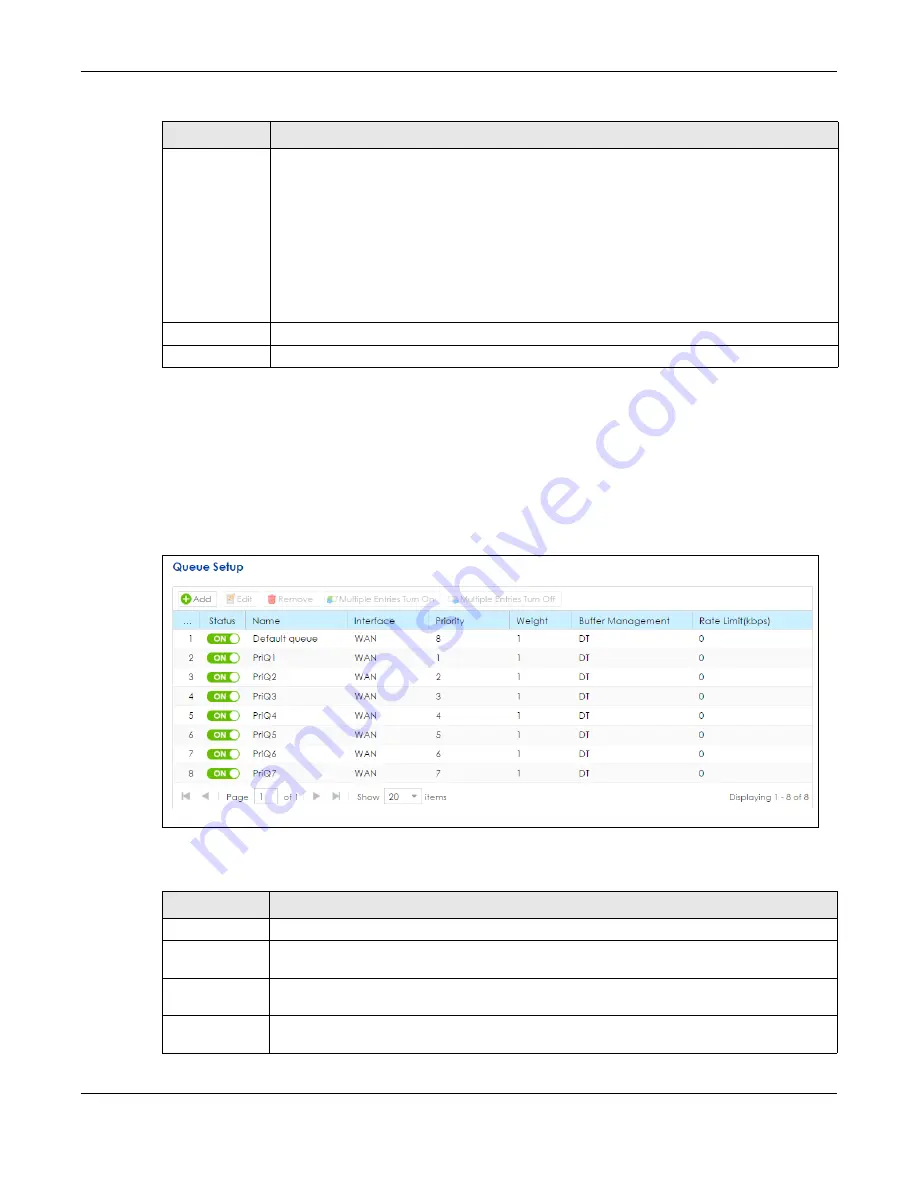
11.3 The Queue Setup Screen
Click
Configuration > Bandwidth Management > Queue Setup
to open the screen as shown next.
Use this screen to configure QoS queue assignment.
Figure 144
Configuration > Bandwidth Management > Queue Setup
The following table describes the labels in this screen.
Upstream traffic
priority Assigned
by
Select how the SBG assigns priorities to various upstream traffic flows.
•
None:
Disables auto priority mapping and has the SBG put packets into the queues
according to your classification rules. Traffic which does not match any of the classification
rules is mapped into the default queue with the lowest priority.
•
Ethernet Priority:
Automatically assign priority based on the IEEE 802.1p priority level.
•
IP Precedence:
Automatically assign priority based on the first three bits of the TOS field in the
IP header.
•
Packet Length:
Automatically assign priority based on the packet size. Smaller packets get
higher priority since control, signaling, VoIP, internet gaming, or other real-time packets are
usually small while larger packets are usually best effort
• data packets like file transfers.
Apply
Click
Apply
to save your changes.
Reset
Click
Reset
to restore your previously saved settings.
Table 84 Configuration > Bandwidth Management > General (continued) (continued)
LABEL
DESCRIPTION
Table 85 Network Setting > QoS > Queue Setup
LABEL
DESCRIPTION
Add
Click this button to create a new queue entry.
Edit
Double-click a queue entry or select it and click
Edit
to open a screen where you can modify
the queue’s settings.
Remove
To remove an existing queue entry, select it and click
Remove
. Note that subsequent rules move
up by one when you take this action.
Multiple Entries
Turn On
Select a queue and click this
to enable it.
Summary of Contents for SBG5500-A
Page 12: ...12 PART I User s Guide...
Page 44: ...44 PART II Technical Reference...


