


P-2608HWL-Dx Series User’s Guide
Chapter 9 Wireless LAN
131
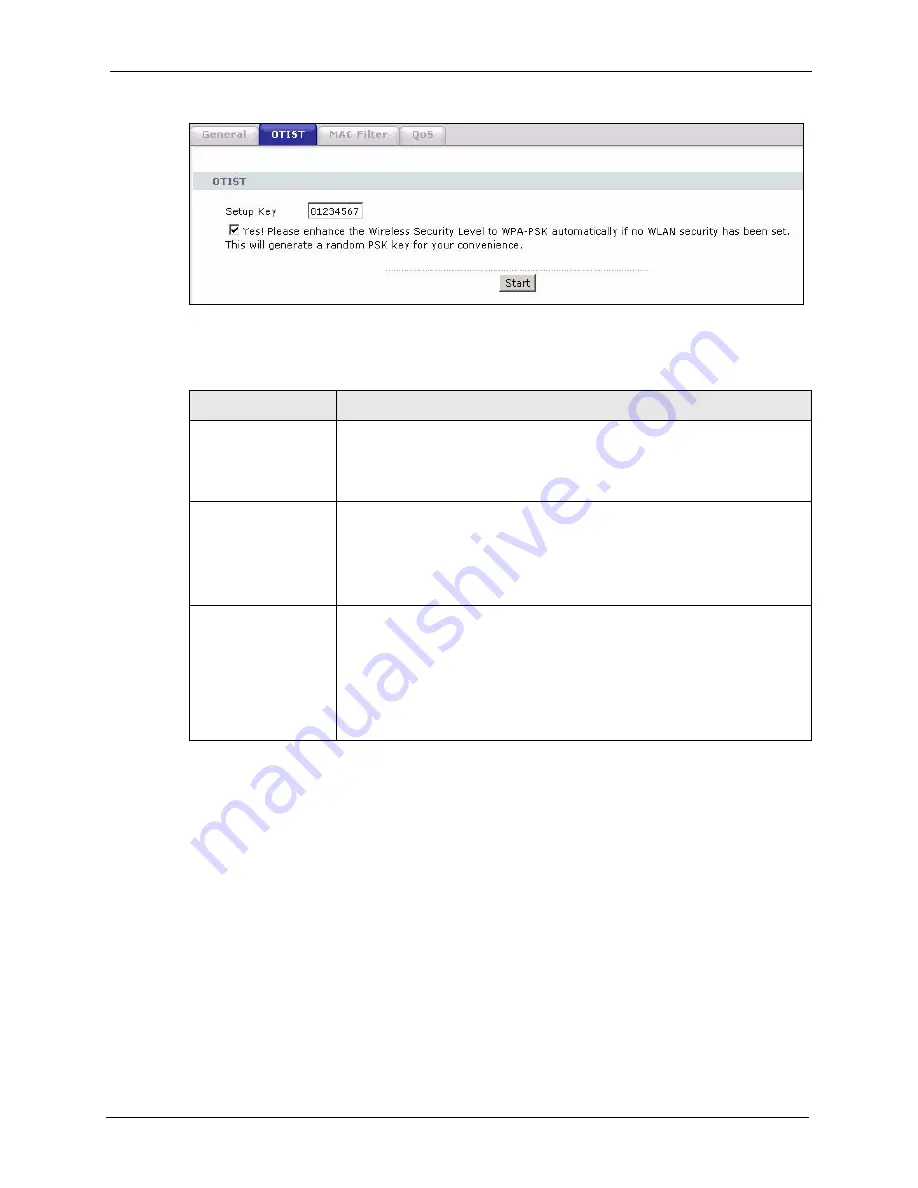
Figure 67
Network > Wireless LAN > OTIST
The following table describes the labels in this screen.
Before you click
Start
, you should enable OTIST on all the OTIST-enabled devices in the
wireless network. For most devices, follow these steps.
1
Start the ZyXEL utility
2
Click the
Adapter
tab.
3
Select the
OTIST
check box, and enter the same
Setup Key
as the ZyXEL Device.
4
Click
Save
.
Table 41
Network > Wireless LAN > OTIST
LABEL
DESCRIPTION
Setup Key
Type a key (password) 8 ASCII characters long.
Note:
If you change the OTIST setup key in the ZyXEL Device,
you must change it on the wireless devices too.
Yes!
Select this if you want the ZyXEL Device to automatically generate a pre-
shared key for the wireless network. Before you do this, click
Network >
Wireless LAN > General
and set the
Security Mode
to
No Security
.
Clear this if you want the ZyXEL Device to use a pre-shared key that you
enter. Before you do this, click
Network > Wireless LAN > General
, set the
Security Mode
to
WPA-PSK
, and enter the
Pre-Shared Key
.
Start
Click
Start
to activate OTIST and transfer settings. The process takes three
minutes to complete.
Note:
You must click
Start
in the ZyXEL Device and in the
wireless device(s) within three minutes of each other. You
can start OTIST in the wireless devices and the ZyXEL
Device in any order.
Summary of Contents for P-2608HWL-D1
Page 2: ......
Page 24: ...P 2608HWL Dx Series User s Guide 24 Table of Contents ...
Page 32: ...P 2608HWL Dx Series User s Guide 32 List of Figures ...
Page 38: ...P 2608HWL Dx Series User s Guide 38 List of Tables ...
Page 44: ...P 2608HWL Dx Series User s Guide 44 Chapter 1 Getting To Know the ZyXEL Device ...
Page 66: ...P 2608HWL Dx Series User s Guide 66 Chapter 3 Internet and Wireless Setup Wizard ...
Page 72: ...P 2608HWL Dx Series User s Guide 72 Chapter 4 VoIP Wizard And Example ...
Page 78: ...P 2608HWL Dx Series User s Guide 78 Chapter 5 Bandwidth Management Wizard ...
Page 88: ...P 2608HWL Dx Series User s Guide 88 Chapter 6 Status Screens ...
Page 118: ...P 2608HWL Dx Series User s Guide 118 Chapter 8 LAN Setup ...
Page 138: ...P 2608HWL Dx Series User s Guide 138 Chapter 9 Wireless LAN ...
Page 166: ...P 2608HWL Dx Series User s Guide 166 Chapter 11 SIP ...
Page 176: ...P 2608HWL Dx Series User s Guide 176 Chapter 12 Phone ...
Page 184: ...P 2608HWL Dx Series User s Guide 184 Chapter 13 Phone Book ...
Page 220: ...P 2608HWL Dx Series User s Guide 220 Chapter 17 Content Filtering ...
Page 276: ...P 2608HWL Dx Series User s Guide 276 Chapter 20 Static Route ...
Page 288: ...P 2608HWL Dx Series User s Guide 288 Chapter 21 Bandwidth Management ...
Page 292: ...P 2608HWL Dx Series User s Guide 292 Chapter 22 Dynamic DNS Setup ...
Page 306: ...P 2608HWL Dx Series User s Guide 306 Chapter 23 Remote Management Configuration ...
Page 318: ...P 2608HWL Dx Series User s Guide 318 Chapter 24 Universal Plug and Play UPnP ...
Page 324: ...P 2608HWL Dx Series User s Guide 324 Chapter 25 System ...
Page 344: ...P 2608HWL Dx Series User s Guide 344 Chapter 27 Tools ...
Page 348: ...P 2608HWL Dx Series User s Guide 348 Chapter 28 Diagnostic ...
Page 360: ...P 2608HWL Dx Series User s Guide 360 Chapter 29 Troubleshooting ...
Page 378: ...P 2608HWL Dx Series User s Guide 378 Appendix B Setting up Your Computer s IP Address ...
Page 402: ...P 2608HWL Dx Series User s Guide 402 Appendix F Triangle Route ...
Page 440: ...P 2608HWL Dx Series User s Guide 440 Appendix H Internal SPTGEN ...


