Chapter 6 Tutorials
GS2210 Series User’s Guide
53
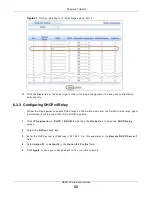
Figure 42
Tut or ial: Add Tag for Fram es Received on Por t 2
11
Click t he Sa v e link in t he upper r ight cor ner of t he w eb configurat or t o save your configurat ion
per m anent ly.
6.3.3 Configuring DHCPv4 Relay
Follow t he st eps below t o enable DHCP r elay on t he Swit ch and allow t he Swit ch t o add r elay agent
inform at ion ( such as t he VLAN I D) t o DHCP r equest s.
1
Click I P Applica t ion > D H CP > D H CPv 4 and t hen t he Globa l link t o open t he D H CP Re la y
scr een.
2
Select t he Act iv e check box.
3
Ent er t he DHCP ser ver ’s I P addr ess ( 192.168.2.3 in t his exam ple) in t he Re m ot e D H CP Se r v e r 1
field.
4
Select de fa u lt 1 or de fa u lt 2 in t he Opt ion 8 2 Pr ofile field.
5
Click Apply t o save your changes back t o t he r un- t im e m em or y.

