ES-2024A User’s Guide
50
Chapter 5 Initial Setup Example
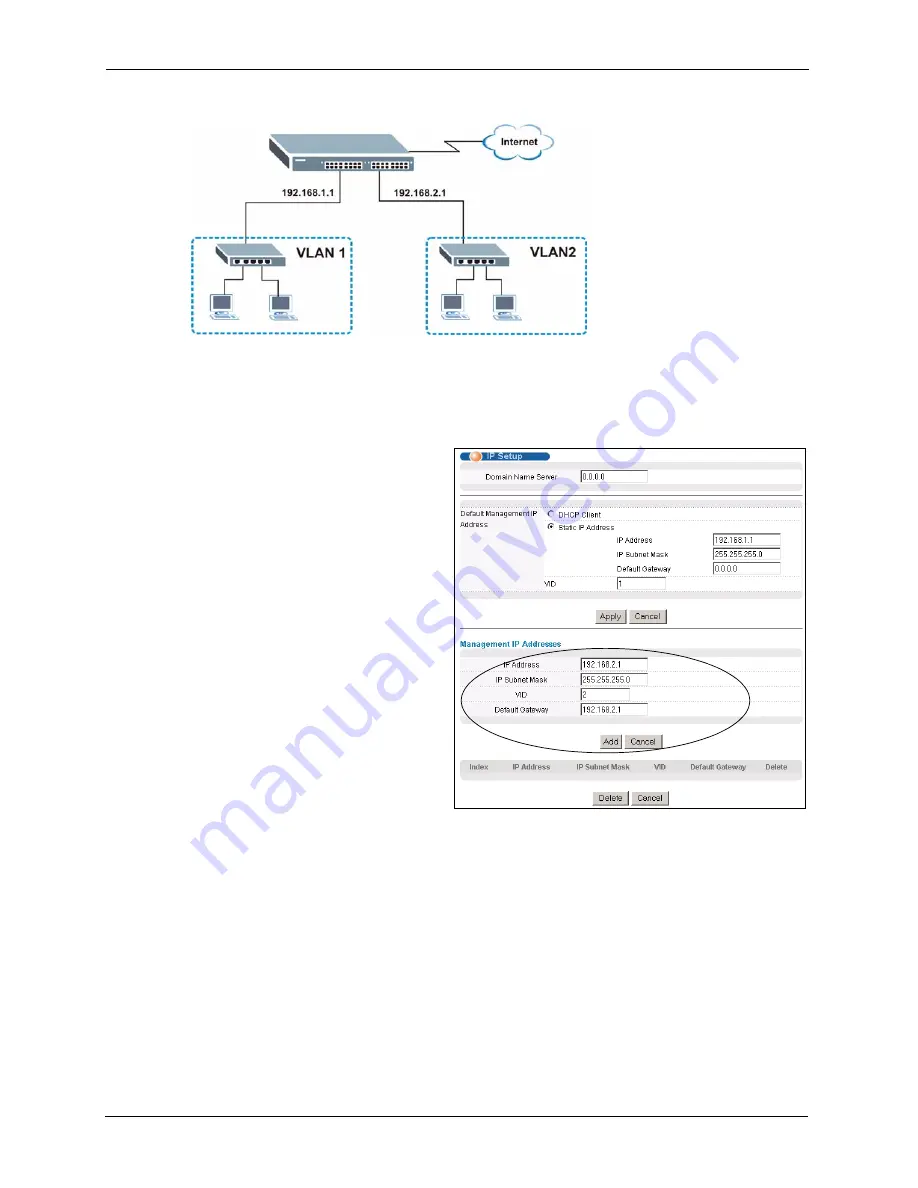
Figure 22
Initial Setup Example: Management IP Address
1
Connect your computer to any Ethernet port on the switch. Make sure your computer is
in the same subnet as the switch.
2
Open your web browser and enter 192.168.1.1 (the default IP address) in the address bar
to access the web configurator. See
3
Click
Basic Setting
and
IP
Setup
in the navigation panel.
4
Configure the related fields in the
IP Setup
screen.
For the
VLAN2
network, enter
192.168.2.1 as the IP address and
255.255.255.0 as the subnet
mask.
5
In the
VID
field, enter the ID of
the VLAN group to which you
want this management IP address
to belong. This is the same as the
VLAN ID you configure in the
Static VLAN
screen.
6
Click
Add
.
Summary of Contents for ES-2024A
Page 1: ...ES 2024A Ethernet Switch User s Guide Version 3 60 6 2005...
Page 33: ...ES 2024A User s Guide 32 Chapter 2 Hardware Installation and Connection...
Page 39: ...ES 2024A User s Guide 38 Chapter 3 Hardware Overview...
Page 74: ...ES 2024A User s Guide Chapter 8 VLAN 73 Figure 35 Port Based VLAN Setup All Connected...
Page 77: ...ES 2024A User s Guide 76 Chapter 8 VLAN...
Page 87: ...ES 2024A User s Guide 86 Chapter 11 Spanning Tree Protocol...
Page 99: ...ES 2024A User s Guide 98 Chapter 15 Link Aggregation...
Page 103: ...ES 2024A User s Guide 102 Chapter 16 Port Authentication...
Page 135: ...ES 2024A User s Guide 134 Chapter 23 Diagnostic...
Page 167: ...ES 2024A User s Guide 166 Chapter 27 Introducing the Commands...
Page 183: ...ES 2024A User s Guide 182 Chapter 28 Command Examples...
Page 193: ...ES 2024A User s Guide 192 Chapter 29 IEEE 802 1Q Tagged VLAN Commands...
Page 203: ...ES 2024A User s Guide 202 Chapter 30 Troubleshooting...
Page 207: ...ES 2024A User s Guide 206 Product Specifications...


