background image

Mobile-Phone Backend Setting


42 


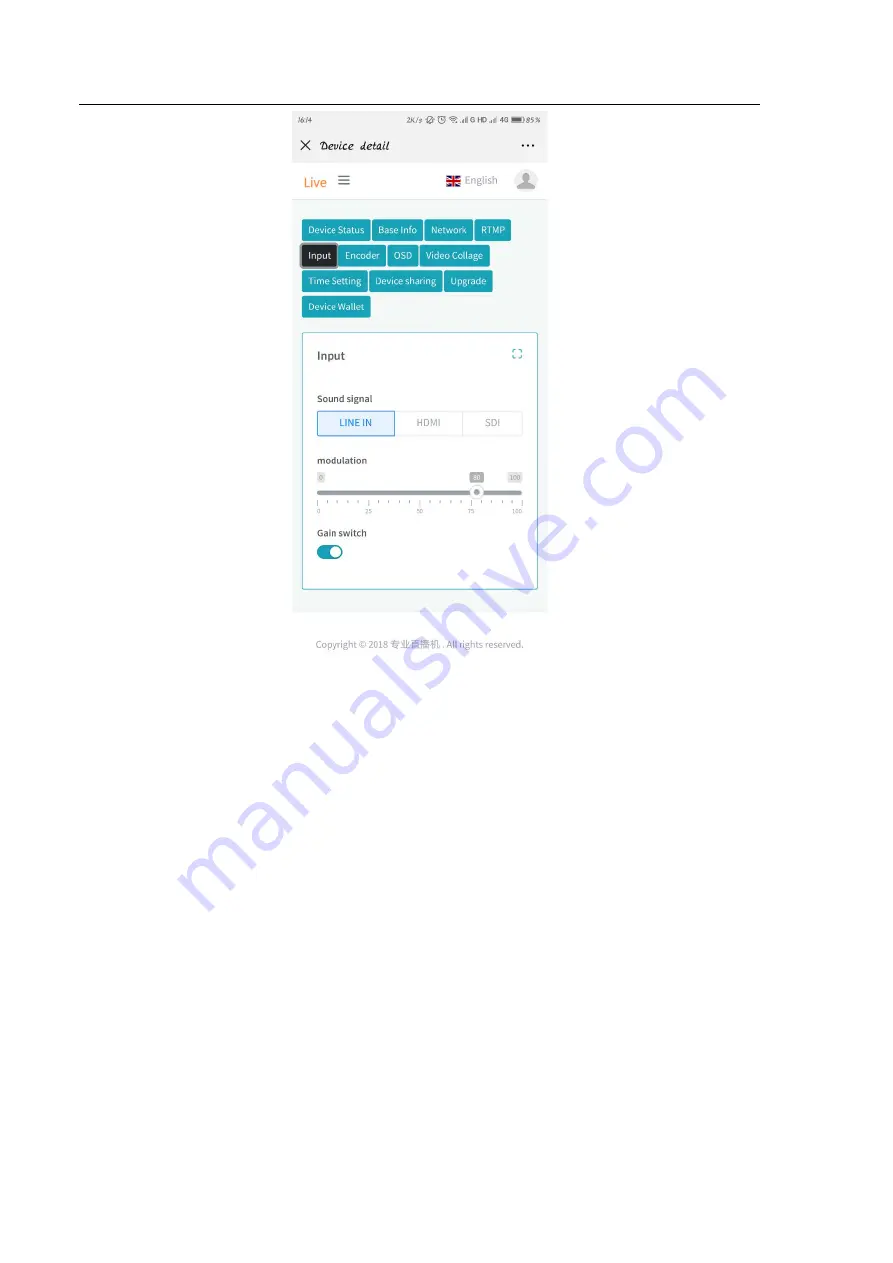
Sound Signal 

Select an audio input source from the available signal input connections. This is the audio that will be 
recorded and/or passed through. 
 

LINE IN

 – Use the analog stereo input as the audio source. In this mode, user can choose to turn on/off auto 

Gain

”, the default setting of auto gain is on, at this condition, user can manually set a volume. The range 

of volume is 0~100. 

HDMI 

– Use the embedded digital stereo audio of HDMI input as the audio source. 

SDI 

– Use the embedded digital stereo audio of SDI input as the audio source.


4.6 Encoder   

In the 

“Encoder”

  optional control page, 3  parameters of Encoder can be set on this page, including 

“Resolution”

“Frame Rate” 

and 

“Bit Rate”

.   


Summary of Contents for LiveV200

Page 1: ...High Definition HD Live Video Streaming Encoder User Manual LiveV200 LiveV210 LiveV300 LiveV310 Revision K2 0 A2 5x Release 2020 07 18 Product 30411 0XX...

Page 2: ...6 3 1 1 LiveV210 IP address 16 3 2 Device Info 17 3 3 Signal Input 17 3 4 Network Setting 18 3 4 1 LAN 18 3 4 2 Built in WIFI 19 3 4 3 Built in 4G 20 3 4 4 Side USB 4G or multiple backpack 4G 20 3 4 5...

Page 3: ...2 4 9 Time Setting 48 4 10 Device sharing 49 4 11 Upgrade 50 4 12 Device Wallet 51 Specification 52...

Page 4: ...otherwise stressed 9 If an extension cord must be used with this unit make sure that the total of the ampere ratings on the products plugged into the extension cord do not exceed the extension cord r...

Page 5: ...point for the recycling of waste electrical and electronic equipment The separate collection and recycling of your waste equipment at the time of disposal will help to conserve natural resources and...

Page 6: ...ion configuration In the Bonding mode the device will aggregate multiple connected networks to push video to the aggregation server at first then the aggregation server distributes the video to multip...

Page 7: ...st s bandwidth and reliability by bonding multiple connected networks LAN WIFI and 3x4G can be used simultaneously Support multi channel network bonding streaming mode up to 9 RTMP Address stream at t...

Page 8: ...e Connection 2 1 What s in the Box Encoder includes LiveV2x0 or LiveV3x0 unit DC Power Adapter 1 x 4G Antenna for LiveV2x0 and LiveV310 3 or 5 4G Antenna for LiveV300 1 x WIFI Antenna Hot shoes USB 4G...

Page 9: ...Quick Start Guide 4 LiveV200 TOP 1 2 3 7 6 4 5 a 8 9 10 13 12 11 14 b c...

Page 10: ...Quick Start Guide 5 LiveV300 TOP Live310 TOP Live210 TOP 2 2 1 Physical Connections Label Name Icon Description Line In Stereo audio input SDI Input Connect up to SDI signal 1 2...

Page 11: ...to USB WIFI Dongle 3 5mm Audio Output For audio confidence monitoring Plays the audio for the currently visible channel TF Card Slot Plug the TF card in here HDMI Loop Out Connect a HDMI cable from t...

Page 12: ...tion LiveV210 don t have LCD Label Description The IP address of LAN network The IP address of wireless network HDMI signal input Display Resolution and Frame Rate of HDMI inputs SDI signal input Disp...

Page 13: ...y 0 kb when the streaming is offline Battery Level and Battery percentage Time Power Off Hide Display desktop Hide Display text and icons on the LCD screen Lock Unlock screen Video Collage Customize l...

Page 14: ...n also fill in network parameters WIFI At first please switch the WIFI button is Open then the user can press the Scan button find WIFI name and connect it Another way is to press the Other button the...

Page 15: ...ection status operator and internet status 2 Live Live Live Button for Start Stop streaming Url combination of RTMP Url and Stream Key equivalent to RTMP Address Network select User can select LAN WIF...

Page 16: ...ut Audio select LINE IN Use the analog stereo input as the audio source HDMI Use the embedded digital stereo audio of HDMI input as the audio source SDI Use the embedded digital stereo audio of SDI in...

Page 17: ...is 30 Bit rate kbps The bitrate range of LiveV200 is 100 kbps 10 000 kbps The default value is 2 000 kbps The bitrate range of LiveV300 is 100 kbps 20 000 kbps I Frame interval The range of I frame in...

Page 18: ...5 QR code Please scan by mobile browser and log in to your account to set up the device 6 System About equipment Display device Name model Serial Number Hardware version Software version and support u...

Page 19: ...Quick Start Guide 14 Software version Display current Software version and support users upgrade software while network was connected Language Language can be choose from English or Chinese simplified...

Page 20: ...Step1 Make the Power Adapter plugged Step2 Press the RED Power button on the left of encoder to turn on the system Step3 Turn on your camera or video source and connect the output to corresponding co...

Page 21: ...o Chapter3 Encoder Web Control User Interface for subsequent settings Step7 Press to push video go live NOTE SIM don t support hot plugging so turn off the unit before plug When WIFI connection settin...

Page 22: ...ill show on the LCD once connected to LAN or WIFI users can enter the IP address into the address bar of the web browser on PC or phone and then the encoder Web Control User Interface will be shown as...

Page 23: ...and support users change device name After clicking the Rename option the Rename window show as follows users can enter a new device name and click the confirm button to apply and save the setting 3 3...

Page 24: ...be enabled all of this network relevant parameters will be set automatically Furthermore user can also choose to turn off IP Auto and fill in network related parameters Last click the confirm button t...

Page 25: ...ble built in WIFI via Power button If the Power option is ON there are two ways to connect WIFI 1 After clicking the scan button find WIFI name and connect it 2 After clicking the Manual Input button...

Page 26: ...don t forget to restart the device to take effect 3 4 4 Side USB 4G or multiple backpack 4G Side USB 4G This Page contains information about Side USB 4G and backpack 4G including Signal Level Mobile...

Page 27: ...en insert the USB dongle into one of your computer ports The computer identifies the new hardware and starts installation automatically When the installation is complete The USB dongle web management...

Page 28: ...nected to 4G that means setting finished The device will connect to 4G LTE network automatically later on Now you can insert the USB 4G Dongle to any USB port of encoder for video streaming If connect...

Page 29: ...or passed through HDMI Use the embedded digital stereo audio of HDMI input as the audio source SDI Use the embedded digital stereo audio of SDI input as the audio source LINE IN Use the analog stereo...

Page 30: ...is not enough In this situation target bitrate can be lowered to improve the performance The resolution can also be lowered if bitrate is low I Frame Interval The range of I frame interval is 5 200 T...

Page 31: ...streaming Connection Status Display connected when the encoder is streaming otherwise display Unconnected Model Signal use selected network in Streaming network to streaming Bonding The LiveV200 aggre...

Page 32: ...dy enabled live stream you can skip this step Log in YouTube account and go to dashboard http www youtbue com live_dashboard Enabling a live stream for the first time may take up to 24 hours Once enab...

Page 33: ...y means offline Yellow means bad health due to latency packet loss jitter or other Stream share link can be found on the right corner or right click video the copy the stream share link NOTE YouTube r...

Page 34: ...ook com 80 rtmp 2121666731211940 ds 1 s_sw 0 s_vt api s a ATiS8VKkOo9OM60f Select Enable persistent stream key if you want your stream key to be permanent If this isn t selected you won t be able to u...

Page 35: ...ly The URL StreamKey of twitch looks like rtmp server stream_key You can find best server in your area at twitch tv https stream twitch tv ingests Here is an example rtmp live sfo twitch tv app live_2...

Page 36: ...can be found instantly Copy and paste the server URL and stream key into the RTMP settings of encoder Now configuration finished Press to start live streaming A preview screen will appear at Producer...

Page 37: ...n in the above figure click to change OSD Image size the range of image length and width is 32Pixel 480Pixel If the image size does not conform to the requirements the image will be automatically hidd...

Page 38: ...480x480 pixels After press the set button if the picture is fits user can preview the picture in the grid area on the left 3 9 Video Collage After clicking the Video Collage option on the left column...

Page 39: ...DI After clicking Size button on the right of HDMI or SDI the Set Collage size window show as follows then the user can change the size of HDMI or SDI Furthermore the user can drag and drop HDMI and S...

Page 40: ...rocedure Keep network connected while upgrading do not power off encoder will reboot when upgrade is successful Online Upgrade please press the Check button to check current version first After detect...

Page 41: ...olumn of the web control UI users can see the Recovery option control page Shutdown Press the Shutdown button to shut down the encoder Reboot Press the Reboot button to restart the Encoder Restore to...

Page 42: ...f you don t have an account yet please click Create account at the bottom of the picture to create your own account After logging in to your personal account and entering the interface as shown below...

Page 43: ...under dashboard Enter the interface as shown below to start configuring the device First you will see the Devices status optional control page In the Devices Status control page the user can view info...

Page 44: ...Push Status If the device is streaming Push On is displayed otherwise Push Off is displayed Bonding Enable If the Bonding mode is turned on Bonding On is displayed otherwise Bonding Off is displayed...

Page 45: ...d Devices Battery Percentage of remaining battery power If the device is charging Charging is displayed otherwise Uncharged is displayed 4 2 Base Info In the Base Info optional control page user can v...

Page 46: ...w to select Stream Mode 1 When the Stream Mode is selected as Automatic the device will automatically select one of connected network as the current streaming network the priority order is LAN WIFI Bu...

Page 47: ...sit this IP in browser for advanced feature settings once having it If LAN Connected does not show in this screen that means the encoder does not connect to LAN or the LAN is not online Please check c...

Page 48: ...Bonding Mode button to turn on off bonding mode RTMP Url Fill in the Stream address please refer 3 7 RTMP Para to get Url and Stream name 4 5 Input In the Input optional control page there are three d...

Page 49: ...ser can choose to turn on off auto Gain the default setting of auto gain is on at this condition user can manually set a volume The range of volume is 0 100 HDMI Use the embedded digital stereo audio...

Page 50: ...efault value is FHD 1080P Frame Rate fps The range of frame rate is 5 30 and 25 30 is recommended The default value is 30 Bitrate kbps The range of bit rate is 100 kbps 10000 kbps The default value is...

Page 51: ...D for details Hidden show Click to hide show OSD components Test_2 is hidden in the above figure Update click to change a new OSD image or re edit text Delete delete OSD components Image After clickin...

Page 52: ...ext button the Text window will pop up in the page for the user to edit the text OSD that Include Title Content Color Background and font Size The background will be transparent when switch the Transp...

Page 53: ...onal control page the user can choose up to 6 different standard video collage that including HDMI FIRST SDI FIRST HDMI BIG SDI SMALL SDI BIG HDMI SMALL HDMI LEFT SDI RIGHT and SDI LEFT HDMI RIGHT Fur...

Page 54: ...Mobile Phone Backend Setting 47...

Page 55: ...I or SDI the Set Collage size window show as follows then the user can change the size of HDMI or SDI Furthermore when HDMI and SDI overlap the user can select the arrow on the left of the HDMI to pla...

Page 56: ...haring optional control page users can set the sharing mode of the device including the Open sharing Administrator audit and Prohibition of sharing Once the user has opened the device sharing anyone c...

Page 57: ...Mobile Phone Backend Setting 50 4 11 Upgrade In the Upgrade optional control page users can check and upgrade the firmware version of the device here...

Page 58: ...Mobile Phone Backend Setting 51 4 12 Device Wallet In the Device wallet optional control page users can recharge devices money check recharge records consumption records and coupon...

Page 59: ...V 2 2K Bias 60db gain adj Input SDI SD SDI HD SDI 3G SDI SMPTE 296M 274M 292M HDMI 1 4a Audio Analog and SDI HDMI Embedded Audio Configuration Config WEB WEB LAN or WIFI LCD Menu Interface SDI Input 1...

Reviews: