background image


Getting Started 

 
Preparation 

Inside the box, please find   
1) PTZ Camera 
2) Power supply and power cord 
3) Remote control 

WARNING: Don’t move or rotate the camera by seizing the camera head. 

 
You also need 
1) Two AAA alkaline battery for the remote control 
2) Video monitor with HDMI input, or SDI input 
3) RJ45 LAN cable. 
4) PC or Laptop. 
 

Connection 

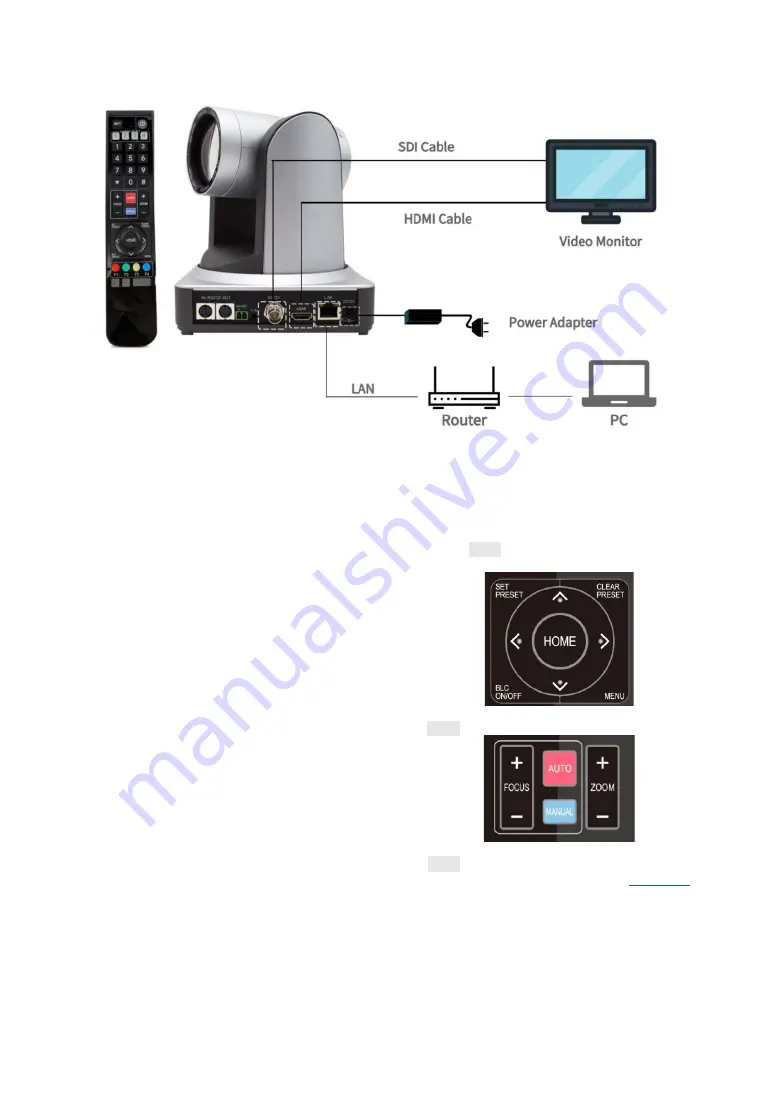
Connect HDMI output as the diagram to video monitor. If you are 
professional and has SDI monitor, you can also try connect SDI 
output to the video monitor instead. 
 

Power on 

Connect the power supply, no power switch. Instantly, you will see 
the camera starts rotate to its default parking position of front 
middle. 
 
A LED in front will be in RED flash, and turn to stead GREEN in 
couple of seconds. 
 
Now, you will see crystal and beautiful video pictures on the 
monitor.   
 

Note:

 If no video picture, please 

1) Check power supply. Make sure the front LED turn on. 
2) Check cable connection and make sure the input video source of the 
monitor is set correctly. 


Control the Camera by Remoter 

 
Put two AAA batteries inside the remote control. Point to the front 
of the PTZ camera. Use the four arrow buttons to control the pan 
and tilt. Press HOME always park the camera at the front middle 
anytime. 


Press ZOOM +/- to change far/near. 


Press  MENU  to set up the camera. For detail camera control by 
remote control, please refer to chapter 3 of th

User Manual


ENGLISH 

Summary of Contents for 90481-980

Page 1: ...rage rapide Schnellstartanleitung Guida Rapida Guía de inicio rápido クイック インストール ガイド English 1 Français 3 Deutsche 5 Italiano 7 Español 9 日本語 11 PTZ HDMI SDI Camera PTZ NDI HX Camera Zowietek Electronics Ltd Printed in China 20201020 ...

Page 2: ... starts rotate to its default parking position of front middle A LED in front will be in RED flash and turn to stead GREEN in couple of seconds Now you will see crystal and beautiful video pictures on the monitor Note If no video picture please 1 Check power supply Make sure the front LED turn on 2 Check cable connection and make sure the input video source of the monitor is set correctly Control ...

Page 3: ...68 5 26 for example Web login and control Now you can access the camera open web browser type IP address 192 168 5 163 then Enter to go to the camera login page Select language English User name admin Password admin At this time you can see the preview of camera video Do the pan tilt and zoom control via LAN For detail advanced network and NDI setting and control please refer to chapter 4 of the U...

Page 4: ... appareil de photo tourner à son défaut en garant la position de milieu de devant Une LED à l avant sera en flash ROUGE et se tourner vers la place GREEN en quelques secondes Maintenant vous verrez du cristal et belle image vidéo sur le moniteur Remarque si aucune image vidéo veuillez 1 Vérifiez l alimentation électrique Assurez vous que le voyant avant s allume 2 Vérifiez la connexion du câble et...

Page 5: ...us pouvez accéder à la caméra ouvrir le navigateur Web saisir l adresse IP 192 168 5 163 puis Entrée pour accéder à la page de connexion de la caméra Sélectionnez la langue English User name admin Password admin À ce stade vous pouvez voir l aperçu de la vidéo de la caméra Contrôlez le panoramique l inclinaison et le zoom via LAN Pour plus de détails sur la configuration et le contrôle avancés du ...

Page 6: ...ion in der vorderen Mitte dreht Eine LED vorne leuchtet ROT und leuchtet in wenigen Sekunden GRÜN Jetzt sehen Sie Kristall und wunderschöne Videobilder auf dem Monitor Hinweis Hinweis Wenn kein Videobild bitte 1 Überprüfen Sie die Stromversorgung Stellen Sie sicher dass die vordere LED leuchtet 2 Überprüfen Sie die Kabelverbindung und stellen Sie sicher dass die Eingangsvideoquelle des Monitors ri...

Page 7: ...Kontrolle Jetzt können Sie auf die Kamera zugreifen den Webbrowser öffnen die IP Adresse 192 168 5 163 und dann Enter eingeben um zur Anmeldeseite der Kamera zu gelangen Sprache auswählen English User name admin Password admin Zu diesem Zeitpunkt können Sie die Vorschau des Kamera Videos sehen Führen Sie die Schwenk Neige und Zoomsteuerung über LAN durch Ausführliche Informationen zur erweiterten ...

Page 8: ...ntrale Un LED nella parte anteriore lampeggerà in ROSSO e diventerà VERDE fisso in un paio di secondi Ora vedrai immagini video cristalline e bellissime sul monitor Nota se nessuna immagine video per favore 1 Verificare l alimentazione Assicurati che il LED anteriore si accenda 2 Controllare il collegamento del cavo e assicurarsi che la sorgente video in ingresso del monitor sia impostata corretta...

Page 9: ...esempio Accesso e controllo web Ora puoi accedere alla telecamera aprire il browser web digitare l indirizzo IP 192 168 5 163 quindi Enter per andare alla pagina di accesso della telecamera Seleziona lingua English User name admin Password admin A questo punto puoi vedere l anteprima del video della videocamera Effettua il controllo di panoramica inclinazione e zoom tramite LAN Per informazioni de...

Page 10: ...lantera central Un LED al frente estará en rojo parpadeando y se volverá VERDE en un par de segundos Ahora verá imágenes de video hermosas y cristalinas en el monitor Nota si no hay imagen de video por favor 1 Verifique la fuente de alimentación Asegúrese de que el LED frontal se encienda 2 Verifique la conexión del cable y asegúrese de que la fuente de video de entrada del monitor esté configurad...

Page 11: ...e sesión y control web Ahora puede acceder a la cámara abrir el navegador web escribir la dirección IP 192 168 5 163 luego Enter para ir a la página de inicio de sesión de la cámara Seleccionar idioma English User name admin Password admin En este momento puede ver la vista previa del video de la cámara Realice el control de panorámica inclinación y zoom a través de LAN Para obtener información de...

Page 12: ... SDI 入力につなげて下さい 電源オン 電源スイッチはありません 電源をつなげると設備オンになります 電源 オンになるとカメラ がすぐ真正面の初期位置に自動的にセッチングさ れます 正面の LED が赤に点滅してから数秒でに緑になります それから表示機に綺麗な画像が表示されます 備考 もし画像が表示せれなければ下記の事を確認して下さい 1 電源を確認して下さい 正面の LED がつくようにして下さい 2 ケーブルの接続を確認し モニターの入力ビデオソースが正しく設定 されていることを確認します リモートコントロールでカメラを操作する アルカリ AAA バッテリー2 個をリモートコントロールに入れて 下さい PTZ カメラの前面をポイントして下さい 4 つの方向コ ントロールキーでカメラの方向パンとチルトを制御してくださ い HOME キーでカメラを初期位置に戻せる事ができます ZOOM ...

Page 13: ...内の他のコンピューター またはデバイスと同じにすることはできません 5 詳細設定キーをクリックしてください 新しい IP を入れ て下さい 例えば 192 168 5 26 ウエブサイトログインと制御 これで カメラを訪問する事ができます ブラウザーを開いて 下さい IP アドレス 192 168 5 163 を入力して下さい Enter キ ーを押してカメラのログインページに移動で下さい Select language English User name admin Password admin 今 カメラビデオのプレビューを見えます ホームページでカ メラの移動 左右 遠近の調整ができます 高度なネットワー クと NDI の設定と制御の詳細については取説の第 4 章をご確認 下さい カメラの IP アドレスを変更する 今後便利のためカメラの IP アドレスとネットアドレス同じよ うに設...

Page 14: ...der Since 2004 Zowietek Electronics Ltd 2218 Hunan Road West Wing 1701 Pudong Shanghai 201204 PN 9048x 980 9049x 980 Mar 2021 www zowietek com www zowietek com documents www zowietek com faq NDI is a registered trademark of NewTek Inc and is authorized to Minrray ...

Reviews: