background image

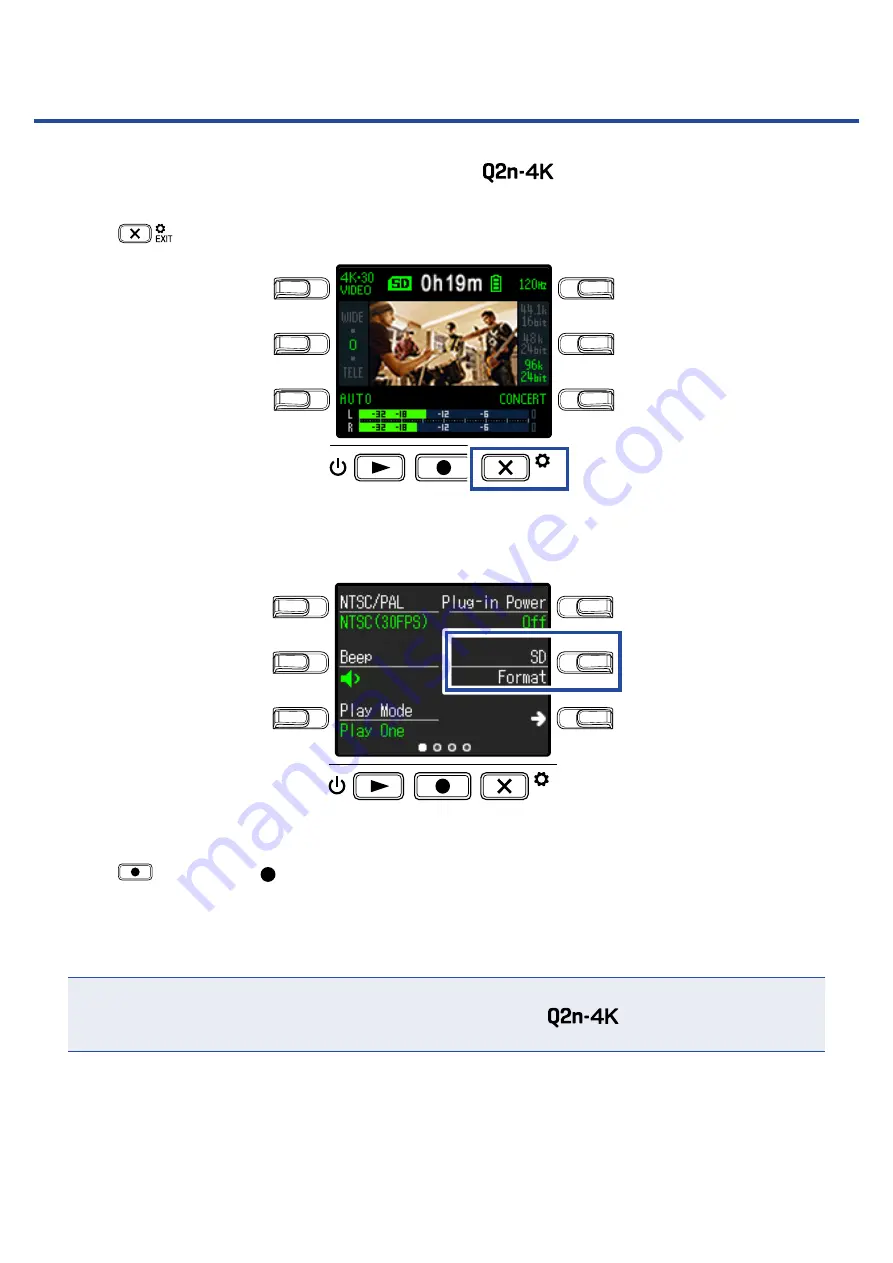
Formatting microSD cards

To maximize the performance of a microSD card, use the 

 to format it.

1. 

Press 

 on the Recording Screen.

LO CUT

VIDEO

AUDIO

FOV

AUTO GAIN

SCENE

EXIT

This opens the Setting Screen.

2. 

Press 

SD Format

.

LO CUT

VIDEO

AUDIO

FOV

AUTO GAIN

SCENE

EXIT

This opens a formatting confirmation screen.

3. 

Press 

 to select 

Yes 

.

This will start microSD card formatting.
“Done" will appear on the display when formatting completes.

NOTE

• After purchasing a new microSD card, always format it using the 

.

• All data previously saved on the microSD card will be deleted when it is formatted.

53

Summary of Contents for Q2n-4K

Page 1: ...ing or reprinting this manual in part or in whole without permission is prohibited You must read the Usage and Safety Precautions before use This document cannot be displayed properly on black and white displays Operation Manual ...

Page 2: ...es registered trademarks and company names in this document are the property of their respective companies Note All trademarks and registered trademarks in this document are for identification purposes only and are not intended to infringe on the copyrights of their respective owners Recording from copyrighted sources including CDs records tapes live performances video works and broadcasts without...

Page 3: ...our times as detailed as full HD With ultra high resolution technology clarity is not lost even when changing viewing angles Capture extreme lighting changes beautifully Incorporating high dynamic range HDR technologies enables video recording of live performances with extreme lighting changes that avoids undersaturation and oversaturation Scene settings for a wide range of filming conditions Alon...

Page 4: ... 18 Setting the scene type 19 Setting low frequency noise reduction 20 Setting the audio quality 20 Adjusting recording levels 21 Adjusting levels manually 21 Using automatic level adjustment 22 Recording 23 Connecting external input devices 24 Playing recordings 25 Playback Screen overview 25 Playing recordings 26 Playback operations 27 Adjusting the output volume 28 Headphone line output 29 View...

Page 5: ...klight time 43 Setting the Auto Power Off function 45 Setting the date and time 47 Setting the volume of the operation sound 48 Enabling continuous playback 49 Using mics that support plug in power 50 Setting the standard frame rate 51 Setting the language shown 52 Formatting microSD cards 53 Restoring factory default settings 54 Updating the firmware 56 Responding to warning messages 58 Troublesh...

Page 6: ... Built in XY mic The two crossing directional mics can record a three dimensional sound with natural depth and width Lens This lens has an F2 8 brightness and 150 wide angle REC LED This LED shows the recording status It lights red during recording 6 ...

Page 7: ...on buttons Use these to operate the functions shown on the display POWER PLAY button Use this to turn the power ON OFF and to start video playback REC button Use this to start and stop recording Use this to confirm on setting and confirmation screens SETTING EXIT button Use this to open and close the Setting Screen Use this to cancel on setting and confirmation screens 7 ...

Page 8: ...nd from a connected device Input volume dial Use to adjust the recording level USB port Connect this to a computer or iOS device to use as a web camera card reader or USB mic The dedicated AC adapter ZOOM AD 17 can also be connected here to use AC power Micro HDMI connector This can output video and audio to an HDMI compatibleTV or other device Strap hole A strap can be attached to help prevent dr...

Page 9: ...SD card compartment cover Tripod mounting threads Battery SD card compartment cover Remove when installing batteries and microSD cards Tripod mounting threads Use these screw threads to attach a tripod not included 9 ...

Page 10: ...atteries 1 Open the battery card compartment cover 2 Install the batteries AA batteries 3 Close the battery card compartment cover NOTE After installing batteries set the correct battery type Setting the type of battery used on page 41 10 ...

Page 11: ...Using an AC adapter 1 Connect the cable of an AD 17 AC adapter to the USB port 2 Plug the AC adapter into an outlet HINT When connected to a computer power can be supplied by USB 11 ...

Page 12: ...inserting or removing a microSD card Inserting or removing a card while the power is on could result in data loss When inserting a microSD card be sure to insert the correct end with the top side up as shown After purchasing a new microSD card always format it using the to maximize performance To format a microSD card see Formatting microSD cards on page 53 Use a microSD card that is Class 10 or h...

Page 13: ...he power on 1 Press and hold After startup completes the REC LED on the front will light green and the Recording Screen will ap pear on the display HINT To turn the power off keep pressing until Goodbye SeeYou appears on the display 13 ...

Page 14: ... display and date and time settings can be changed later on the Setting Screen Setting the language shown on page 52 Setting the date and time on page 47 Setting the language shown 1 Use and to select the language displayed LO CUT VIDEO AUDIO FOV AUTO GAIN SCENE EXIT 2 Press to confirm LO CUT VIDEO AUDIO FOV AUTO GAIN SCENE EXIT 14 ...

Page 15: ...Setting the date and time 1 Press the button for the item to be set LO CUT VIDEO AUDIO FOV AUTO GAIN SCENE EXIT 2 Press to confirm LO CUT VIDEO AUDIO FOV AUTO GAIN SCENE EXIT 15 ...

Page 16: ...cording time In recording standby available recording time Remaining battery charge VIDEO setting FOV setting SCENE setting LO CUT setting AUDIO setting AUTO GAIN setting HINT If the power is turned on when connected to a computer the USB function selection screen will open Turning the power on when connected to a computer on page 37 16 ...

Page 17: ... priority Large 4K 24 CINEMA 3840 2160 24 Record 4K video quality Record with the frame rate used for filming movies This is good for recording movies and music videos 1080 60 SMOOTH 1920 1080 60 Use when you want to record subjects that move quickly 1080 30 VIDEO 1920 1080 30 This is suitable for all kinds of video recording 1080 24 CINEMA 1920 1080 24 Record with the frame rate used for filming ...

Page 18: ... of view FOV for videos 1 Press FOV on the Recording Screen to set the field of view LO CUT VIDEO AUDIO FOV AUTO GAIN SCENE EXIT Setting Explanation Distortion correction WIDE This widens the field of view 0 TELE This narrows the field of view 18 ...

Page 19: ...s are made for night and other dark situations CONCERT LIGHT Settings are suitable for concert lighting that is bright and changes drastically JAZZ CLUB Settings are suitable for jazz clubs and similar venues DANCE CLUB Settings are suitable for dance clubs and venues where lighting changes drasti cally MONOCHROME Recording is processed to be like black and white film SEPIA Recording is processed ...

Page 20: ...cutoff frequency is set the stronger the low frequency noise reduction effect will be Since this also affects other low frequency sounds though check the effect while you are making this setting Setting the audio quality This sets the sampling frequency kHz and bit rate 1 Press AUDIO on the Recording Screen to set the audio quality LO CUT VIDEO AUDIO FOV AUTO GAIN SCENE EXIT Setting Explanation Au...

Page 21: ...ak indicators light and the REC LED on the front blinks when loud sounds are input Recording when the indicators are lit could cause the sound to become distorted Lower the input vol ume to avoid this If the sound distorts even when you lower the input volume try changing mic positions and adjusting the output levels of connected devices HINT To clear the peak indicators press to open the Setting ...

Page 22: ...DIO FOV AUTO GAIN SCENE EXIT Setting Explanation OFF This disables automatic level adjustment Adjust the recording level manually CONCERT This is suitable for recording band performances concerts and other loud situa tions SOLO Use for solo performances and other quiet sounds MEETING Use for meetings and field recordings NOTE When automatic gain adjustment is in use manual adjustments cannot be ma...

Page 23: ...ll turn off automatically Wait for the temperature to decrease before using it again By connecting an HDMI compatibleTV or other device you can monitor the video and audio during recording Viewing on an HDMI compatibleTV on page 30 The maximum resolution of HDMI output is 1920 1080 when recording When recording video connecting or disconnecting an HDMI cable will cause video and audio record ing t...

Page 24: ...ng video or audio 1 Connect the external mic or audio device to the external input jack EXT IN NOTE The built in mics are disabled when an external device is connected to the external input jack HINT This jack can provide plug in power to mics that use it Using mics that support plug in power on page 50 24 ...

Page 25: ... Recording Screen press to open the Playback Screen Remaining battery charge Progress bar shows playback position Remaining playback time Status indicator Playing Paused Stopped Current file total number of files File name Peak indicators Level meters 25 ...

Page 26: ...ding Screen LO CUT VIDEO AUDIO FOV AUTO GAIN SCENE EXIT Playback of the last recorded file or the most recently played file will start NOTE The can only play videos that it recorded 2 Press to stop playback and reopen the Recording Screen 26 ...

Page 27: ...Press Search forward Press and hold Search backward Press and hold Selecting files Move to next file Press Move to previous file Press Playing files continuously Playback can be set so that after playback of one file completes the next file can be played back without stopping Enabling continuous playback on page 49 27 ...

Page 28: ...sting the output volume 1 Use to adjust the volume LO CUT VIDEO AUDIO FOV AUTO GAIN SCENE EXIT HINT The volume can be adjusted separately for the speaker and headphones The volume can be set from 0 to 30 28 ...

Page 29: ...isten to the audio with headphones or an external audio amplifier 1 Connect headphones or audio equipment to the headphone jack using a stereo mini plug cable HINT When the Recording Screen is open you can monitor the input sound 29 ...

Page 30: ... and audio LO CUT VIDEO AUDIO FOV AUTO GAIN SCENE EXIT The display on the recorder will turn off and the recorded file will play on theTV screen HINT The recorder can be operated while outputting to aTV Playback operations on page 27 NOTE DuringTV output file information cannot be shown and files cannot be deleted SomeTVs do not support some audio formats so correct playback might not always be po...

Page 31: ...bout the current playback file 1 Press on the Playback Screen LO CUT VIDEO AUDIO FOV AUTO GAIN SCENE EXIT This shows information about the current playback file Information about the duration size date time video and audio can be checked 2 Press This reopens the Playback Screen 31 ...

Page 32: ...T The deletion screen will open 2 Press to select a file LO CUT VIDEO AUDIO FOV AUTO GAIN SCENE EXIT A check will appear in the box at the top left of the file image HINT You can use and to change files and add checks to multiple files 3 Press LO CUT VIDEO AUDIO FOV AUTO GAIN SCENE EXIT This opens a deletion confirmation screen 32 ...

Page 33: ...4 Press to select Yes LO CUT VIDEO AUDIO FOV AUTO GAIN SCENE EXIT The checked files will be deleted To cancel deletion press to select No 33 ...

Page 34: ... a computer or iOS device and use the recorder as a web camera card reader or USB mic 1 Press on the Recording Screen LO CUT VIDEO AUDIO FOV AUTO GAIN SCENE EXIT This opens the Setting Screen 2 Press LO CUT VIDEO AUDIO FOV AUTO GAIN SCENE EXIT This opens the USB Connection Setting Screen 34 ...

Page 35: ...ard reader on page 39 Card reader for iOS Use as an SD card reader with an iOS device Using as a card reader on page 39 USB Mic Use as a USB mic with a computer Using as a USB mic on page 40 USB Mic for iOS Use as a USB mic with an iOS device Using as a USB mic on page 40 4 Press on the Confirmation Screen to select Yes LO CUT VIDEO AUDIO FOV AUTO GAIN SCENE EXIT This activates the selected functi...

Page 36: ...a computer power can be supplied by USB When connected to an iOS device use batteries because power cannot be supplied by USB A list of iOS devices that have been confirmed to work with this unit can be checked at www zoom co jp An iPad Camera Connection Kit or Lightning to USB Camera Adapter not included is necessary to connect to an iOS device 36 ...

Page 37: ...e USB function selection screen will open 1 Use and to select the function to use LO CUT VIDEO AUDIO FOV AUTO GAIN SCENE EXIT 2 Press to confirm LO CUT VIDEO AUDIO FOV AUTO GAIN SCENE EXIT 3 Press on the Confirmation Screen to select Yes This activates the selected mode Press to open the Recording Screen 37 ...

Page 38: ...efer to the manual for the application that you are using for the procedures to select the 3 To end the connection conduct the necessary disconnection procedures on the computer Compensating for lags between video and audio If a timing difference occurs between the video and audio when using the recorder as a web camera you can set an audio delay time so that it matches the timing of the video 1 D...

Page 39: ...reen on the computer or iOS device and show the contents of the mi croSD card in the 3 Work with the files on the microSD card 4 To end the connection conduct the necessary disconnection procedures on the computer or iOS de vice HINT Refer to the manual for the computer or iOS device that you are using for detailed operation procedures 5 Press 6 Press on the Confirmation Screen to select Yes This ...

Page 40: ...r or iOS device and select the HINT Refer to the manual for the application that you are using for the procedures to select the 3 To end the connection conduct the necessary disconnection procedures on the computer or iOS de vice Enabling direct monitoring The input sound can be monitored directly during USB mic use 1 During USB mic use press DIRECT MNTR LO CUT VIDEO AUDIO FOV AUTO GAIN SCENE EXIT...

Page 41: ...d so that the amount of remaining battery charge can be accurately displayed 1 Press on the Recording Screen LO CUT VIDEO AUDIO FOV AUTO GAIN SCENE EXIT This opens the Setting Screen 2 Press three times to change the Setting Screen LO CUT VIDEO AUDIO FOV AUTO GAIN SCENE EXIT 41 ...

Page 42: ...3 Press BatteryType to set the type of battery used LO CUT VIDEO AUDIO FOV AUTO GAIN SCENE EXIT The options are Alkaline Ni MH and Lithium 4 Press This reopens the Recording Screen 42 ...

Page 43: ...e saved by shortening the amount of time that the backlight stays lit 1 Press on the Recording Screen LO CUT VIDEO AUDIO FOV AUTO GAIN SCENE EXIT This opens the Setting Screen 2 Press three times to change the Setting Screen LO CUT VIDEO AUDIO FOV AUTO GAIN SCENE EXIT 43 ...

Page 44: ...CENE EXIT Setting Explanation Off The backlight always stays bright 1 min The backlight dims if no operation occurs for 1 minute 3 min The backlight dims if no operation occurs for 3 minutes 5 min The backlight dims if no operation occurs for 5 minutes 4 Press This reopens the Recording Screen 44 ...

Page 45: ...battery power NOTE This function is disabled during recording and playback as well as when it is powered through its USB port 1 Press on the Recording Screen LO CUT VIDEO AUDIO FOV AUTO GAIN SCENE EXIT This opens the Setting Screen 2 Press three times to change the Setting Screen LO CUT VIDEO AUDIO FOV AUTO GAIN SCENE EXIT 45 ...

Page 46: ...ion Off The Auto Power Off function is disabled 1 min The power will turn off automatically 1 minute after the last operation 3 min The power will turn off automatically 3 minutes after the last operation 5 min The power will turn off automatically 5 minutes after the last operation 4 Press This reopens the Recording Screen 46 ...

Page 47: ...een LO CUT VIDEO AUDIO FOV AUTO GAIN SCENE EXIT This opens the Setting Screen 2 Press two times to change the Setting Screen LO CUT VIDEO AUDIO FOV AUTO GAIN SCENE EXIT This opens the Date andTime Setting Screen 3 Press the button for the item to be set LO CUT VIDEO AUDIO FOV AUTO GAIN SCENE EXIT 4 Press This reopens the Recording Screen 47 ...

Page 48: ...UT VIDEO AUDIO FOV AUTO GAIN SCENE EXIT This opens the Setting Screen 2 Press Beep and set the volume LO CUT VIDEO AUDIO FOV AUTO GAIN SCENE EXIT Setting Explanation No operation sound is output A low volume operation sound is output A high volume operation sound is output 3 Press This reopens the Recording Screen 48 ...

Page 49: ...een 2 Press Play Mode and set whether continuous playback is enabled LO CUT VIDEO AUDIO FOV AUTO GAIN SCENE EXIT Setting Explanation Play One Playback stops after one file completes playing Play All After one file completes playing the next file plays back without stopping Files will play back in the order of the time they were recorded Playback will stop after the most recent file completes playi...

Page 50: ...m the for mics that support it 1 Press on the Recording Screen LO CUT VIDEO AUDIO FOV AUTO GAIN SCENE EXIT This opens the Setting Screen 2 Press Plug in Power and set it to On LO CUT VIDEO AUDIO FOV AUTO GAIN SCENE EXIT 3 Press This reopens the Recording Screen 50 ...

Page 51: ...g Screen 2 Press NTSC PAL to set the standard frame rate LO CUT VIDEO AUDIO FOV AUTO GAIN SCENE EXIT Setting Explanation NTSC 30 FPS The standard frame rate for the NTSC format is used for recording PAL 25 FPS The standard frame rate for the PAL format is used for recording The VIDEO setting options will change to 4K 25 VIDEO 1080 50 SMOOTH 1080 25 VIDEO and 720 25 VIDEO 3 Press This reopens the R...

Page 52: ...UT VIDEO AUDIO FOV AUTO GAIN SCENE EXIT This opens the Setting Screen 2 Press three times to change the Setting Screen LO CUT VIDEO AUDIO FOV AUTO GAIN SCENE EXIT 3 Press Language LO CUT VIDEO AUDIO FOV AUTO GAIN SCENE EXIT This changes the display language 4 Press This reopens the Recording Screen 52 ...

Page 53: ...ng Screen 2 Press SD Format LO CUT VIDEO AUDIO FOV AUTO GAIN SCENE EXIT This opens a formatting confirmation screen 3 Press to select Yes This will start microSD card formatting Done will appear on the display when formatting completes NOTE After purchasing a new microSD card always format it using the All data previously saved on the microSD card will be deleted when it is formatted 53 ...

Page 54: ... on the Recording Screen LO CUT VIDEO AUDIO FOV AUTO GAIN SCENE EXIT This opens the Setting Screen 2 Press three times to change the Setting Screen LO CUT VIDEO AUDIO FOV AUTO GAIN SCENE EXIT 3 Press Setting Reset LO CUT VIDEO AUDIO FOV AUTO GAIN SCENE EXIT This opens a reset confirmation screen 54 ...

Page 55: ...4 Press to select Yes LO CUT VIDEO AUDIO FOV AUTO GAIN SCENE EXIT This starts resetting the After resetting completes the power will automatically turn off 55 ...

Page 56: ...the firmware update file to the root directory on a microSD card The latest firmware update file can be downloaded from www zoom co jp 3 Insert the microSD card into the microSD card slot 4 While pressing press to turn the power on LO CUT VIDEO AUDIO FOV AUTO GAIN SCENE EXIT This opens an update confirmation screen 5 Press to select Yes LO CUT VIDEO AUDIO FOV AUTO GAIN SCENE EXIT This opens a fina...

Page 57: ...6 Press to select Yes After updating completes a notification screen appears NOTE Do not turn the power off during a firmware update 7 Press and hold to turn the power off 57 ...

Page 58: ...opped because the writing speed to the microSD card was insuffi cient Use a microSD card that has been formatted by the and con firmed to work with it Please check the list of cards that have been confirmed to work on the ZOOM website www zoom co jp The microSD became full Delete unneeded data or replace it with a new microSD card The power will turn off because the temperature inside the unit has...

Page 59: ...t device Recording audio video is not possible Checked the remaining recordable time on the Recording Screen Recording Screen overview on page 16 A Low Speed Card warning appears frequently Stopping recording takes a very long time microSD cards can become worn out Speed can decrease after repeated writing and erasing Formatting the card with the might improve this Formatting microSD cards on page...

Page 60: ...ed headphone line stereo mini jack HDMI microType D Built in speaker 300 mW 8 Ω mono speaker Recording media microSD microSDHC microSDXC 256 GB maximum USB micro USB WEBCAM Class UVC 1 0 UAC 1 0 Formats 720 p WVGA video 48 kHz 16 bit audio CARD READER Class USB Mass Storage USB MIC Class UAC 1 0 Format 44 1 kHz 16 bit Note card reader and USB mic functions support iOS devices Power 2 AA batteries ...

Page 61: ...ZOOM CORPORATION 4 4 3 Kanda surugadai Chiyoda ku Tokyo 101 0062 Japan www zoom co jp Z2I 3402 01 ...

Reviews: