background image

ProFace X Series


User Manual 

P a g e

 |  12 


Copyright©2022 ZKTECO CO., LTD. All rights reserved. 


Face Registration and Authentication Methods 

Instructions to register a face: 


When registering a face, maintain a distance of 40cm to 80cm between the device and the face. 


Be careful not to change the facial expression. (smiling face, drawn face, wink, etc.) 


If you do not follow the instructions on the screen, the face registration may take a longer time or 
may fail. 


Be careful to not cover the eyes or eyebrows. 


Do not wear hats, masks, sunglasses, or eyeglasses. 


Be careful to not show two faces on the screen. Register one person at a time. 


It is recommended for a user wearing glasses to register both the faces with and without glasses. 

Instructions to authenticate a face: 


Ensure that the face appears inside the detection area displayed on the device screen. 


If  eyeglasses have been changed, authentication may fail. If the face without glasses has been 
registered, authenticate the face without glasses. If only the face with glasses has been registered, 
authenticate the face with the previously worn glasses again. 


If a part of the face is covered with a hat, a mask, an eye patch, or sunglasses authentication may fail. 
Do not cover the face, allow the device to recognize both the eyebrows and the face. 


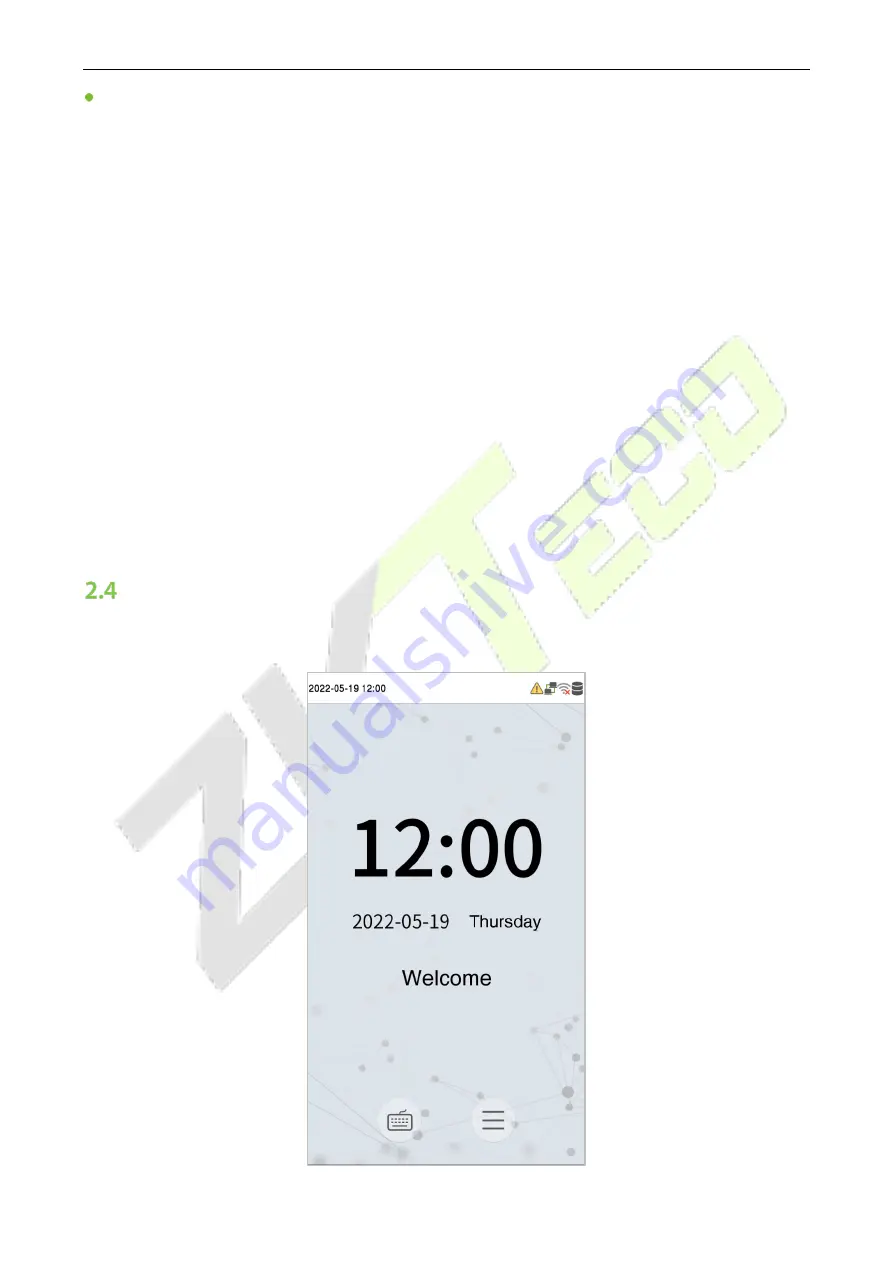
Standby Interface 

After connecting the power supply, the home screen appears as shown below: 


Summary of Contents for ProFace X Series

Page 1: ...read the instructions carefully before operation Follow these instructions to ensure that the product is functioning properly The images shown in this manual are for illustrative purposes only For fur...

Page 2: ...on of the machine unit equipment that personnel has read understood and followed the safety instructions contained in the manual In case of any conflict between terms and conditions of this manual and...

Page 3: ...e the machine unit equipment malfunctions due to any non compliance of the instructions contained in this manual ii in case of operation of the machine unit equipment beyond the rate limits iii in cas...

Page 4: ...ric verification procedures and the productization of biometric verification SDK which was initially widely applied in PC security and identity authentication fields With the continuous enhancement of...

Page 5: ...scription Button or key names for devices For example press OK Window names menu items data table and field names are inside square brackets For example pop up the New User window Multi level menus ar...

Page 6: ...FICATION 16 2 6 3 FACIAL VERIFICATION 18 2 6 4 COMBINED VERIFICATION 23 3 MAIN MENU 24 4 USER MANAGEMENT 26 ADDING USERS 26 SEARCH FOR USERS 30 EDIT USERS 31 DELETING USERS 31 5 USER ROLE 32 6 COMMUNI...

Page 7: ...TION ADDRESS 73 ADD DEVICE ON THE SOFTWARE 74 ADD PERSONNEL ON THE SOFTWARE 75 REAL TIME MONITORING ON THE SOFTWARE 75 15 LAN VIDEO INTERCOM FUNCTION SETTINGS 77 INSTALLING ZKBIO VMS PLUGIN IN THE ZKB...

Page 8: ...ven cause death 1 Read follow and retain instructions All safety and operational instructions must be properly read and followed before bringing the device into service 2 Do not ignore warnings Adhere...

Page 9: ...evice is a weak current switch signal otherwise components of the device will get damaged Ensure that the standard voltage applicable in your country or region is applied If you are not sure about the...

Page 10: ...ed or experienced technical personnel Note Make sure whether the positive polarity and negative polarity of the DC 12V power supply is connected correctly A reverse connection may damage the device It...

Page 11: ...into the premises without compromising any security aspect thus ensuring protection 2 Instructions to Use Standing Position Facial Expression and Standing Posture Recommended Distance Facial Expressi...

Page 12: ...ur palm in the palm collection area such that the palm is placed parallel to the device Make sure to keep space between your fingers Face Registration Try to keep your face in the center of the screen...

Page 13: ...reen Register one person at a time It is recommended for a user wearing glasses to register both the faces with and without glasses Instructions to authenticate a face Ensure that the face appears ins...

Page 14: ...efore entering the menu operation For ensured security of the device it is recommended to register a Super Administrator the first time you use the device Virtual Keyboard Note The device supports the...

Page 15: ...lected by the palm module with all the palm data template in the device The device will automatically distinguish between the palm and face verification mode Place the palm in the area that can be col...

Page 16: ...All rights reserved 1 Input the user ID and press OK 2 If the user has registered the face and password in addition to palm and the verification method is set to palm face password the following scre...

Page 17: ...l rights reserved 2 6 2 Password Verification The Password Verification mode compares the entered password with the registered User ID and Password Click the button on the main screen to open the 1 1...

Page 18: ...2022 ZKTECO CO LTD All rights reserved 2 If an employee registers palm and face in addition to password the following screen will appear Select the icon to enter the password verification mode 3 Input...

Page 19: ...iled Verification 2 6 3 Facial Verification 1 N One to Many Facial Verification Mode 1 Conventional verification The conventional method compares the acquired facial images with all the face data temp...

Page 20: ...the user enabled temperature screening with infrared function during user verification in addition to the conventional verification method the user s face must be aligned with the temperature detectio...

Page 21: ...ection function the device will identify whether the user is wearing a mask or not The following is the verification interface 4 Display Thermodynamics Figure When the user enabled the Display Thermod...

Page 22: ...hts reserved 1 1 One to One Facial Verification Mode This verification method compares the face captured by the camera with the facial template related to the entered user ID Press on the main interfa...

Page 23: ...an employee registered palm and password in addition to face the following screen will appear Select the icon to open the face verification mode After successful verification the prompt Successfully...

Page 24: ...thods A total of 7 different verification combinations can be used as shown below Note means or and means and You must register the required verification information before using the combination verif...

Page 25: ...ettings temperature management and detection management Personalize This includes user Interface voice bell punch state options and shortcut key mappings settings Data Mgt To delete all the relevant d...

Page 26: ...User Manual P a g e 25 Copyright 2022 ZKTECO CO LTD All rights reserved product does not have an administrator setting the system will show an administrator setting command prompt every time you enter...

Page 27: ...the main menu Click New User Register a User ID and Name Enter the User ID and Name Note A User Name may contain 17 characters The User ID may contain 1 to 9 digits by default During the initial regi...

Page 28: ...inistrator owns all the management privileges If a custom role is set you can also select user defined role permissions for the user Click User Role to select a Normal User or Super Admin Note If the...

Page 29: ...al P a g e 28 Copyright 2022 ZKTECO CO LTD All rights reserved Register Face Click Face to open the face registration page Please face the camera and stay still during face registration The registrati...

Page 30: ...ake a photo The system will return to the New User interface after taking a photo Note While registering a face the system will automatically capture a picture as the user photo If you do not want to...

Page 31: ...yright 2022 ZKTECO CO LTD All rights reserved Search for Users Click the search bar on the user list and enter the retrieval keyword The keyword may be an ID surname or full name The system will searc...

Page 32: ...n of editing a user is the same as that of adding a user except that the user ID cannot be modified when editing a user Operation method refers to 4 1 Adding Users Deleting Users Choose a user from th...

Page 33: ...edit the User Defined Role under the User Role menu You may set the permission scope of the custom role up to 3 roles and enroller that is the permission scope of the operation menu Click User Role o...

Page 34: ...During privilege assignment the main menu is on the left and its sub menus are on the right You only need to select the features in sub menus If the device has a role enabled you may assign the roles...

Page 35: ...he parameters of the Network PC connection Wireless network Cloud server and Wiegand TapCOMM on the main menu Network Settings When the device needs to communicate with a PC over the Ethernet you need...

Page 36: ...according to the actual network situation DHCP Dynamic Host Configuration Protocol which is to dynamically allocate IP addresses for clients via server Display in Status Bar To set whether to display...

Page 37: ...ion Click Wireless Network on the Comm Settings interface Wi Fi is enabled in the Device by default Toggle on button to enable or disable Wi Fi When Wi Fi is enabled tap on the required network from t...

Page 38: ...is interface is used to set the network parameters Menu Name Description DHCP Dynamic Host Configuration Protocol which involves allocating dynamic IP addresses to network clients IP Address IP addres...

Page 39: ...Server Address IP address of the ADMS server Server Port Port used by the ADMS server Enable Proxy Server When you choose to enable the proxy you need to set the IP address and port number of the prox...

Page 40: ...e of the pulse width sent by Wiegand is 100 microseconds by default which can be adjusted within the range of 20 to 100 microseconds Pulse Interval us The default value is 1000 microseconds which can...

Page 41: ...CCCCCCCCCCCCO Consists of 36 bits of binary code The 1st bit is the even parity bit of the 2nd to 18th bits while the 36th bit is the odd parity bit of the 19th to 35th bits The 2nd to 19th bits are t...

Page 42: ...esponding outputdigitsin the Wiegand format Failed ID If the verification is failed the system will send the failed ID to the device and replace the card number or Personnel IDwith the new ones Site C...

Page 43: ...em parameters to optimize the performance of the device Click System on the main menu interface Date and Time Click Date Time on the System interface 1 The product supports the NTP synchronization tim...

Page 44: ...or disable the 24 Hour time format and select the date format When restoring the factory settings the time 24 hour and date format YYYY MM DD can be restored but the device date and time cannot be res...

Page 45: ...will automatically display an alert Users may disable the function or set a valid value between 1 and 9999 Circulation Delete Access Records When the access records have reached full capacity the devi...

Page 46: ...erification mode the verification will only be successful when the similarity between the acquired facial image and the facial templates enrolled in the device is greater than the set value The valid...

Page 47: ...is parameter can adjust the furthest comparison distance of faces When the value is 0 the face comparison distance is not limited LED Light Triggered Threshold This value controls to turn on and off t...

Page 48: ...is a security prompt when switching When this function is disabled it will indicate that there is a risk reminder Face re registration is required after an algorithm upgrade Notes Improper adjustment...

Page 49: ...iption Calling Delay s Set the time of call valid value 30 to 60 seconds Talking Delay s Set the time of intercom valid value 60 to 120 seconds Calling Shortcut Settings You can set a shortcut key to...

Page 50: ...urity This function can be enabled or disabled via the menu interface When switching on and off there are security prompts All data will be deleted and the device will be restarted after confirmation...

Page 51: ...ly the User ID with more than 2 digits supports the masking display and it is enabled by default Display Verification Name After enabled the user s name will be displayed in the personnel verification...

Page 52: ...he System interface Menu Name Description Current Device Temperature This column shows the real time temperature of the device Low Temp to Heat Once the device temperature is lower than the set value...

Page 53: ...dy temperature Temperature Deviation Correction As the temperature measurement module allows a small range of errors disturbance of an observed value under different environments humidity room tempera...

Page 54: ...to access function When enabled as long as the person who passes the detection the device allows the personnel to enter without registration Enable Capture of Unregistered Person To enable or disable...

Page 55: ...ll rights reserved 8 Personalize Settings You may customize the interface settings audio and bell Click Personalize on the main menu interface Interface Settings You can customize the display style of...

Page 56: ...be disabled or you may set the value between 3 and 999 seconds Slide Show Interval s This refers to the time interval switching different slide show pictures The function can be disabled or you may se...

Page 57: ...ingsthe bell Repeat Set the repetition cycle of the bell Ring Tone Select a ring tone Internal Bell Delay s Set the duration of the internal bell Valid values range from 1 to 999 seconds 2 Back to the...

Page 58: ...Auto Mode After this mode is chosen set the switching time of punch state key in Shortcut Key Mappings when the switching time is reached the set punch state key will be switched automatically Manual...

Page 59: ...ed Shortcut Keys Mappings Users may define shortcuts as attendance status or functional keys On the main interface when the shortcut keys are pressed the corresponding attendance status or function in...

Page 60: ...pyright 2022 ZKTECO CO LTD All rights reserved 9 Data Management The Data Management interface is used to delete the relevant data in the device Click Data Mgt on the main menu interface Delete Data C...

Page 61: ...eges Delete Access Control To delete all the access data Delete User Photo Templates When deleting template photos there is a risk reminder Face re registration is required after an algorithm upgrade...

Page 62: ...access the registered user must meet the following conditions 1 The current door unlock time should be within any valid time zone of the user time period 2 The user s group must be in the door unlock...

Page 63: ...e controls the electric lock to be unlocked The valid range is 1 to 10 seconds 0 second represents disabling the function Door Sensor Delay s If the door is not closed and locked after opening for a c...

Page 64: ...alarm or disable the alarm from the local When the door is closed or the verification is successful the system will cancel the alarm from the local Reset Access Setting The restored access control pa...

Page 65: ...2022 ZKTECO CO LTD All rights reserved 1 Click the grey box to input a time zone to search Enter the number of time zone maximum 50 zones 2 Click the date on which time zone settings is required Ente...

Page 66: ...ay Settings Whenever there is a holiday you may need a special access time but changing everyone s access time one by one is extremely cumbersome so you can set a holiday access time which applies to...

Page 67: ...on 1 is set as 01 03 05 06 08 indicating that the unlocking combination 1 consists of 5 people and the 5 individuals are from 5 groups namely access control group 1 AC group 1 AC group 3 AC group 5 AC...

Page 68: ...problem So to avoid this situation Anti Passback option is developed Once it is enabled the check in record must match with check out record so as to open the door This function requires two devices t...

Page 69: ...in out only if the last record is a check out record the user can check in again or a check in record the user can check out again otherwise the alarm will be triggered Duress Options Settings If a us...

Page 70: ...Search on the main menu interface The process of searching for attendance and blocklist photos is similar to that of searching for access records The following is an example of searching for access r...

Page 71: ...ries User Manual P a g e 70 Copyright 2022 ZKTECO CO LTD All rights reserved 3 The record search succeeds Click the record in green to view its details 4 The below figure shows the details of the sele...

Page 72: ...est LCD To automatically test the display effect of LCD screen by displaying full color pure white and pure black to check whether the screen displays the colors normally Test Voice To automatically t...

Page 73: ...evice s name Serial number MAC address Face algorithm version information Platform information and Manufacturer details Firmware Info Displays the firmware version and other version information of the...

Page 74: ...mmunicate with the ZKBioSecurity MTD server preferably in the same network segment with the server address 2 In the main menu click COMM Cloud Server Setting to set the server address and server port...

Page 75: ...are You can add a device by searching The process is as follows 1 Click Access Control Device Search Device to open the Search interface 2 Click Search and it will prompt Searching 3 After searching t...

Page 76: ...ts reserved Add Personnel on the Software 1 Click Personnel Person New 2 After setting all the parameters click OK Real time monitoring on the Software 1 Click Prevention Epidemic Real time monitoring...

Page 77: ...Alarm temperature setting has set the abnormal body temperature will be marked red automatically 2 Click Epidemic Statistics panel to view the analysis of statistical data and view the personnels with...

Page 78: ...ng select the VMS module of the ZKBioSecurity software to install as shown in the following installation interface Note The Video module and the VMS module cannot be selected at the same time Installi...

Page 79: ...Site management Add on the login interface Then enter the Name IP address and Port to add a site as shown in the following figure IP address Enter the local IP address Port The default port is 5252 b...

Page 80: ...set during installation e g http 192 168 163 61 8098 not the ADMS port 3 Configure the parameters on the device a Click on COMM Cloud Server Setting on device to set the server address and server por...

Page 81: ...Series User Manual P a g e 80 Copyright 2022 ZKTECO CO LTD All rights reserved 4 Adding device on the ZKBioSecurity software a Click Access Device Device Search to add the device on the ZKBioSecurity...

Page 82: ...module it automatically adds to the video module User can click Video Video Device Search to view Note If the device is not added to the Video module please check whether the parameter settings are c...

Page 83: ...2022 ZKTECO CO LTD All rights reserved Make a Call on the Device 1 Click on icon on the welcome screen of the device to make a call 2 The server page pops up the call window by default as shown in the...

Page 84: ...lose the call window and the icon in the upper right corner will display the number of pending calls like this The user can click the icon in the drop down menu to open the call window of the current...

Page 85: ...y software 1 Firstly change the parameter on the device Tap on System Video intercom parameters Intercom Server Setting on the device to change the server address and server port as shown in the follo...

Page 86: ...r can click on to preview the video on the right On clicking or icon a user can close the preview screen No action is taken when is clicked 4 When a user clicks icon on the main interface of the devic...

Page 87: ...e call the IP address is displayed in green while on the call The call duration is also displayed just above the icon Function Description This is the Snapshot key used to take a snapshot This is the...

Page 88: ...rt APP on your phone create a User account initially with your Email ID After creating the User account log in to the App and click or icon on the top right corner of the screen to add a device The pr...

Page 89: ...ProFace X Series User Manual P a g e 88 Copyright 2022 ZKTECO CO LTD All rights reserved...

Page 90: ...he video door phone interface Enter the password to unlock the door Parameter Description Screenshot Click to take a screenshot Speak The icon becomes blue when click it and you can talk to the device...

Page 91: ...CO LTD All rights reserved 18 Connecting to SIP Local Area Network Use Set the IP address on the indoor station Tap Menu Advanced Network 1 Network 1 IPv4 Note In LAN the IP addresses of the indoor s...

Page 92: ...is configured with the network the video intercom function can be realized by tap the icon on the ProFace X screen and entering the IP address of the indoor station in the jumping interface Custom th...

Page 93: ...ProFace X Series User Manual P a g e 92 Copyright 2022 ZKTECO CO LTD All rights reserved 2 Enter the WebSever account and password the initial account is admin password admin 123...

Page 94: ...ddress and device number in the downloadable form IP Address Subnet Mask Gateway Must be the same as the indoor station to be connected Dialing Number Customize the number of the indoor station you ca...

Page 95: ...Function Name Description Name You can customize any character support Chinese English numbers symbols etc that will be displayed on the call page Device Number It is the dialing number in the config...

Page 96: ...r Manual P a g e 95 Copyright 2022 ZKTECO CO LTD All rights reserved Name You can then tap 199 on the punch status options to directly implement the video intercom Device Number Enter the device numbe...

Page 97: ...e X tap SIP Server after the device is rebooted enter the server related parameters as shown below Once the SIP is set up correctly a green dot will appear in the upper right corner of the call page t...

Page 98: ...ProFace X Series User Manual P a g e 97 Copyright 2022 ZKTECO CO LTD All rights reserved For details on the operation and use of the indoor station please refer to the indoor station user manual...

Page 99: ...ose your face and forehead properly and do not cover your face and eyebrows with your hair 5 It is recommended to show a normal facial expression A smile is acceptable but do not close your eyes or in...

Page 100: ...ect light For persons with thick eyeglasses frames it is recommended to capture two images one with eyeglasses and the other one without eyeglasses Face The image must have clear contour real scale ev...

Page 101: ...be saved on the device according to the device type you have selected to verify the unique similarity between you and the User ID you have registered You can optionally enter your Name and Code The ab...

Page 102: ...shall know that some data cannot be downloaded for sake of data security 6 All the personal information in our products can be queried modified or deleted If you no longer use our products please clea...

Page 103: ...nt Name Hazardous Toxic Substance Element Lead Pb Mercury Hg Cadmium Cd Hexavalent Chromium Cr6 Polybrominated Biphenyls PBB Polybrominated Diphenyl Ethers PBDE Chip Resistor Chip Capacitor Chip Induc...

Page 104: ...ZKTeco Industrial Park No 32 Industrial Road Tangxia Town Dongguan China Phone 86 769 82109991 Fax 86 755 89602394 www zkteco com Copyright 2022 ZKTECO CO LTD All Rights Reserved...

Reviews: