background image

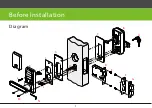
Before Installation

Diagram

B

A

C

C

D

E

F

I

H

G

K

J

L

M

N

1

Summary of Contents for PL10D

Page 1: ...Installation Instruction Version 1 0 Date Nov 2014 PL10D ML10D...

Page 2: ...Before Installation Diagram B A C C D E F I H G K J L M N 1...

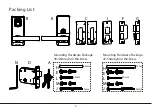
Page 3: ...64mm 72mm 35mm 40mm 30mm 35mm Mounting Hardware Package Mounting Hardware Package 39 46mm door thickness 47 54mm door thickness A H E L M J H E L M J G F K Packing List B D C I N 2...

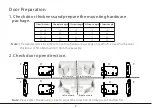
Page 4: ...ture to adjust the direction of strike plate F and latch D 1 Check door thickness and prepare the mounting hardware package 2 Check door open direction F F F F D D D D 30 38 56 20 10 25 39 46 64 30 10...

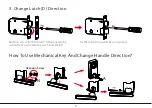
Page 5: ...im panel by using screw Remove screw from the latch trim panel with a screwdriver and rotate the latch bolt at 180 Hexagon Screw N A How To Use Mechanical Key And Change Handle Direction How To Use Me...

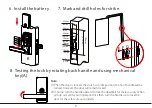
Page 6: ...ower on the lock four alkaline AA batteries not included are required Non alkaline and rechargeable batteries ARE NOT RECOMMENDED 4 Please avoid strong light direct to the fingerprint holder otherwise...

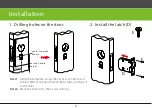
Page 7: ...er line of the latch D at the desired handle height and tape it to the door Note2 Mark the holes first then start drilling 1 Drilling holes on the door 2 Install the latch D E E D center line of the h...

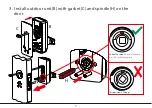
Page 8: ...Correct Position The small triangle must be vertically upward This position is Wrong 3 Install outdoor unit B with gasket C and spindle H on the door B H C 7...

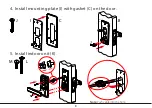
Page 9: ...4 Install mounting plate I with gasket C on the door J 5 Install indoor unit K M Note Push cable into the hole L B C I I C J 8...

Page 10: ...is in idle position the front handle will be turned However the door will remain locked 2 At home turn the handle upward to lock the deadbolt for more security When you go out verify your fingerprint...

Reviews: