background image

2 Device Access 


5

.    The 

Unpartitioned cameras

 area displays the device selected in

 Step


3

.   

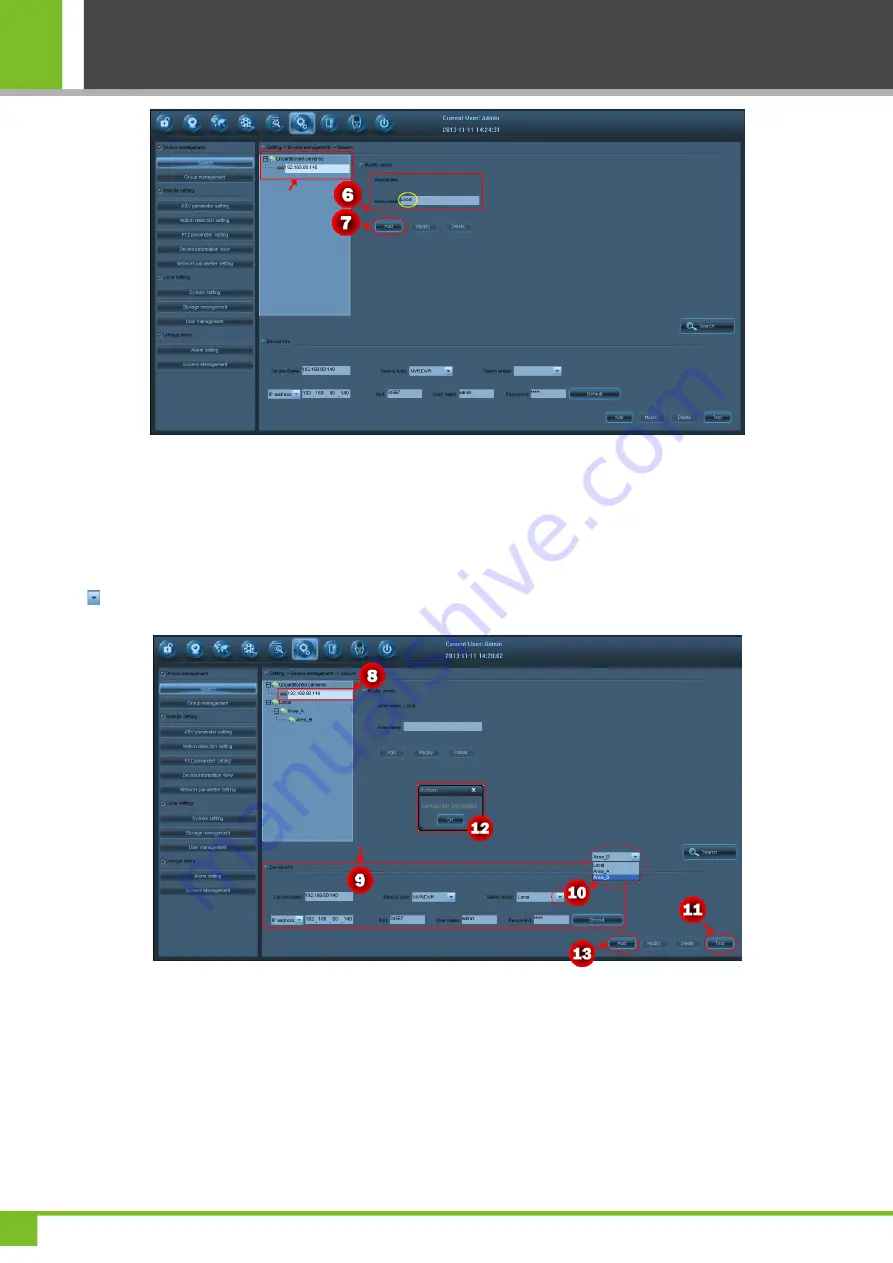
6

.    No area is added to the software if the software is used for the first time. You can enter an area name besides 

Area 

name

 and click 

Add

 to add an area for the software. (For example, enter 

Local

 besides 

Area name

 and click 

Add

 to 

add an area, as shown in the preceding figure.) 

7

.    Click to select the device in the 

Unpartitioned cameras

 area, and modify device information as required. Click the 

  button besides

 Select areas

, and select an area in the drop-down list. After that, click the 

Test

 button. If the device 

connection is successful, the 

Connection succeeded

 prompt will display, as shown in the following figure. 


Note: Password

 in the 

Device Info.

 area indicates the device connection password. If this password is incorrect, the 

device cannot be successfully connected.   

8

.    Click 

OK

 to close the prompt. Click 

Add

 to add the NVR device. After the NVR device is successfully added, it wills 

display in the 

Video Device List

, as shown in the following figure.   

Summary of Contents for MD532

Page 1: ...actual product Since the product is subject to updating our company is not responsible for any difference from this guide and not liable for any dispute over different technical parameters from this...

Page 2: ...ch copyrights are shared by the licensors including our company Except for the permission of the relevant holder any person can t copy distribute revise modify extract decompile disassemble decrypt re...

Page 3: ...net Access 1 1 3 1 Connecting the MD532 to the Internet 2 1 3 2 Connecting the Access Device to the Internet 2 1 3 3 Connecting the NVR to the Internet 3 2 Device Access 4 2 1 Using the Software of th...

Page 4: ...Camera User Manual 2 For the installation method of F7 see the F7 Installation Guide and User Manual 3 For the installation method of NVR see the NVR User Manual 1 3 Cable Connection for Internet Acc...

Page 5: ...532 Connect the MD532 to the switch by using network cables for Internet access Install the access control device F7 and power on it Connect the F7 to the switch by using network cables for Internet a...

Page 6: ...ace 2 Alarm Interface 5 USB Interface 7 Audio Output 10 Power Interface 3 CBVS Video Output Interface 8 Audio Input Use the CBVS or VGA video output mode and connect the display device by using corres...

Page 7: ...ick the default configuration in Config List to access the Remote Channel Config window 3 Click Device search The system automatically searches the devices in the same network segment as the NVR had a...

Page 8: ...ess control function users can use the Surveillance Client Software to implement linkage between video and access control 2 2 1 1 Adding NVR and MD532 This document takes the method of adding the NVR...

Page 9: ...CH NVR Kit 6 3 In the Device List area select the device to be added to this software The following figure provides an example of adding the NVR device to the software 4 Click OK to access the Device...

Page 10: ...meras area and modify device information as required Click the button besides Select areas and select an area in the drop down list After that click the Test button If the device connection is success...

Page 11: ...on the left of the window and the real time monitoring pictures of the IP cameras MD532 already added to the software are displayed in the preview window as shown in the following figure 2 2 1 2 Addi...

Page 12: ...is successful the Connection succeeded prompt will display as shown in the following figure 3 Click OK to close the prompt and then click Add A prompt as shown in the following figure will display 4...

Page 13: ...the video device and access device to implement linkage between access control and video The detailed operation procedure is as follows 2 2 2 1 Alarm Linkage Setting 1 In the Access Management window...

Page 14: ...se the prompt 5 Click to access the Alarm Setting window 6 Double click the camera in the Video Device List click to select an alarm input signal in the Input Signal List area take Open door normally...

Page 15: ...2 Camera Arming Setting 1 Click the Preview icon to access the Preview window 2 Right click the camera and choose All arming in the shortcut menu as shown in the following figure 2 2 2 3 Viewing the E...

Page 16: ...evice Access 13 Note Users can click the Events Search icon and then the button to view the video recording For detailed operations refer to the bundled optical disk ZKiVision Client Software User Man...

Page 17: ......

Reviews: