background image

Get two holes on the wall 2 m above the floor and near the corner more 25 mm, be sure to make the 
diameter just as same as the expanding pipe. Fix two screws on the expanding pipe, keep the tips of 
the screws out for 10mm, and hang up the machine after the screws are fixed enough. 


OPERATION INSTRUCTION 

1.  Before inserting the plug into an electrical outlet, make sure that the electrical supply in your area 

matches that on the rating label on the unit. 

2.  Carefully remove the heater from the plastic bag and the carton. 
3.  Place the heater on a firm level surface ,setting the master button to “-”position.plug the cord set into 

a AC220-240V electrical outlet,with “BEE” sounds the “Power”light is on and the heater will shows 
the room temperature. 

1.Set time


WEEK

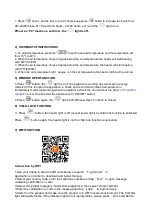
 Press “Set” button again,

“Mo”light twinkle 

,press “


two buttons set the week from Mo--

Su (Mo=Monday...Su=Sunday ect.) 
 

HOUR 

 Press “Set” button one time,LED display front “00” twinkle, press


two buttons set 

the Hours from 01--00(01=1 o’clock,02=2 o’clock...00=24 o’clock ect.) 

MINUTE 

Press “Set” button again,LED display behind “00” twinkle, press 


two buttons set 

the minutes from 00--59(01=1 Minute,02=2 Minute ect.) 


2)General Using OPERATION 

4. 

Turn the heater ON by pressing remote control the ON/OFF button ,the unit will blow the cold air . 

5. 

Pressing the “MODE” button on remote control ,the unit will blow the warm air and 

 will light 

on. 
6.  Pressing the “MODE” button second times on remote control,the unit will blow the hot air and the 

 will light on 

4.Pressing the “MODE” button Three times on remote control,the unit will blow the cold air  
5. Pressing the “Swing” button,the heater will be s

wing the blade up and down


PS:For smart operate,customer only press the one start button near about master 
button,the heater will working with hot air and Swing function.


3)  24H Timer FUNCTION  
 

330 


Summary of Contents for ZMW4000V

Page 1: ...TERMOVENTILATORE A PARETE MODELLO ZMW4000V SMART...

Page 2: ...sia necessario rivolgersi al Servizio d Assistenza Tecnica ZEPHIR indicate sempre il modello riportato sulla targhetta posta sul retro dell apparecchio stesso e il motivo della richiesta di assistenza...

Page 3: ...esposto agli agenti atmosferici 4 Attenzione per evitare il surriscaldamento non coprire l apparecchio 5 L apparecchio non deve essere posizionato appena al di sotto di una presa di corrente 6 L uso...

Page 4: ...ore ai 3 anni dovranno essere tenuti lontano dall apparecchio se non continuamente controllati 27 I bambini con et compresa tra i 3 e gli 8 anni potranno unicamente spegnere accendere l apparecchio po...

Page 5: ...l prodotto con acqua o altri liquidi 38 E necessaria la supervisione di un adulto quando l apparecchio e usato alla presenza di un bambino 39 Scollegare il cavo di alimentazione quando l apparecchio n...

Page 6: ...o altre installazioni esempio tubi vicino ai fori Assicurati che il dispositivo sia fissato saldamente e verticalmente alla parete Praticare due fori nel muro a 2 m dal pavimento e ad almeno 25cm dall...

Page 7: ...per attivare l oscillazione automatica dell aletta PS Per un accensione rapida possibile premere solo il pulsante di avvio vicino a quello principale l apparecchio lavorer in modalit aria calda con la...

Page 8: ...il numero di cellulare e tocca Ottieni Get per ricevere un messaggio contenente la verifica sul codice 3 Seleziona la categoria Piccolo elettrodomestico Small Home Appliance quindi selezionare il simb...

Page 9: ...mostrato nella figura 3 C Se la spia sul dispositivo lampeggia rapidamente premere il pulsante con su scritto L indicatore di conferma lampeggia rapidamente come mostrato nella figura 4 D Inserire la...

Page 10: ...stare una schedulazione sui 7 giorni a Premere il pulsante Aggiungi pianificazione Add schedule come mostrato nella foto 8 b In questa fase possibile selezionare la configurazione desiderata quindi pr...

Page 11: ...mpostazione appena salvata f Toccando a lungo la label dell impostazione appena salvata per annullarla Segnale acustico L apparecchio emette un segnale acustico ogni qualvolta viene cambiata un impost...

Page 12: ...ntatto con la pelle o vestiti 7 Se il liquido dalla batteria viene a contatto con la pelle o indumenti lavare la pelle con acqua immediatamente Prima di inserire nuove batterie pulire accuratamente il...

Page 13: ...diventando eccessivamente calde Ad esempio a causa dell ostruzione totale o parziale delle bocchette d aria In questo caso scollegare l apparecchio attendere circa 30 secondi affinch si raffreddi e ri...

Page 14: ...stita da ventilatore no Alla potenza termica nominale elmax 0 000 KW Tipo di potenza termica controllo della temperatura ambiente indicare una sola opzione Alla potenza termica minima elmin 0 000 KW p...

Page 15: ...con controllo di avviamento adattabile no con limitazione del tempo di funzionamento no con termometro a globo nero no Contatti Westim S p A Via Roberto Bracco 42 00137 Roma Italia...

Page 16: ...the following instructions KEEP THIS BOOKLET IN A SAFE PLACE SO THAT YOU MAY CONSULT IT LATER After removing the packaging make sure that the appliance is in good condition The packaging materials may...

Page 17: ...stalled at least 2 m above the floor 13 If the heater needs repair please ask for special person or our company authorized maintenance department 14 This appliance can be used by children aged from 8...

Page 18: ...buttons set the week from Mo Su Mo Monday Su Sunday ect HOUR Press Set button one time LED display front 00 twinkle press two buttons set the Hours from 01 00 01 1 o clock 02 2 o clock 00 24 o clock...

Page 19: ...in immediately It will stop working when the appliance check the environment are drop 3 within 1 minute The user should restart the appliance with ON OFF button 2 Press button again the light is off W...

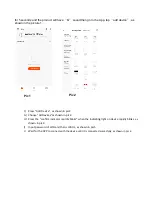
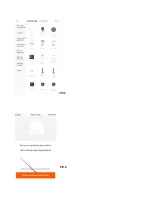
Page 20: ...wn in pic 2 G Choose All Devices as shown in pic 3 H Press the confirm indicator rapidly blinks when the indicating light on device rapidly blinks as shown in pic 4 I Input password of WIFI and then c...

Page 21: ...PIC 3 PIC 4...

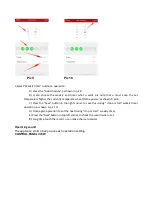
Page 22: ...PIC 5 PIC 6 Operation by WIFI 1 U can operate the device by mobile under WIFI or 4G LTE environment as shown in the picture 7 Pic 7 Pic 8...

Page 23: ...ower as shown in pic 9 C Press the Save button in top right corner to save this during stop or start weekly timer operation as shown in pic 10 D Once again operation to set the next during stop or sta...

Page 24: ...ntrol power button is labeled as such 10 Main power button 11 24H Setting timer from 1 24 hours 12 MODE COLD WARM HOT 3 setting for selection 13 Swing Louver swing up and down 14 LOCK Child Lock funct...

Page 25: ...soft moist rag and neutral detergent Do not use an abrasive cloth or devices which could affect the appearance of the appliance Check that the hot air outlet and the ventilation inlet are free of dust...

Page 26: ...un anno Diritti di garanzia Per GARANZIA s intende la riparazione o la sostituzione gratuita dei componenti o delle parti dell apparecchio riconosciuti da Westim difettosi nella fabbricazione o nel m...

Page 27: ...ato Zephir In caso di difficolt di accesso si deve preventivamente avvertire e si deve rendere l accessibilit priva di rischi all incolumit personale I costi derivanti dal rendere sicuro l accesso ai...

Page 28: ...ttagliate circa il riciclaggio di questo prodotto potete contattare l ufficio comunale il servizio locale di smaltimento rifiuti oppure il negozio dove l avete acquistato Chiunque abbandona o cestina...

Page 29: ...icos Asegur ndose de que este producto es desechado correctamente Ud Est ayudando a prevenir las consecuencias negativas para el medio ambiente y la salud humana que podr an derivarse de la incorrecta...

Reviews: