background image

28 


6.3  Calibrating Media Sensor by Diagnostic Tool 


6.3.1 Auto Calibration 


1. Make sure the media is already installed and media cover is closed. (Please refer to 

section 3.4

) 

2. Turn on the printer power switch. 
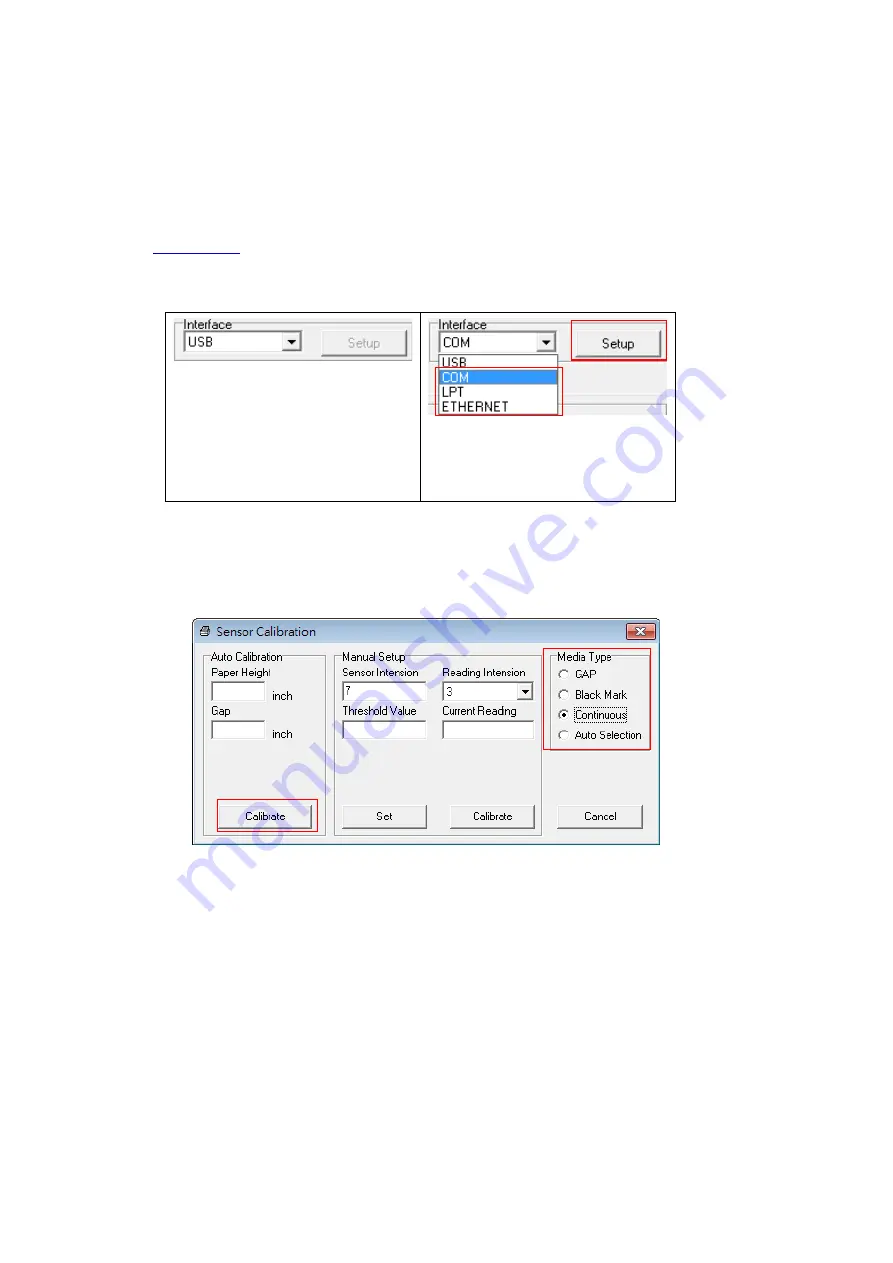
3. Open Diagnostic tool and set interface (The default setting is USB).   


The default interface setting is 
USB interface. If USB interface 
is connected with printer, no 
other settings need to be 
changed in the interface field. 


4. Click the “Calibrate Sensor” button. 
5. Select the media type and click the “Calibrate” button. 


Note: The 3R20 series can only support continuous, die-cut, receipt, and black mark media 

type. 


1


2


1


2


Summary of Contents for 3R20

Page 1: ...i USER S MANUAL 3R20 Direct Thermal Portable Printer...

Page 2: ...cense from the Monotype Corporation Windows is a registered trademark of Microsoft Corporation All other trademarks are the property of their respective owners Information in this document is subject...

Page 3: ...he device Tipping or dropping could cause damage 7 Make sure to follow the correct power rating and power type indicated on marking label provided by manufacture 8 Please refer to user manual for maxi...

Page 4: ...iv CAUTION Any changes or modifications not expressly approved by the grantee of this device could void the user s authority to operate the equipment NBTC SDoC...

Page 5: ...ions Overview 6 2 1 Unpacking and Inspection 6 2 2 Printer Overview 7 2 2 1 Front View 7 2 2 2 Interior View 8 2 2 3 Rear View 9 2 3 Operator control 10 2 3 1 LCD Indication and Keys 10 2 3 2 Battery...

Page 6: ...5 2 Self test and Dump Mode 22 5 3 Printer Initialization 25 6 Diagnostic Tool 26 6 1 Start the Diagnostic Tool 26 6 2 Printer Function 27 6 3 Calibrating Media Sensor by Diagnostic Tool 28 6 3 1 Aut...

Page 7: ...s Use Micro USB 2 0 interface to connect to a mobile computer or even a smartphone and produce clear easy to read receipts hour after hour This document provides an easy reference for operating the 3R...

Page 8: ...MAC address error messages Audible alert Programmable buzzer Rechargeable Li ion battery 32 bit RISC high performance processor Micro USB 2 0 interface 64 MB DRAM 16 MB Flash memory Bluetooth V4 2 mo...

Page 9: ...PLANET Code 49 Deutsche Post Identcode Deutsche Post Leitcode LOGMARS CODABLOCK F mode DataMatrix Maxicode PDF 417 Aztec MicroPDF417 QR code RSS Barcode GS1 Databar 1 2 2 Printer Optional Features Th...

Page 10: ...ing Storage 5 to 90 non condensing Drop 1 5 m 4 9 ft w o environmental case Environmental concern Comply with RoHS WEEE and REACH 1 4 Print Specifications Print Specifications 3R20 Print head resoluti...

Page 11: ...ark Media wound type Outside wound Media length 15 mm 0 59 2 794 mm 110 Tear mode 25 4 mm 1 max print length Media width Without media fixing tabs max 80 mm With media fixing tabs 1 1 5 2 2 5 Media th...

Page 12: ...e bar code printer Please retain the packaging materials in case you need to reship the printer Unpacking the printer the following items are included in the carton One printer unit One Li ion battery...

Page 13: ...1 Front View 1 Power on off button 2 Media cover release button 3 Feed Pause button 4 LCD screen indicates battery status media type firmware version BT MAC address error messages 5 Media cover 6 Medi...

Page 14: ...8 2 2 2 Interior View 1 Tear edge 2 Print head 3 Gap sensor 4 Black mark sensor 5 Platen roller 1 3 5 4 2...

Page 15: ...9 2 2 3 Rear View 1 Li ion Battery 2 Battery open clasp 3 USB interface 4 Interface cover 2 1 4 3...

Page 16: ...Pause button 4 LCD screen indicates battery status media type firmware version BT MAC address error messages Keys Function 1 Press and hold for 2 3 seconds to turn on the printer 2 Press and hold for...

Page 17: ...11 LCD monitor Cont B1 00 D148 Battery level Media type Bluetooth BT MAC address F W version...

Page 18: ...After the battery was fully charged and stopped print job for a while the printer will automatically turn off 2 Charging the battery when the printer turns off Charging cycle LCD version Charging the...

Page 19: ...Setup 3 1 Install the Battery 1 Insert the battery to the left side of battery slot on the rear of the printer 2 Push the right side of the battery down 3 Pull the battery latch to lock the battery P...

Page 20: ...discharge cycles 3 2 1 Charge the Battery 1 Open the interface cover and plug the power cord to the power jack 2 Plug the power cord into a properly power outlet Note Please refer to Ch 2 3 2 for mor...

Page 21: ...2 Connecting with Bluetooth Default Name RF BHS PIN 0000 Turn on the printer and make sure the Bluetooth device opened Note Please refer to section 6 4 to change the name of default and PIN printers t...

Page 22: ...ia cover by pressing the media cover release button 2 Place the media roll at the correct side and pull out enough paper over the tear edge 3 Press the media cover on both sides to close it and make s...

Page 23: ...Accessories 4 1 Install the Media Spacers 1 Open the printer media cover by pressing the media cover release button 2 Fix the media spacer in the slots on printer inner mechanism as indicated Slots P...

Page 24: ...tall the media spacers on the different slots as picture shown to fit the label width 3 Complete the installation of media spacers 4 Place the paper roll between the media spacers 2 5 width 2 width wi...

Page 25: ...19 Note 1 The media spacers could support 1 1 5 2 2 5 inches width of media roll 2 When removing the media spacers please follow the removal direction as pictured...

Page 26: ...20 4 2 Install the Shoulder Strap Option 1 Install the shoulder strap on the both sides of the pillars as indicated 2 The printer can be hung on the shoulder strap Pillars...

Page 27: ...ent positions for different functions Power on utilities The LCD monitor will be changed as following pattern LCD monitor Functions 5 blinks 5 blinks 5 blinks Ready 1 Media sensor calibration Release...

Page 28: ...and measures the media length and prints internal settings then enter the dump mode 6 Turn off on the power to resume printer for normal printing Self test Printer will print the printer configuration...

Page 29: ...black mark sensor intension Code page Country code Sleep time ZPL setting information Print darkness Print speed inch sec Label size Control prefix Format prefix Delimiter prefix Printer power up mot...

Page 30: ...printed in 2 columns as following The left side characters are received from your system and right side data are the corresponding hexadecimal value of the characters It allows users or engineers to v...

Page 31: ...then turn on the power switch 3 Release the FEED button when the indicator becomes and blinking Any blink will do during the 5 blinks Printer configuration will be restored to defaults as below after...

Page 32: ...erful tool you can review printer status and settings in an instant which makes it much easier to troubleshoot problems and other issues You can download Diagnostic Utility via the link on our website...

Page 33: ...Setup the IP address subnet mask gateway for the on board Ethernet RTC Setup Synchronize printer Real Time Clock with PC Factory Default Initialize the printer and restore the settings to factory defa...

Page 34: ...Open Diagnostic tool and set interface The default setting is USB The default interface setting is USB interface If USB interface is connected with printer no other settings need to be changed in the...

Page 35: ...erface If USB interface is connected with printer no other settings need to be changed in the interface field 4 Select Wireless tab and Built in wireless module item 5 Enter the new BT Local Name or B...

Page 36: ...brated Supply a new media roll Please refer to the steps on section 3 4 to reinstall the media roll Calibrate the black mark sensor The printer status from DiagTool shows Paper Jam Black mark sensor i...

Page 37: ...l size setup Set the correct label size Gray line on the blank label The print head is dirty The platen roller is dirty Clean the print head Clean the platen roller Irregular printing The printer is i...

Page 38: ...an the print head when changing a new label roll Platen Roller 1 Turn the power off 2 Rotate the platen roller and wipe it thoroughly with water Clean the platen roller when changing a new label roll...

Page 39: ...ent Editor 2019 12 31 Modify Ch 3 2 1 Charge the Battery Charging Warning Kate 2020 1 2 Modify Ch 2 3 1 LCD Indication and Keys Modify Ch 5 Power on Utilities Kate 2020 3 30 Add Agency Compliance and...

Page 40: ...d 2nd Floor Workshop Rongda Building No 51 the 9th Avenue Tianjin Economic and Technological Development Area Tianjin China 300457 TEL 86 22 5981 6661 FAX 86 22 5981 5312 E mail Sales_support zenpert...

Reviews: